PCPlanet – Tech Blogs | Information
  • Home
  • Tools
    • CHMOD Calculator
    • Subnet Calculator
  • Linux Guides & Tutorials
    • Beginner Guides
    • Linux Installation Tutorials
    • Command Line Tutorials
    • Server Administration Guides
    • Security Tutorials
    • Database Tutorials
    • Open-Source Software
      • Nextcloud Guides
      • Apache
    • Operating Systems
      • Ubuntu
      • RHEL/Rocky/Alma
  • Ransomware News
  • Cybersecurity Laws and Regulations
Top Posts
How to install Emby Server on Ubuntu
Best Linux distribution (distros) in 2022
15,000 WordPress Sites hacked with Malicious Redirects
How to Install Python 3.9 on Ubuntu 18.04
How to Install Python 3.9 on Ubuntu 16.04
How to Install MongoDB on Ubuntu 16.04 to...
How to enable HSTS on Apache
How to install Python on CentOS 8
How to install PHP 8.1 on RHEL based...
Comment activer HSTS pour Apache
Navigating CVE-2023-49103: Proactive Defense for ownCloud
Tuesday, May 13, 2025
PCPlanet – Tech Blogs | Information
  • Home
  • Tools
    • CHMOD Calculator
    • Subnet Calculator
  • Linux Guides & Tutorials
    • Beginner Guides
    • Linux Installation Tutorials
    • Command Line Tutorials
    • Server Administration Guides
    • Security Tutorials
    • Database Tutorials
    • Open-Source Software
      • Nextcloud Guides
      • Apache
    • Operating Systems
      • Ubuntu
      • RHEL/Rocky/Alma
  • Ransomware News
  • Cybersecurity Laws and Regulations
Copyright 2021 - All Right Reserved
ApacheLinux

Implementing SSL on Apache: Protecting Your Website with Secure Connections

by pcplanet March 16, 2024
written by pcplanet 6 minutes read

In today’s digital landscape, securing your website with an SSL certificate is crucial for protecting sensitive data and establishing trust with your users. Whether you’re running a web server on a cloud-based virtual private server (VPS) or a local machine behind a network address translation (NAT) gateway, properly configuring your setup to accept and verify SSL certificates is essential. In this comprehensive guide, we’ll walk you through the steps involved in setting up your machine to handle SSL certificates seamlessly.

Before going further, you should make sure the following is already one:

  1. Update DNS records:
    • Log in to your domain registrar’s control panel or the DNS management interface provided by your DNS hosting provider.
    • Create an A record for your domain (yourdomain.com) and point it to the public IP address of the server where your website is hosted.
    • Create another A record for the www subdomain (www.yourdomain.com) and point it to the same IP address.
    • If your server has a static IP address, you can directly enter the IP address in the A records.
    • If your server has a dynamic IP address, you may need to use a dynamic DNS service to automatically update the IP address whenever it changes.
  2. Wait for DNS propagation:
    • After updating the DNS records, it may take some time for the changes to propagate across the internet.
    • DNS propagation can take anywhere from a few minutes to a few hours, depending on various factors.
    • You can use online tools like “What’s My DNS” or “DNS Checker” to verify that your DNS records have propagated correctly.

Understanding the Difference: Cloud VPS vs. NAT Network

Before we dive into the setup process, it’s important to understand the distinction between a cloud-based VPS and a network that utilizes NAT.

Cloud VPS (e.g., Amazon EC2):

  • A cloud VPS, such as Amazon Elastic Compute Cloud (EC2), provides a virtualized server environment that is directly accessible from the internet.
  • With a cloud VPS, you typically have a public IP address assigned to your instance, eliminating the need for port forwarding.
  • The cloud provider manages the underlying network infrastructure, simplifying the setup process.

NAT Network:

  • In a NAT network, your web server is located behind a router or firewall that translates between private and public IP addresses.
  • To make your web server accessible from the internet, you need to configure port forwarding on your router to direct incoming traffic to the appropriate internal IP address and port.
  • NAT networks are commonly found in home or small office settings where a single public IP address is shared among multiple devices.

Step 1: Preparing Your Web Server

To provide a hands-on experience, let’s walk through the process of setting up a fictitious WordPress installation on an Apache web server and configuring SSL using Let’s Encrypt. We’ll focus on the Apache, Certbot, and SSL configuration steps.

Install Apache Web Server:

  • Open a terminal or SSH into your server.
  • Update the package manager:
    sudo apt update
  • Install Apache:
    sudo apt install apache2
  • Verify that Apache is running by accessing your server’s IP address or domain name in a web browser. You should see the default Apache page.

Install Certbot and Obtain an SSL Certificate:

  • Install Certbot, the Let’s Encrypt client, and the Apache plugin:
    sudo apt install certbot python3-certbot-apache
  • Obtain an SSL certificate using Certbot:
    sudo certbot --apache -d yourdomain.com -d www.yourdomain.com
    Replace yourdomain.com with your actual domain name.
  • Follow the prompts to provide an email address and agree to the Let’s Encrypt terms of service.
  • Choose whether to redirect HTTP traffic to HTTPS (recommended for better security).
  • Certbot will automatically configure Apache with the obtained SSL certificate.

Configure SSL in Apache:

  • Open the Apache SSL configuration file:
    sudo nano /etc/apache2/sites-available/default-ssl.conf
  • Verify that the following lines are present and uncommented:
    SSLCertificateFile /etc/letsencrypt/live/yourdomain.com/fullchain.pem
    SSLCertificateKeyFile /etc/letsencrypt/live/yourdomain.com/privkey.pem
    Replace yourdomain.com with your actual domain name.
  • Save the file and exit the text editor.

Enable SSL in Apache:

  • Enable the Apache SSL module:
    sudo a2enmod ssl
  • Enable the default SSL virtual host:
    sudo a2ensite default-ssl
  • Restart Apache to apply the changes:
    sudo systemctl restart apache2

Verify SSL Configuration:

  • Open a web browser and access your WordPress site using https:// (e.g., https://yourdomain.com).
  • Verify that the website loads securely with a valid SSL certificate. You should see a padlock icon in the browser’s address bar.
  • Click on the padlock icon to view the SSL certificate details and ensure that it is issued by Let’s Encrypt and valid for your domain.

Additional Configuration:

  • To ensure that your SSL certificate remains valid, set up automatic renewal using Certbot. You can create a cron job or systemd timer to run the renewal command regularly.
  • Consider implementing HTTP Strict Transport Security (HSTS) to enforce HTTPS connections and improve security.
  • Regularly monitor your SSL configuration and keep your web server software up to date to address any potential vulnerabilities.

Note: Remember to replace yourdomain.com with your actual domain name throughout the configuration process.

Step 2: Network Configuration

The network configuration steps vary depending on whether you’re using a cloud VPS or a NAT network.

Cloud VPS (e.g., Amazon EC2):

  • No additional network configuration is required since your VPS has a public IP address.
  • Ensure that the necessary ports (e.g., port 443 for HTTPS) are open in your VPS’s security group or firewall settings.

NAT Network:

  • Access your router’s administrative interface, typically through a web browser.
  • Locate the port forwarding or virtual server settings.
  • Create a new port forwarding rule specifying the following:
    • External port: 443,80 as the verification may be done via http, dns
    • Internal IP address: The private IP address of your web server
    • Internal port: The port on which your web server is listening (e.g., 443 or 80)
  • Save the port forwarding rule and restart your router if necessary.

Step 3: Testing and Verification

Once you have completed the web server and network configuration, it’s time to test and verify that your SSL certificate is properly set up.

Access Your Website via HTTPS:

  • Open a web browser and enter your website’s URL preceded by https:// (e.g., https://www.example.com).
  • Verify that the website loads securely without any SSL-related errors or warnings.

Check Certificate Details:

  • Click on the padlock icon in the browser’s address bar to view the SSL certificate details.
  • Ensure that the certificate is issued to your domain name and is valid and trusted.

Perform SSL Server Test:

  • Use online tools like SSL Labs (https://www.ssllabs.com/ssltest/) to perform a comprehensive SSL server test.
  • The test will evaluate your SSL configuration and provide a detailed report highlighting any potential issues or vulnerabilities.

Conclusion

Setting up a machine to accept and verify SSL certificates is a critical step in securing your website and protecting your users’ data. By following the steps outlined in this guide, you can configure your web server and network to handle SSL certificates effectively, regardless of whether you’re using a cloud VPS or a NAT network. Remember to regularly monitor and update your SSL configuration to ensure ongoing security and compliance with industry standards.

Additional Resources:

  • Let’s Encrypt: https://letsencrypt.org/
  • Apache SSL/TLS Encryption: https://httpd.apache.org/docs/current/ssl/
  • Nginx SSL Termination: https://docs.nginx.com/nginx/admin-guide/security-controls/terminating-ssl-http/
  • Amazon EC2: https://aws.amazon.com/ec2/
  • SSL Labs Server Test: https://www.ssllabs.com/ssltest/

By taking the time to properly set up your machine for SSL certificate verification, you can enhance the security and trustworthiness of your website, providing a safe and secure experience for your users.

March 16, 2024 0 comments
3 FacebookTwitterPinterestEmail
Windows

Troubleshooting PC Shutdowns During Gaming

by pcplanet March 14, 2024
written by pcplanet 4 minutes read

If your PC keeps shutting down during gaming, it can be a frustrating and alarming experience. However, this issue is often solvable with the right approach unless the hardware is really done for. This comprehensive troubleshooting guide provides specialized tools and methods to diagnose and resolve hardware-related shutdowns that occur during high-stress gaming sessions.

Troubleshooting steps for PC Shutdowns during Gaming

Step 1: In-Depth Hardware Monitoring

Tool: HWiNFO

launch HWiNFO before starting your gaming session. This powerful tool allows you to track various system stats in real-time. Keep a close eye on critical metrics such as temperatures, fan RPMs, voltages, and power consumption. If any readings approach or exceed safe thresholds, it could indicate a potential issue with that component.

Step 2: CPU and GPU Stress Testing

Tools: Prime95 , IntelBurnTest, FurMark

  • Prime95 or IntelBurnTest: Target the CPU to evaluate its stability under extreme conditions.
  • FurMark: Assess the GPU’s performance limits and heat tolerance.

Perform targeted stress tests on your CPU and GPU to evaluate their stability under extreme conditions. Use Prime95 or IntelBurnTest to push your CPU to its limits, while FurMark assesses your GPU’s performance and heat tolerance. Execute each stress test while continuously monitoring with HWiNFO. If your system shuts down during these tests, it could signify an issue with the tested component.

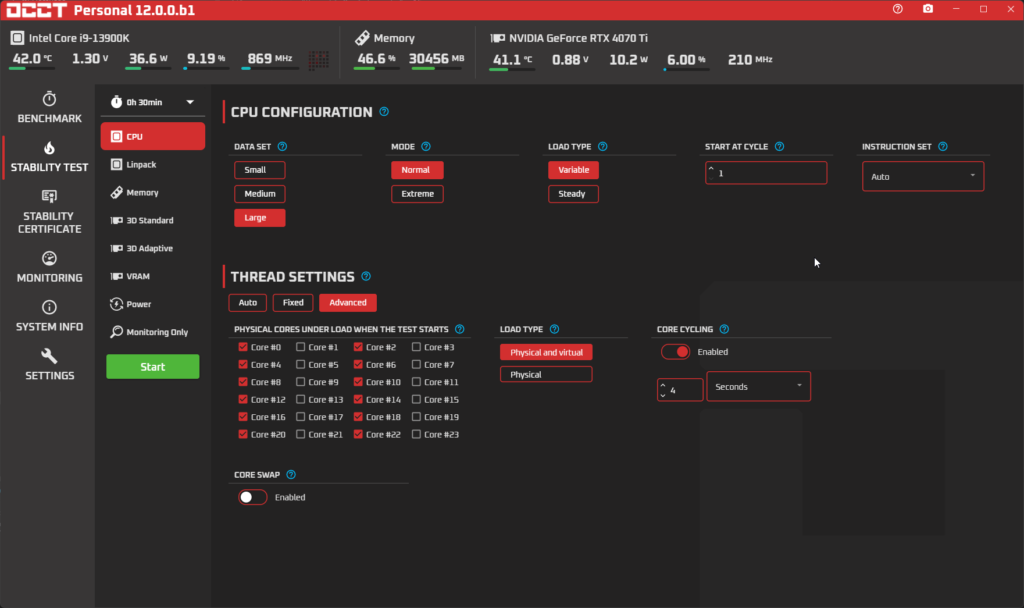
Step 3: System Stability Assessment – OCCT

Tool: OCCT

  • Utilize OCCT to assess the integrity of CPU, GPU, and PSU simultaneously.
  • Observe the power supply’s performance to ensure it can handle the demands of high-stress gaming.

To assess the overall stability of your system, including the power supply unit (PSU), use OCCT. This tool simultaneously stresses the CPU, GPU, and PSU, allowing you to observe how well your power supply handles the demands of high-stress gaming. If your PC shuts down during this test, it may indicate that your PSU is struggling to provide sufficient power.

Step 4: RAM Integrity Check

Random Access Memory (RAM) plays a crucial role in system stability, especially during memory-intensive tasks like gaming. Improperly installed or faulty RAM sticks can lead to sudden PC shutdowns. To ensure that your RAM is not the culprit, follow these steps:

  1. Correct RAM Seating: Consult your motherboard manual to identify the recommended slots for your RAM sticks (usually slots 1 and 3 or 2 and 4 for dual-channel configurations). Power down your system, unplug it, and open your case to reseat or install the RAM modules. Ensure each stick is fully inserted and the clips on the side of the slot click into place.
  2. Conduct a Memory Test: Create a bootable USB drive with MemTest86 and restart your PC to boot from it. Run a full memory test, which may take several hours to thoroughly check for errors across all sectors of your RAM. If errors are reported, it could indicate a defective or incompatible RAM module.

Interpreting Test Results

  • If MemTest86 finds no errors, your RAM is likely in good condition.
  • If errors are detected, try testing each stick individually to isolate the faulty module.
  • Replace any defective RAM modules or consider upgrading to a higher quality or larger capacity set if necessary.

Step 5: System Log Analysis

Tool: Windows Event Viewer

  • Review the Event Viewer logs post-shutdown to identify any critical system errors.
  • Scrutinize the “System” logs for discrepancies that could reveal underlying hardware issues.

After a PC shutdown occurs, review the Event Viewer logs to identify any critical system errors. Pay special attention to the “System” logs, as they may reveal underlying hardware issues that contribute to the shutdowns.

Step 6: Power Supply Unit (PSU) Evaluation

  • If PSU concerns arise and you lack testing equipment, a power supply tester or an alternate PSU can be instrumental in isolating the issue.

Additional Tips:

  • Check BIOS Configuration and Firmware Updates: Reboot into your BIOS/UEFI settings and disable any overclocks, including XMP profiles, to ensure your hardware runs at default settings. Visit your motherboard manufacturer’s website to download and install the latest BIOS updates, which can improve system stability.
  • Ensure Proper Cooling: Verify that your PC case has adequate airflow and that all fans are functioning correctly. Dust buildup can hinder cooling performance, so regularly clean your components and case interior.

Conclusion and Next Steps

PC shutdowns during demanding gaming sessions are often caused by power supply issues or thermal anomalies. By systematically following this troubleshooting guide, you can identify and address the problematic component or setting. If the issue persists after trying these steps, it may be wise to seek professional technical assistance. As a precautionary measure, always back up your critical data before making significant changes to your system.

March 14, 2024 0 comments
3 FacebookTwitterPinterestEmail
Linux

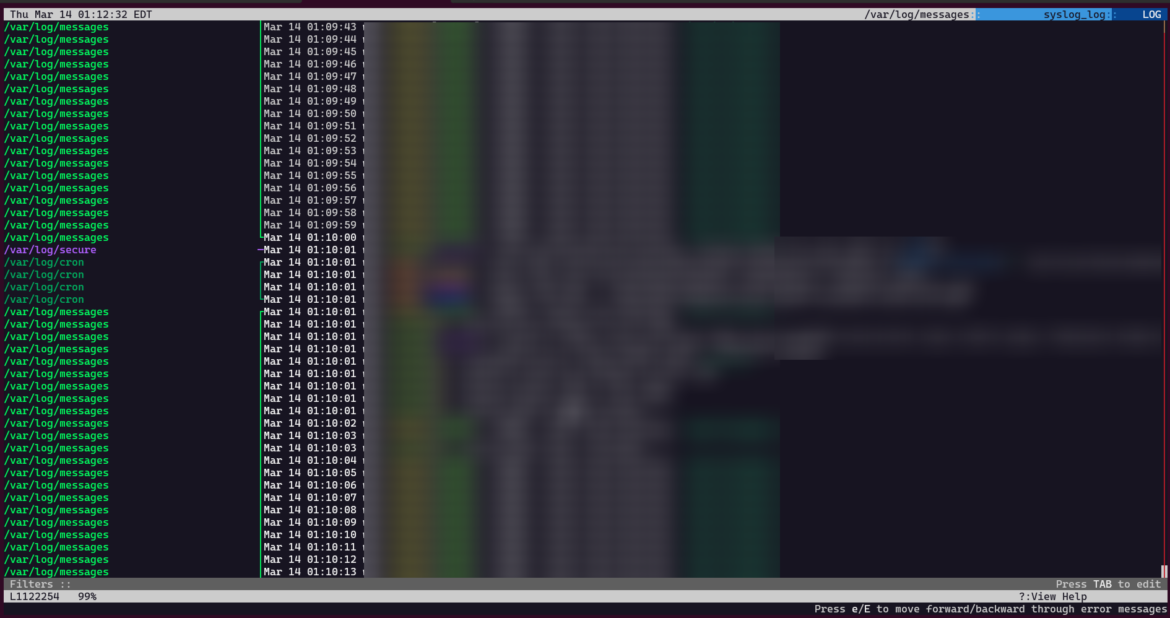
Log Management in Linux with Lnav

by pcplanet March 14, 2024
written by pcplanet 3 minutes read

Managing log files on a Linux system can be a daunting task due to the sheer volume and complexity of the data generated. Logs are crucial for system monitoring, troubleshooting, and security auditing. Lnav, the Log Navigator, is an advanced command-line utility that simplifies the process of managing logs. This post will focus on how to effectively manage your log files with Lnav, providing you with a comprehensive understanding of log management on Linux.

Introduction to Log Management

Before diving into Lnav, let’s understand why managing log files is essential. Logs provide a historical record of events and changes that occur within a system. By effectively managing logs, system administrators can:

  • Detect and troubleshoot issues
  • Monitor system performance
  • Ensure security and compliance
  • Analyze trends over time

What is Lnav?

Lnav is a powerful and open-source tool designed for managing logs. It offers a user-friendly interface for navigating through log files, real-time monitoring, and a wealth of features such as automatic log format detection, filtering, and search capabilities.

Key Features of Lnav:

  • Automatic log file discovery: Lnav can detect and open log files in a specified directory.
  • Real-time log monitoring: View live updates of log files as new entries are written.
  • Filtering and searching: Easily search for specific entries and filter out noise.
  • Log format support: Lnav can parse and format standard log file formats automatically.
  • SQL queries: Run SQL-like queries on log data for advanced analysis.

Installing Lnav

To get started with Lnav, you’ll need to install it on your Linux system. Most distributions provide Lnav in their default repositories. For example, on Ubuntu or Debian-based systems, you can install Lnav using the following command:

sudo apt-get install lnav

For RHEL or CentOS, you may use:

sudo yum install lnav

Basic Usage of Lnav

Once installed, Lnav is straightforward to use. To open Lnav with all log files in a specific directory, you can use the following command:

lnav /var/log

This command will load all recognizable log files from the /var/log directory, allowing you to navigate through them seamlessly.

Advanced Log Management with Lnav

Combining Multiple Log Files

If you’re managing logs across multiple directories or services, Lnav allows you to combine them into a single view. For example:

lnav /path/to/service1/logs /path/to/service2/logs

Searching Logs

Lnav excels at searching through logs. Simply type / followed by your search query, and Lnav will highlight the matching entries:

/search_term

Filtering Logs

To focus on specific events, you can filter logs. For instance, to show only ERROR messages, type:

:filter-in ERROR

Running SQL Queries

Lnav supports SQL-like queries for sophisticated log analysis. Here’s an example of counting ERROR messages:

;SELECT count(*) FROM logs WHERE log_level = 'error'

Best Practices for Managing Logs with Lnav

To make the most of Lnav, consider these best practices:

  • Regularly monitor logs: Set aside time for routine log reviews to catch issues early.
  • Use filtering: Filter logs to avoid information overload and focus on what matters.
  • Leverage SQL queries: Use Lnav’s querying capability for in-depth analysis.
  • Maintain log hygiene: Archive old logs and ensure log directories are not bloated.

Conclusion

Lnav is an indispensable tool for managing log files on Linux. With its robust feature set, you can transform log management from a chore into a streamlined part of your workflow. Embrace Lnav, and you’ll unlock the full potential of your system’s logs, turning them into a resource for insight and efficiency.

Remember, effective log management is not just about troubleshooting; it’s about proactively leveraging your logs to improve your systems. With Lnav, you’re well-equipped to tackle the challenges of managing logs.

Further Reading

To learn more about Lnav and its capabilities, visit the official Lnav documentation. For more advanced use cases and troubleshooting tips, the community forums and GitHub repository are excellent resources.

By mastering Lnav, you’re taking a significant step towards efficient log management, ensuring your Linux systems are monitored, secure, and running smoothly.

March 14, 2024 0 comments
3 FacebookTwitterPinterestEmail
CommandsLinuxWindows

How to Extract Gzip Files on Windows, Mac, and Linux

by pcplanet March 14, 2024
written by pcplanet 2 minutes read

Knowing how to extract gzip files is an essential skill for anyone working with compressed data archives. This guide will walk you through the process of unzipping .gz files on the three major operating systems: Windows, macOS, and Linux.

What is Gzip?

Before we dive into the extraction methods, let’s quickly go over what gzip is. Gzip is a popular file compression utility that helps reduce the size of files or archives, making them easier to transfer over the internet or store on your computer. It uses the Deflate compression algorithm to compress the data, resulting in files with the .gz extension.

Extracting Gzip Files on Windows

Windows does not natively support extracting gzip files out of the box. However, you can use free third-party utilities like 7-Zip or WinRAR to get the job done.

Using 7-Zip

  1. Download and install 7-Zip from https://www.7-zip.org/
  2. Right-click on the .gz file you want to extract
  3. Select “7-Zip” > “Extract Here”
  4. The contents will be extracted to the same directory as the original .gz file
extract gzip on windows with 7zip

Using WinRAR

  1. Download and install WinRAR from https://www.rarlab.com/
  2. Right-click on the .gz file
  3. Select “Extract Here”
  4. The contents will be extracted to the same directory

Extracting Gzip Files on macOS

macOS has built-in support for extracting gzip files, making the process incredibly straightforward.

Using the Graphical Interface

  1. Double-click on the .gz file
  2. A new file or folder with the extracted contents will be created in the same directory

Using the Terminal

If you prefer the command line, you can use the gunzip command to extract your gzip file:

Zsh
gunzip file.gz

This will extract the contents of file.gz and remove the .gz extension. If you want to keep the original .gz file, you can use:

Zsh
gunzip -c file.gz > unzipped_file

This will create a new file called unzipped_file with the extracted contents, while keeping the original file.gz intact.

Extracting Gzip Files on Linux

Linux users also have multiple options for extracting gzip files, including both graphical and command-line methods.

Using the Graphical Interface

Most modern Linux file managers (like Nautilus or Dolphin) support right-clicking on a .gz file and selecting “Extract Here” or a similar option.

Using the Terminal

Just like on macOS, you can use the gunzip command:

Bash
gunzip file.gz

Or, to extract while keeping the original .gz file:

Bash
gunzip -c file.gz > unzipped_file

With these simple steps, you’ll be able to extract gzip files with ease, no matter which operating system you’re using. Happy unzipping!

March 14, 2024 0 comments
1 FacebookTwitterPinterestEmail
LinuxNetworking

Setting Up VLANs on OpenWrt 23.05: Making the Switch to DSA

by pcplanet March 10, 2024
written by pcplanet 5 minutes read

Introduction:

OpenWrt 23.05 brings a significant change in how VLANs are configured, introducing the DSA (Distributed Switch Architecture) system. This transition from the old swconfig method can be challenging, particularly for users upgrading from OpenWrt 19.07. In this comprehensive guide, we’ll walk you through the process of setting up VLANs on OpenWrt 23.05, using the WRT1900ac router as an example.

For optimal results, it’s highly recommended to perform these steps on a fresh OpenWrt 23.05 installation rather than copying and pasting configurations blindly. The starter configuration files are found at the bottom, read the article first, then edit the starter configuration file.

Network Overview:

For the purposes of this guide, we’ll use the following network setup:

  • Wireless devices connected to a WRT1900ac router (LAN1 port used, WAN port empty)
  • WRT1900ac from lan1 is connected to a Cisco switch (configured to accept VLANs)
  • Cisco switch connected to a top-level firewall (where VLANs, DHCP, and DNS are managed)

The DSA Challenge:

When transitioning from swconfig to DSA, you may encounter a few hurdles:

  1. Different network configuration layout
  2. Loss of connection to the router’s IP address after applying settings
  3. Assigning wireless access points (SSIDs) to the correct VLANs

My old swconfig configuration looked like this:

swconfig spreadsheet vlan config

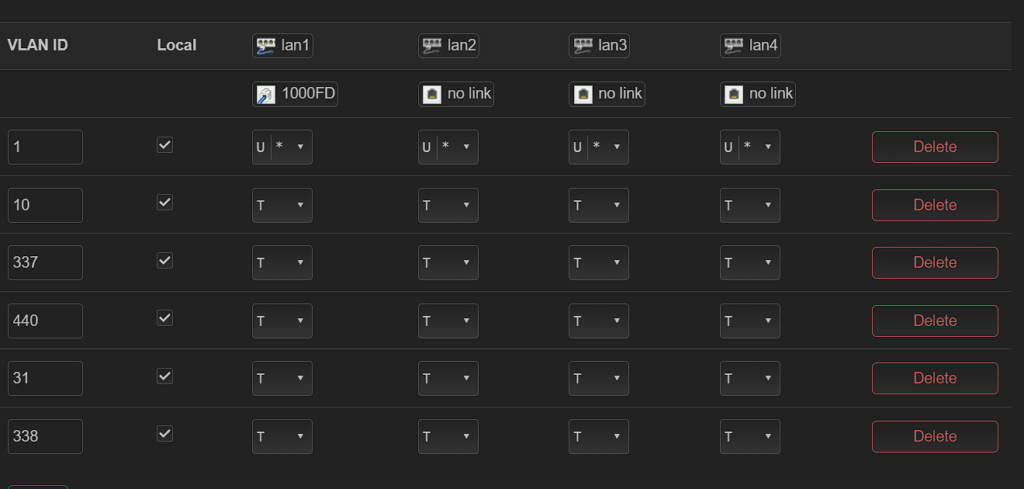
A similar configuration but in DSA looks like this:

DSA vlan configuration

Step 1: Configure the Main LAN Interface

To prevent losing connectivity to the router after applying settings, set your main LAN interface to br-lan.1. This is because VLAN ID 1 is the default for the internal network.

Step 2: Create Unmanaged Interfaces for VLANs

Create unmanaged interfaces for each VLAN you want to use. This allows you to assign the VLANs to specific ports and devices.

openwrt interface page

Step 3: Assign Wireless SSIDs to VLANs

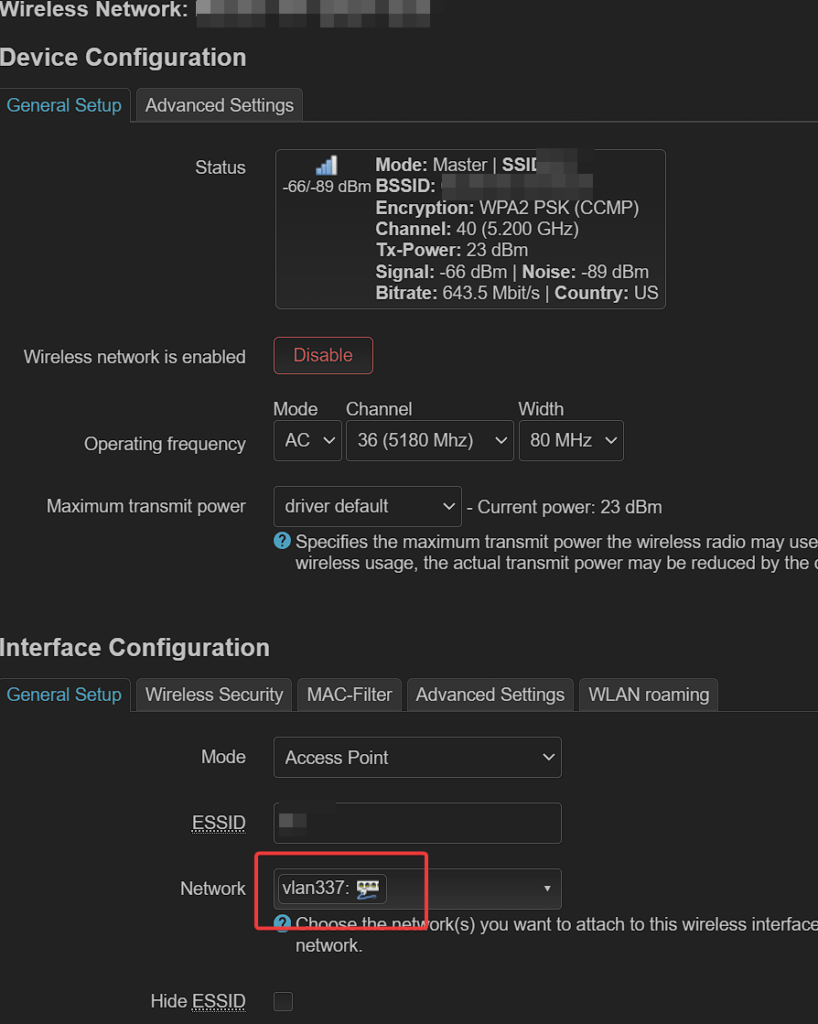
Once the unmanaged interfaces are set up, assign the wireless SSIDs (OpenWrt access points) to the corresponding VLANs. This ensures that wireless devices connect to the correct VLAN based on the SSID they use.

openwrt wireless network SSID page

Configuration Files

Here is what the standard stock configuration looks like when you drop into openwrt for the first time:

Plaintext
root@OpenWrt:~# cat /etc/config/network


config interface 'loopback'
        option device 'lo'
        option proto 'static'
        option ipaddr '127.0.0.1'
        option netmask '255.0.0.0'

config globals 'globals'
        option ula_prefix 'fdf7:4c8b:cbcd::/48'

config device
        option name 'br-lan'
        option type 'bridge'
        list ports 'lan1'
        list ports 'lan2'
        list ports 'lan3'
        list ports 'lan4'

config device
        option name 'lan1'
        option macaddr ''

config device
        option name 'lan2'
        option macaddr ''

config device
        option name 'lan3'
        option macaddr ''

config device
        option name 'lan4'
        option macaddr ''

config interface 'lan'
        option device 'br-lan'
        option proto 'dhcp'

config device
        option name 'wan'
        option macaddr 'x'

config interface 'wan'
        option device 'wan'
        option proto 'dhcp'

config interface 'wan6'
        option device 'wan'
        option proto 'dhcpv6'

To help you get started, here’s a template for adding two VLANs to your OpenWrt DSA configuration:

Plaintext
root@OpenWrt:~# cat /etc/config/network


config interface 'loopback'
        option device 'lo'
        option proto 'static'
        option ipaddr '127.0.0.1'
        option netmask '255.0.0.0'

config globals 'globals'
        option ula_prefix 'fdf7:4c8b:cbcd::/48'

config device
        option name 'br-lan'
        option type 'bridge'
        list ports 'lan1'
        list ports 'lan2'
        list ports 'lan3'
        list ports 'lan4'

config device
        option name 'lan1'
        option macaddr ''

config device
        option name 'lan2'
        option macaddr ''

config device
        option name 'lan3'
        option macaddr ''

config device
        option name 'lan4'
        option macaddr ''

config interface 'lan'
        option device 'br-lan.1'
        option proto 'dhcp'

config device
        option name 'wan'
        option macaddr 'x'

config interface 'wan'
        option device 'wan'
        option proto 'dhcp'

config interface 'wan6'
        option device 'wan'
        option proto 'dhcpv6'
        
config bridge-vlan
        option device 'br-lan'
        option vlan '1'
        list ports 'lan1:u*'
        list ports 'lan2:u*'
        list ports 'lan3:u*'
        list ports 'lan4:u*'

config bridge-vlan
        option device 'br-lan'
        option vlan '10'
        list ports 'lan1:t'
        list ports 'lan2:t'
        list ports 'lan3:t'
        list ports 'lan4:t'

config bridge-vlan
        option device 'br-lan'
        option vlan '337'
        list ports 'lan1:t'
        list ports 'lan2:t'
        list ports 'lan3:t'
        list ports 'lan4:t'

config interface 'vlan10'
        option device 'br-lan.10'
        option proto 'none'

config interface 'vlan337'
        option device 'br-lan.337'
        option proto 'none'

Conclusion:

At first, setting up VLANs on the WRT1900ac with the latest OpenWrt version can seem pretty confusing, but once you understand DSA, it’s straightforward. This setup makes your network more secure and runs better. Keep in mind that what worked for me might need some tweaks for your network. I’ll keep updating this guide to keep it helpful.

This is a solution that worked for me and may not be a one size fits all. This guide will be updated as more ways are found.

My original post

March 10, 2024 0 comments
2 FacebookTwitterPinterestEmail
News

Navigating CVE-2023-49103: Proactive Defense for ownCloud

by pcplanet November 30, 2023
written by pcplanet 5 minutes read
  • Risk: critical
  • CVSS v3 Base Score: 10
  • CVSS v3 Vector: AV:N/AC:L/PR:N/UI:N/S:C/C:H/I:H/A:H
  • CWE ID: CWE-200
  • CWE Name: Exposure of Sensitive Information to an Unauthorized Actor

The recent reports from BleepingComputer and Creative Collaboration highlight a series of critical vulnerabilities in ownCloud, a widely-used open-source file synchronization and sharing solution. These vulnerabilities are particularly alarming due to their ease of exploitation and the sensitive nature of the data at risk.

CVE-2023-49103: The Severe Vulnerability in ‘graphapi’

The Vulnerability Explained

CVE-2023-49103 is a critical vulnerability in ownCloud’s ‘graphapi’ app, receiving the highest severity score (10.0) on the CVSS scale. This flaw enables remote attackers to execute the PHP function phpinfo(), inadvertently exposing server environment variables. These variables can contain sensitive data such as credentials.

Affected Components

The issue affects ‘graphapi’ versions 0.2.0 and 0.3.0. A third-party library within these versions, when accessed through a specific URL, leaks PHP environment configuration details.

Exploitation and Consequences

Exploiting CVE-2023-49103 is relatively straightforward and has been widely observed in the wild. Particularly vulnerable are containerized deployments using Docker, where the exposure of environment variables can reveal admin passwords, mail server credentials, and license keys.

Addressing Related High-Severity Vulnerabilities

  • CVE-2023-94105: With a 9.8 severity score, it enables authentication bypass in the WebDAV API via pre-signed URLs, allowing unauthorized file operations.
  • CVE-2023-94104: This 8.7-severity flaw allows subdomain validation bypass, enabling attackers to redirect callbacks to a domain they control.

Immediate Response for CVE-2023-49103

  1. Deleting Vulnerable Files:
    • Path: owncloud/apps/graphapi/vendor/microsoft/microsoft-graph/tests/GetPhpInfo.php.
    • Technical Rationale: This file is the entry point for the vulnerability. Deleting it removes the immediate threat vector.
    • Command:
      • rm -f /path/to/owncloud/apps/graphapi/vendor/microsoft/microsoft-graph/tests/GetPhpInfo.php
  2. Disabling the ‘phpinfo()’ Function in Docker Containers:
    • Purpose: Prevent the function from being used maliciously to extract environment variables.
    • Implementation: Edit the php.ini file to disable the function.
    • *BACKUP YOUR PHP.INI FILE*
    • Command:
      • sed -i 's/;disable_functions =/disable_functions = phpinfo/g' /etc/php.ini
  3. Changing Exposed Credentials:
    • Scope: Includes admin passwords, mail server credentials, object-store/s3 access-keys, and database access details.
    • Procedure:
      • For admin passwords, access the admin panel or use CLI tools provided by ownCloud.
      • Update mail server credentials in the configuration file or admin panel.
      • Rotate database credentials and update the configuration files accordingly.
    • Importance: Prevents attackers from using credentials they might have already compromised.

Long-Term Security Enhancements:

  • ownCloud is set to introduce hardenings in future releases to prevent similar vulnerabilities, indicating a commitment to ongoing security improvements.

Hypothetical Attack Example: Breaching via CVE-2023-49103

Stage 1: Identifying the Target

  • Method: Utilize network scanning tools like Nmap or Shodan to locate servers running ownCloud.
  • Criteria: Specifically target servers indicating the presence of the ‘graphapi’ app in versions 0.2.0 or 0.3.0.

Stage 2: Initiating the Attack

  • Crafting the HTTP Request: Use a tool like cURL or a custom script to send a request.
  • Example Code:
    • import requests target_url = 'http://target-owncloud-server.com/vulnerable-path' response = requests.get(target_url) print(response.text)

Stage 3: Data Exfiltration

  • Interpreting the Output: Analyze the phpinfo() output for environment variables.
  • Extracting Credentials: Look for specific patterns indicating admin passwords or database credentials.

Stage 4: Expanding Control

  • Privilege Escalation: Use the extracted credentials to log into the server or database.
  • Lateral Movement: Employ common tools like Metasploit to exploit further vulnerabilities or gain deeper access into the network.

Ethical Consideration and Defense

This hypothetical scenario is a demonstration of an attack vector and should only be used for educational purposes. To defend against such attacks, administrators should patch vulnerable software, regularly monitor and audit their systems, and employ intrusion detection systems to identify unusual network activities.

if you suspect to be compromised here is a small checklist to get you started:

CVE-2023-49103 Specific Checklist

  1. Web Server Access Logs
    • What to Look For: Requests to the vulnerable URL.
    • Typical Log Entry:
      • Look for entries accessing owncloud/apps/graphapi/vendor/microsoft/microsoft-graph/tests/GetPhpInfo.php.
      • Example: GET /owncloud/apps/graphapi/vendor/microsoft/microsoft-graph/tests/GetPhpInfo.php HTTP/1.1.
    • Action: Investigate any request to this URL, as it should not be normally accessed.
  2. Error Logs
    • What to Look For: Errors generated due to the exploitation attempts.
    • Typical Log Entry:
      • Entries related to PHP errors or warnings triggered by accessing the vulnerable URL.
    • Action: Pay attention to PHP-related error messages, especially if they coincide with the access logs mentioned above.
  3. PHP Logs (if enabled)
    • What to Look For: Direct invocation of phpinfo() function.
    • Typical Log Entry:
      • Explicit calls to phpinfo() function in the context of the graphapi app.
    • Action: Any instance of phpinfo() being called outside of a standard maintenance or debugging session should be treated as suspicious.

Understanding the Implications

These vulnerabilities in ownCloud represent a significant security threat, primarily due to the ease of exploitation and the potential access to sensitive information. The rapid response and recommendations provided by ownCloud and security researchers underscore the seriousness of these vulnerabilities and the need for immediate action by administrators of affected systems.

The case of ownCloud also serves as a cautionary tale about the inherent risks associated with open-source solutions, particularly in environments where sensitive data is handled. It’s a reminder of the importance of regular security audits, timely patching of known vulnerabilities, and the proactive management of third-party libraries and dependencies.

Finally, this situation highlights the evolving nature of cybersecurity threats and the need for continuous vigilance in the digital landscape. For organizations relying on open-source solutions like ownCloud, it becomes imperative to establish robust security protocols and stay informed about the latest vulnerabilities and patches.

November 30, 2023 0 comments
3 FacebookTwitterPinterestEmail
Linux

How to install PHP 8.2 on RHEL based systems

by pcplanet September 1, 2023
written by pcplanet 6 minutes read

Introduction

Brief Explanation of PHP 8.2

Welcome to the world of PHP 8.2! In this article, we will explore how to install PHP 8.2 on RHEL-based systems. PHP 8.2 is the latest version of PHP, packed with exciting new features, improvements, and bug fixes. By upgrading to PHP 8.2, you can harness the power of enhanced performance, security enhancements, and better developer productivity. Let’s dive in!

Benefits of PHP 8.2

Before we delve into the installation process, let’s take a moment to highlight some of the key benefits of PHP 8.2. By upgrading to this version, you can expect:

  • Improved performance: PHP 8.2 introduces several optimizations that enhance the speed and efficiency of your PHP applications.
  • Enhanced security: PHP 8.2 comes with strengthened security measures, protecting your code and preventing potential vulnerabilities.
  • New features and syntax improvements: PHP 8.2 brings exciting new features and syntax enhancements that make your code more concise, readable, and maintainable.
  • Better error handling: With PHP 8.2, error handling has been improved, making it easier to debug and troubleshoot your applications.
  • Increased developer productivity: The latest version includes various quality-of-life improvements, enabling developers to write code more efficiently.

Now that we understand the benefits, let’s move on to the next section.

Prerequisites for Installation

System Requirements

Before we begin the installation process, let’s ensure that your system meets the necessary requirements to run PHP 8.2. The following are the system requirements for installing PHP 8.2 on RHEL-based systems:

  • Operating System: RHEL-based system (e.g., CentOS, Fedora)
  • Memory: At least 2GB of RAM (recommended)
  • Disk Space: Sufficient free space for the installation

Necessary Tools and Software

To install PHP 8.2 on your RHEL-based system, you will need a few tools and software. Make sure you have the following prerequisites in place:

  1. Terminal Access: You should have terminal access to your RHEL-based system, either through a local console or remote SSH.
  2. Package Manager: Ensure that your system has a package manager installed. YUM and DNF are commonly used package managers on RHEL-based systems.

With the system requirements and necessary tools in place, we are now ready to install PHP 8.2 on your RHEL-based system. Let’s move on to the next section.

Installing PHP 8.2 on RHEL-Based Systems

Step 1: Update Your System

Before installing PHP 8.2, it is essential to update your system to ensure you have the latest packages and security patches. Open your terminal and execute the following command:

sudo yum update

This command will update all installed packages on your system to their latest versions.

Step 2: Download the Remi Repository

To install PHP 8.2, we will utilize the Remi repository, which provides up-to-date PHP packages for RHEL-based systems. Follow these steps to download and enable the Remi repository:

  1. Download and install the Remi repository configuration package:
sudo yum install https://rpms.remirepo.net/enterprise/remi-release-8.rpm
  1. Enable the Remi repository:
sudo dnf module enable php:remi-8.2

Step 3: Install PHP 8.2

With the Remi repository enabled, we can now proceed to install PHP 8.2. Execute the following command to install PHP and its necessary extensions:

sudo dnf install php

Once the installation is complete, PHP 8.2 should be successfully installed on your RHEL-based system.

Troubleshooting Common Issues

If you encounter any issues during the installation process, here are some common troubleshooting steps:

  1. Check for conflicting repositories: One common issue is conflicting repositories that might interfere with the installation of PHP 8.2. It’s important to ensure that there are no conflicting repositories enabled on your system. Conflicting repositories can cause dependency conflicts or unexpected package versions. To resolve this, review the repository configuration files in the /etc/yum.repos.d/ directory. Disable or remove any repositories that may conflict with the Remi repository used for PHP 8.2 installation.
  2. Verify internet connectivity: Another potential issue could be a lack of stable internet connectivity. Ensure that your system has a reliable internet connection to download the necessary packages from the Remi repository. A disrupted or slow internet connection may result in incomplete package downloads or installation failures. Check your network settings, firewall rules, and DNS configuration to ensure a stable internet connection.
  3. Review error messages: Error messages can provide valuable insights into the root cause of installation issues. If you encounter any error messages during the installation of PHP 8.2, carefully read and analyze them for potential solutions. Error messages may indicate missing dependencies, conflicting package versions, or other issues that need to be addressed. Search for the specific error message online or consult the official documentation and community forums for recommended solutions. Often, the error message itself will provide clues about possible fixes or workarounds.For example, if you see an error related to unresolved dependencies, it may indicate that certain PHP extensions or required libraries are missing on your system. In such cases, you can use the package manager (YUM or DNF) to search for and install the missing dependencies explicitly. Additionally, the error message may suggest specific commands or alternative packages to resolve the issue.

Verifying the Installation

How to Check Your PHP Version

After successfully installing PHP 8.2, you can verify the installation by checking the PHP version. Open your terminal and execute the following command:

php -v

This command will display the installed PHP version, confirming that PHP 8.2 is up and running on your RHEL-based system.

Conclusion

Congratulations! You have successfully installed PHP

8.2 on your RHEL-based system. By upgrading to PHP 8.2, you can enjoy enhanced performance, improved security, and new features. Remember to keep your system up to date with regular updates and security patches to ensure a stable and secure environment for your PHP applications.

FAQs

Q1: Can I install PHP 8.2 on non-RHEL-based systems?
Yes, PHP 8.2 can be installed on various Linux distributions. However, the installation process may vary depending on the specific distribution. It is recommended to refer to the official documentation or community resources for installation instructions tailored to your specific system.

Q2: How can I uninstall PHP 8.2 from my RHEL-based system?
To uninstall PHP 8.2, you can use the package manager on your RHEL-based system. Execute the appropriate command (e.g., sudo yum remove php) to remove the PHP packages and dependencies from your system.

Q3: Can I have multiple PHP versions installed on my RHEL-based system?
Yes, it is possible to have multiple PHP versions coexisting on your RHEL-based system using the Remi repository. You can enable different PHP versions as per your requirements.

Q4: Is it necessary to update my system before installing PHP 8.2?
Updating your system before installing PHP 8.2 is recommended as it ensures that you have the latest packages and security patches. It helps maintain system stability and compatibility with the installed PHP version.

Q5: Can I migrate my existing PHP applications to PHP 8.2 without any modifications?
Migrating existing PHP applications to PHP 8.2 may require some modifications, especially if your code relies on deprecated features or incompatible syntax. It is advisable to thoroughly test your applications for compatibility and make any necessary adjustments to ensure smooth migration.


That concludes the article on how to install PHP 8.2 on RHEL-based systems. If you have any further questions, feel free to ask. Happy coding!

September 1, 2023 0 comments
1 FacebookTwitterPinterestEmail
Linux

How to Secure Nextcloud: Guide to Protecting Your Data

by pcplanet August 30, 2023
written by pcplanet 11 minutes read

Nextcloud offers a powerful platform for data synchronization and collaboration. However, to secure Nextcloud is paramount to ensure the integrity and safety of your data. In this guide, we’ll explore various strategies and tools to help you secure your Nextcloud installation.

Implementing Geoblocking to Secure Nextcloud

Geoblocking restricts access to Nextcloud based on geographic location, adding a sophisticated layer of protection to your Nextcloud instance. By limiting unauthorized access from specific regions, geoblocking enhances security in several key ways. Here’s how you can set up geoblocking at both the Nextcloud and OS levels, along with an explanation of why it’s an essential security measure:

  1. Preventing Access from High-Risk Locations: Certain regions may be known for higher levels of cybercriminal activity. By blocking access from these locations, you minimize the risk of attacks originating from those areas.
  2. Compliance with Legal and Regulatory Requirements: Some jurisdictions have specific data protection laws that require businesses to restrict access to data based on geographic locations. Geoblocking helps in adhering to these legal obligations.
  3. Protection Against Brute-Force Attacks: By limiting access to specific regions where your organization operates or where legitimate users reside, you reduce the surface area for potential brute-force attacks.
  4. Reducing Bandwidth and Resource Abuse: Unwanted traffic from regions that are not relevant to your Nextcloud instance can consume valuable bandwidth and resources. Geoblocking can minimize unnecessary consumption and improve the performance for legitimate users.
  5. Customized User Experience: Geoblocking allows for a more tailored user experience by directing users from specific regions to localized versions of Nextcloud or providing content specific to their location.
  6. Enhanced Monitoring and Analytics: Tracking access attempts from different regions can provide insights into potential threats and allow for proactive security measures. Geoblocking logs can be analyzed to detect patterns indicative of malicious activity.
  7. Integration with Other Security Measures: Geoblocking can be part of a multi-layered security strategy, working in conjunction with firewalls, two-factor authentication, and other security protocols to create a robust defense against unauthorized access.

By implementing geoblocking, you not only secure Nextcloud but also demonstrate a commitment to safeguarding user data and adhering to best practices in cybersecurity. Whether you choose to apply geoblocking at the Nextcloud level using the Geoblocker app or at the OS level using tools like GeoIP, the enhanced security measures will contribute to a more resilient and reliable Nextcloud environment.

Using the Geoblocker App

The Geoblocker app in Nextcloud provides an easy way to restrict access based on geographic locations.

Install the Geoblocker App

  1. Navigate to the Apps menu in Nextcloud.
  2. Search for “Geoblocker” and click “Download and enable.”
  3. Go to Settings > Security to configure the Geoblocker.

Configure the Geoblocker App

  1. Select the geographical regions to allow or block.
  2. Choose the blocking method, such as blocking login or all access.
  3. Configure logging to keep track of blocked attempts.
  4. Save the settings.

OS-Level Geoblocking

Implementing geoblocking at the operating system level can provide additional protection. This can be achieved using tools like geoip with iptables.

Configure Firewall with GeoIP

Here’s a step-by-step guide for setting up geoblocking using GeoIP on a Linux system:

  1. Install the GeoIP module:
   sudo apt-get install xtables-addons-common
  1. Download the GeoIP database:
   sudo /usr/lib/xtables-addons/xt_geoip_dl
  1. Build the GeoIP database:
   sudo /usr/lib/xtables-addons/xt_geoip_build /usr/share/xt_geoip
  1. Add rules to block or allow specific countries: To block access from a specific country (e.g., Russia – RU):
   sudo iptables -A INPUT -m geoip --src-cc RU -j DROP

To allow access only from specific countries (e.g., United States – US, Canada – CA):

   sudo iptables -A INPUT -m geoip ! --src-cc US,CA -j DROP
  1. Save the iptables rules to make them persistent across reboots:
   sudo iptables-save > /etc/iptables/rules.v4

Two-Factor Authentication (2FA)

Two-Factor Authentication (2FA) adds an indispensable layer of security to Nextcloud by requiring two separate forms of identification for user authentication. This multi-step verification process ensures that even if a password is compromised, an attacker would still need access to the second form of identification, such as a mobile device or a hardware token, to gain entry. Here’s why implementing 2FA is a crucial security measure for Nextcloud:

  1. Protection Against Password Breaches: In an age where password breaches are common, relying solely on passwords can leave your Nextcloud instance vulnerable. 2FA adds an additional barrier, making unauthorized access more challenging.
  2. Mitigation of Phishing Attacks: Even if a user’s credentials are stolen through phishing, the attacker would need physical access to the second authentication factor (e.g., a mobile phone), rendering the stolen credentials useless by themselves.
  3. Enhanced User Accountability: With 2FA, you can ensure that only authorized individuals have access to specific resources, enhancing the accountability of users within your organization.

Enable 2FA in Nextcloud

Here’s how to set up 2FA in Nextcloud, focusing on TOTP (Time-based One-Time Password) but also mentioning other supported 2FA methods.

Navigate to Security Settings

  1. Log in as an administrator to your Nextcloud instance.
  2. Go to Settings > Security.

Enable TOTP

  1. Find the “Two-Factor TOTP Provider” section.
  2. Click “Enable.”

TOTP works with various authenticator apps, such as Google Authenticator or Authy, on smartphones.

Other Supported 2FA Methods

Nextcloud also supports other 2FA methods like U2F (Universal 2nd Factor) and SMS. These can be enabled similarly to TOTP and require corresponding hardware or services.

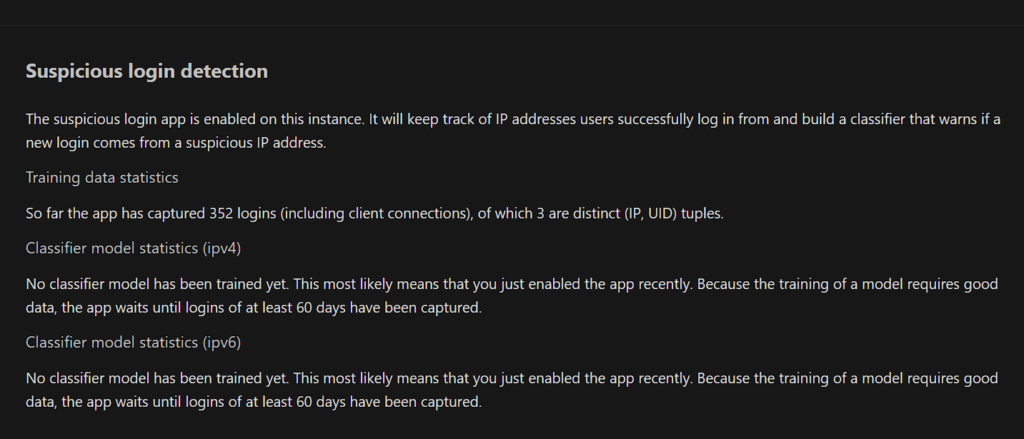
Suspicious Login Detection

This feature uses machine learning to detect and warn about suspicious login attempts.

Setting Up Suspicious Login Detection

  • Install the Suspicious Login app from the Nextcloud app store.
  • Configure the app to set up notification methods and sensitivity.

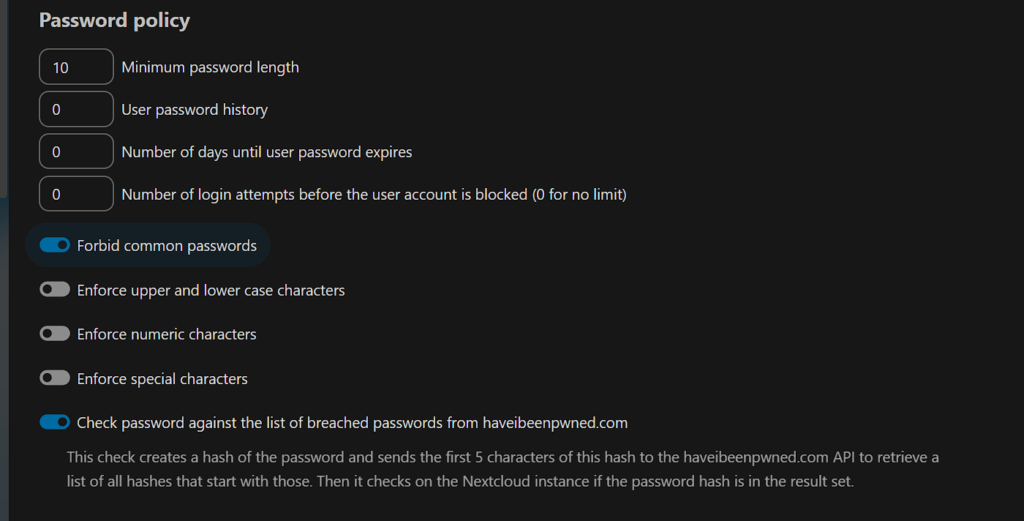
Implementing Strong Password Policies

Password policies enforce strong passwords, reducing the risk of brute-force attacks.

Read about managing users and passwords on Ubuntu

Configure Password Policies in Nextcloud

  • Go to Security settings in Nextcloud admin.
  • Set password length, complexity, and expiration rules.

OS-Level Password Policies

  • Configure PAM (Pluggable Authentication Module) to enforce strong passwords at the system level.

OS-Level Security Measures to Secure Nextcloud

Securing Nextcloud is not just about configuring the application itself; the underlying operating system must also be fortified. Here are some essential OS-level security practices.

Discover more about basic Linux commands

Regular Updates

Keeping the OS and all installed software up to date is vital to ensure that known vulnerabilities are patched.

Steps to Automate Updates on Ubuntu

  1. Install the unattended-upgrades package:
   sudo apt-get install unattended-upgrades
  1. Configure unattended-upgrades by editing /etc/apt/apt.conf.d/50unattended-upgrades.
  2. Enable automatic updates:
   sudo dpkg-reconfigure --priority=low unattended-upgrades
  1. Verify that updates are working by checking the log files in /var/log/unattended-upgrades.

Firewall Configuration

A well-configured firewall is a primary defense against unauthorized access.

Using UFW on Ubuntu
  1. Install UFW (Uncomplicated Firewall):
   sudo apt-get install ufw
  1. Allow necessary ports (e.g., 80 for HTTP, 443 for HTTPS):
   sudo ufw allow 80,443/tcp
  1. Enable UFW:
   sudo ufw enable
  1. Verify the rules:
   sudo ufw status

Secure SSH Access to Secure Nextcloud

Securing SSH (Secure Shell) access is a crucial step in minimizing the risk of unauthorized remote access to the server where Nextcloud is hosted. Here’s a comprehensive guide to enhancing SSH security.

Learn how to use SSH

Use SSH Keys

Using SSH keys instead of passwords adds an extra layer of security.

Generate an SSH Key Pair
  1. Open a terminal on your local machine.
  2. Generate an SSH key pair with the ssh-keygen command:
   ssh-keygen -t rsa -b 4096 -C "your_email@example.com"

This will create a 4096-bit RSA key pair.

  1. Secure the private key by setting a strong passphrase when prompted.
Add the Public Key to the Server
  1. Copy the public key to the server using the ssh-copy-id command:
   ssh-copy-id user@server

Replace user@server with your username and server’s IP address or hostname.

  1. Verify the key-based authentication by SSHing into the server:
   ssh user@server

You should be prompted for the passphrase of your private key, not the user’s password.

Disable Root Login and Change SSH Port

Disabling root login and changing the default SSH port adds additional security layers.

Edit the SSH Configuration File
  1. Open the SSH configuration file on the server:
   sudo nano /etc/ssh/sshd_config
  1. Disable root login by finding the line with PermitRootLogin and setting it to no:
   PermitRootLogin no

If the line doesn’t exist, add it.

  1. Change the SSH port by finding the line with Port and setting it to a non-default value, like 2222:
   Port 2222

If the line doesn’t exist, add it.

  1. Save the file and exit the editor.
Restart SSH to Apply Changes
  1. Restart the SSH service to apply the changes:
   sudo systemctl restart ssh
  1. Verify the new configuration by SSHing into the server with the new port:
   ssh -p 2222 user@server

Harden PHP Configuration to Secure Nextcloud

Nextcloud runs on PHP, so securing PHP is an essential part of hardening Nextcloud.

Find out how to install PHP on Ubuntu

Disable Unnecessary PHP Functions
  1. Edit the php.ini file (location depends on the PHP version).
  2. Find or add the disable_functions line:
   disable_functions = exec,passthru,shell_exec,system
  1. Restart the web server to apply the changes.
Set Appropriate Permissions
  1. Set the correct owner for Nextcloud files:
   sudo chown -R www-data:www-data /var/www/nextcloud
  1. Set secure file permissions:
   sudo find /var/www/nextcloud -type f -exec chmod 0640 {} \;
   sudo find /var/www/nextcloud -type d -exec chmod 0750 {} \;

Protecting Nextcloud from Malware

Use Nextcloud’s Antivirus App to Secure Nextcloud

Nextcloud offers an antivirus app that integrates with ClamAV, a popular open-source antivirus engine. This combination allows for continuous scanning of uploaded files and periodic scans of existing data.

Install and Configure ClamAV

Install ClamAV and ClamAV Daemon
  1. Update the package lists:
   sudo apt-get update
  1. Install ClamAV and ClamAV Daemon:
   sudo apt-get install clamav clamav-daemon
Update ClamAV’s Signatures
  1. Update the virus database to ensure that ClamAV can detect the latest threats:
   sudo freshclam
  1. Enable automatic updates by editing /etc/clamav/freshclam.conf and setting:
   Checks 24

This will update the virus signatures 24 times a day.

Install the Antivirus App for Files in Nextcloud

  1. Log in to Nextcloud as an administrator.
  2. Go to the Apps menu.
  3. Search for “Antivirus for files” in the search bar.
  4. Click “Download and enable” to install the app.

Configure the Antivirus App to Use ClamAV

  1. Go to Settings > Security in Nextcloud.
  2. Find the “Antivirus Configuration” section.
  3. Select “Daemon (Socket)” as the mode to connect to ClamAV.
  4. Set the hostname and port (usually localhost and 3310).
  5. Choose the desired action for infected files, such as “Only log” or “Delete file.”
  6. Save the settings.

Regularly Scan for Malware

  1. Open a terminal on the server.
  2. Run a recursive scan on Nextcloud’s data directory:
   sudo clamscan -r /path/to/nextcloud/data

Replace /path/to/nextcloud/data with the actual path to Nextcloud’s data directory.

  1. Consider setting up a cron job to automate regular scans. For example, to run a scan every day at 3:00 AM:
   0 3 * * * sudo clamscan -r /path/to/nextcloud/data >/dev/null 2>&1

Edit the cron table with sudo crontab -e and add the above line.

Protecting the System from Malware

Use Intrusion Detection Systems (IDS) to Enhance Security

Intrusion Detection Systems (IDS) play a vital role in securing Nextcloud installations and Linux servers by monitoring and analyzing network traffic for suspicious activities. Implementing IDS solutions like Fail2Ban, Snort, and Suricata can provide robust protection against various threats, including brute-force attacks, malware, and unauthorized access attempts. Here’s an overview of these tools:

Fail2Ban

Fail2Ban is an intrusion prevention software that protects Linux servers from brute-force and dictionary attacks. It operates by:

  1. Monitoring Logs: Fail2Ban scans system logs for patterns indicating failed login attempts or suspicious behavior.
  2. Banning Offenders: Upon detecting repeated failures from an IP address, Fail2Ban temporarily bans the address, preventing further access.
  3. Customizable Rules: Administrators can configure custom rules, defining the number of failed attempts allowed and the duration of the ban.
  4. Integration with Firewalls: It works seamlessly with iptables and other firewall management tools, enabling swift response to threats.
Install Fail2Ban
  1. Update the package lists:
   sudo apt-get update
  1. Install Fail2Ban:
   sudo apt-get install fail2ban
Configure Fail2Ban for Nextcloud
  1. Create a custom filter for Nextcloud by creating a file /etc/fail2ban/filter.d/nextcloud.conf with the following content:
   [Definition]
   failregex={"reqId":".*","remoteAddr":"<HOST>","app":"core","message":"Login failed: '.*' \(Remote IP: '<HOST>'\)"
   ignoreregex =
  1. Create a jail configuration for Nextcloud by editing /etc/fail2ban/jail.local and adding:
   [nextcloud]
   enabled  = true
   filter   = nextcloud
   port     = 80,443
   logpath  = /path/to/nextcloud/data/nextcloud.log
   maxretry = 3
   bantime  = 3600

Adjust the logpath to the actual path of your Nextcloud log file.

  1. Restart Fail2Ban to apply the changes:
   sudo systemctl restart fail2ban

Learn about additional security with Fail2Ban or learn more about Fail2Ban

Snort

Snort is a well-known open-source network intrusion detection system (NIDS) that offers real-time traffic analysis and packet logging. Key features include:

  1. Signature-Based Detection: Snort uses predefined signatures to identify known threats in network traffic.
  2. Anomaly Detection: It can also detect unusual patterns or behavior that may signify an attack, even if the signature is unknown.
  3. Extensible: Snort’s community and commercial support provide a rich set of plugins, rules, and configurations to tailor its behavior.
  4. Scalable: Suitable for various environments, from small businesses to large enterprises, providing consistent protection.

Suricata

Suricata is another open-source network IDS, Intrusion Prevention System (IPS), and Network Security Monitoring engine. Its features are:

  1. Multi-Threading: Suricata is designed to utilize multi-core CPUs efficiently, offering high performance.
  2. Protocol Analysis: It provides deep inspection of many protocols, including HTTP, TLS, and DNS, allowing for detailed analysis.
  3. Flexible Rule System: Suricata’s powerful and adaptable rule system enables custom detection logic, adapting to specific threats and environments.
  4. Integration with Threat Intelligence: Suricata can integrate with various threat intelligence feeds, enhancing its ability to detect emerging threats.

Use Linux Malware Detect (LMD)

Linux Malware Detect (LMD) is a malware scanner specifically designed to detect and remove malware on Linux systems.

Download and Install LMD

  1. Download LMD:
   wget http://www.rfxn.com/downloads/maldetect-current.tar.gz
  1. Extract the archive:
   tar -xvf maldetect-current.tar.gz
  1. Navigate to the extracted directory:
   cd maldetect-*
  1. Install LMD:
   sudo ./install.sh

Configure LMD

  1. Edit the configuration file /usr/local/maldetect/conf.maldet.
  2. Set the email alerts, daily update checks, and other preferences as needed.
  3. Configure the scan options, such as scan depth and file types.

Run a Scan

  1. Run a manual scan on a specific directory:
   sudo maldet -a /path/to/scan

Set Up Daily Scans with Cron

  1. Edit the cron file for LMD:
   sudo crontab -e
  1. Add a daily scan job, for example:
   0 2 * * * /usr/local/sbin/maldet -a /path/to/scan >/dev/null 2>&1

This will run a scan every day at 2:00 AM.

Conclusion

Securing Nextcloud requires a multifaceted approach, encompassing both application-level and OS-level measures. By implementing geoblocking, 2FA, suspicious login detection, strong password policies, and robust OS-level security practices, administrators can build a secure and resilient Nextcloud environment.

For further details on any of these topics, always refer to Nextcloud’s official documentation and consult with security professionals as needed.

August 30, 2023 0 comments
0 FacebookTwitterPinterestEmail
Linux

How to Use the OCC Command in Nextcloud

by pcplanet August 26, 2023
written by pcplanet 3 minutes read

Nextcloud is one of the most popular open-source platforms for file synchronization, collaboration, and more. An essential aspect of managing a Nextcloud instance is leveraging the OCC command. In this guide, we’ll explore everything you need to know about using the OCC command in Nextcloud.

What is the OCC Command?

The OCC command is Nextcloud’s command-line interface. It provides administrators with a variety of tools to manage users, apps, encryption, and other core functions.

Why Use the OCC Command?

The OCC command allows administrators to perform complex tasks quickly, making it a vital tool for efficient Nextcloud management. It’s especially useful for:

  • Managing users and groups
  • Configuring apps
  • Upgrading Nextcloud
  • Running maintenance tasks

Prerequisites for Using the OCC Command

Before using the OCC command, ensure that:

  • You have command-line access to the server.
  • You have administrative permissions.
  • Nextcloud is properly installed.

Running OCC as the Web Server User

One of the crucial aspects of using the OCC command is running it as the web server user. This is vital for preserving file ownership and permissions.

Why Run OCC as the Web Server User?

Nextcloud files and directories are usually owned by the web server user (e.g., www-data on Debian/Ubuntu systems). Running OCC commands as a different user might change the ownership of files, leading to permission issues and potential Nextcloud malfunctions.

How to Run OCC as the Web Server User?

The command to run OCC as the web server user typically looks like this:

sudo -u www-data php occ command

Here, www-data should be replaced with the user that runs your web server, which might vary depending on your system and web server software.

Using OCC in Different Environments

The OCC command can be used in various environments, and some specific considerations must be kept in mind:

Shared Hosting

On shared hosting, direct command-line access might not be available. In such cases, administrators might need to use alternative methods or contact their hosting provider for assistance with OCC commands.

Secure Permissions

Setting up proper permissions is crucial for Nextcloud’s security. When using the OCC command, ensure that file permissions remain secure and adhere to Nextcloud’s recommendations.

Maintenance Mode

Some OCC commands, like upgrading Nextcloud, require putting the instance into maintenance mode. This can be done with:

sudo -u www-data php occ maintenance:mode --on

Remember to disable maintenance mode afterward:

sudo -u www-data php occ maintenance:mode --off

Troubleshooting OCC Issues

OCC commands might lead to errors or warnings, and understanding how to troubleshoot them is essential:

Permission Errors

If you encounter permission errors, double-check that you are running the OCC command as the correct web server user and that file permissions are set appropriately.

Dependency Issues

Ensure that all required PHP modules and dependencies are installed, as missing modules can lead to OCC command failures.

For more information on installation, visit our guide on Nextcloud setup.

Basic Usage of the OCC Command

Navigate to the Nextcloud Directory

First, navigate to the Nextcloud directory:

cd /var/www/nextcloud

Run OCC Commands

OCC commands are run with the following syntax:

sudo -u www-data php occ command
List Available Commands

To see a full list of available commands:

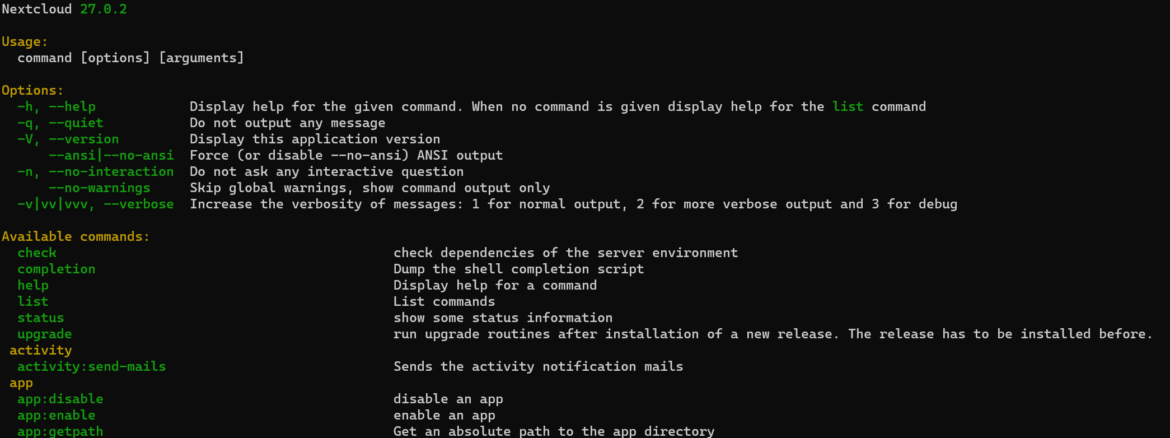
sudo -u www-data php occ list
Manage Users
  • Create a user:
  sudo -u www-data php occ user:add username
  • Delete a user:
  sudo -u www-data php occ user:delete username
  • Set a user’s email:
  sudo -u www-data php occ user:setting username email myuser@example.com
Manage Groups
  • Create a group:
  sudo -u www-data php occ group:add groupname
  • Add a user to a group:
  sudo -u www-data php occ group:adduser groupname username
Manage Apps
  • List all available apps:
  sudo -u www-data php occ app:list
  • Enable an app:
  sudo -u www-data php occ app:enable appname
  • Disable an app:
  sudo -u www-data php occ app:disable appname

Advanced Tasks with the OCC Command

Database Conversion

Convert the database type:

sudo -u www-data php occ db:convert-type --all-apps mysql username localhost nextcloud

Maintenance Mode

  • Enable maintenance mode:
  sudo -u www-data php occ maintenance:mode --on
  • Disable maintenance mode:
  sudo -u www-data php occ maintenance:mode --off

Upgrading Nextcloud

  • Start the upgrade process:
  sudo -u www-data php occ upgrade

File Operations

  • Scan for new files:
  sudo -u www-data php occ files:scan username
  • Repair file cache:
  sudo -u www-data php occ maintenance:repair

Conclusion

The OCC command in Nextcloud offers a powerful and versatile way to manage your instance. From basic user management to complex database operations, understanding how to use the OCC command can significantly enhance your Nextcloud administration skills.

For further details, refer to the official Nextcloud OCC documentation.

Happy Nextcloud administration!

August 26, 2023 0 comments
1 FacebookTwitterPinterestEmail
Linux

How to manage processes in Linux

by pcplanet August 25, 2023
written by pcplanet 9 minutes read

Ever found yourself in the heart of a bustling city at rush hour? That’s kind of what process management in Linux is like. It’s about overseeing and directing the flow of tasks, ensuring everything runs smoothly, and nothing crashes or stalls.

Fundamentals of Linux Processes

What are Linux Processes?

Linux, like all Unix-like systems, works with a concept known as ‘processes’. Think of processes as individual tasks, like cars on a busy highway, each trying to get to their destination.

Why Managing Processes is Important?

Without proper management, these tasks can consume excessive resources, creating a gridlock in your system. That’s where process management comes in—it’s like having a traffic management system to ensure smooth flow.

Different Ways to Manage Linux Processes

Using Top Command

Just like traffic cameras giving real-time traffic data, the ‘top‘ command in Linux provides a dynamic, real-time view of the processes running on a system.

Using Htop Command

Then we have ‘htop‘, an even more colorful and interactive traffic monitor. It offers a full view of processes running, plus it gives you the power to control them.

Using PS Command

Imagine a traffic snapshot at a particular moment—that’s what ‘ps’ command does. It provides a static snapshot of current processes.

Detailed Guide on Viewing Processes in Linux

Using ‘ps’ Command

The ‘ps’ command is like a snapshot of the processes running on your system at a given moment. It’s like taking a picture of a busy intersection to assess the traffic situation.

Examples:

  1. Basic ‘ps’ command: Running the ps command without any options or arguments will display a list of processes owned by the current user. The output typically includes columns like PID, CPU usage, memory usage, and the command associated with each process.
  2. Customizing the output: The ps command provides various options and arguments to customize the output. For example, you can use the -e option to display information about all processes on the system, not just those owned by the current user. You can also use the -o option to specify the columns you want to include in the output.
  3. Filtering processes: The ps command allows you to filter the processes based on certain criteria. For instance, you can use the -u option followed by a username to display processes owned by a specific user. The -C option can be used to filter processes by command name.
  4. Monitoring processes: By combining the ps command with other utilities, you can create powerful process monitoring tools. For instance, you can use the watch command to run ps repeatedly at a specific interval, providing an updated view of the processes.

Using ‘top’ Command

If ‘ps’ is a snapshot, the ‘top’ command is a live CCTV feed. It provides real-time updates of system usage and list of running processes. It’s like a traffic chopper reporting live on the morning commute.

This analogy highlights the difference between the ‘ps’ command and the ‘top’ command. While ‘ps’ gives you a momentary snapshot of processes at a specific time, the top command provides real-time updates of system usage and actively running processes. It’s like a live CCTV feed that continuously monitors the system and presents up-to-date information.

Examples

  1. Basic top command: Running the top command without any additional parameters will display a continuously updated list of processes, along with system usage information such as CPU usage, memory usage, and load averages.
  2. Sorting processes: The top command provides various options to sort and prioritize processes based on specific criteria. For example, you can sort processes by CPU usage, memory consumption, or any other relevant metric to identify resource-intensive processes.
  3. Changing update frequency: By default, the top command updates the displayed information every few seconds. However, you can customize the update interval to suit your needs. For example, you can specify a different update interval using the -d option followed by the desired delay in seconds.
  4. Filtering processes: The top command allows you to filter the displayed processes based on certain criteria. You can use the top command with options such as -u to only show processes owned by a specific user or -p to monitor specific process IDs.

Using ‘htop’ Command

Lastly, there’s ‘htop’. If ‘top’ is a CCTV feed, ‘htop’ is an advanced drone overview of the entire traffic situation. It not only provides an enhanced view but also allows direct control over processes.

This analogy highlights the enhanced capabilities of the htop command compared to the top command. While top provides a real-time view of system usage and processes, htop takes it a step further by offering additional features and functionality. It’s like having an advanced drone providing an aerial view of the traffic situation, enabling a comprehensive understanding of the system’s state.

  1. Enhanced visualization: When you run the htop command, you’ll see an interactive and organized display of processes. It presents them in a hierarchical manner, making it easier to identify parent-child relationships and dependencies between processes.
  2. Detailed system information: htop not only provides a live overview of processes but also offers detailed system information. You can view CPU and memory usage per core, network activity, and disk usage, among other system metrics, in real-time.
  3. Direct process control: One of the notable features of htop is its ability to directly interact with processes. You can send signals to processes, such as terminating or pausing them, directly from the htop interface, making it convenient for managing system resources.
  4. Customization and sorting: Similar to the top command, htop allows you to customize the displayed information and sort processes based on specific criteria. You can filter processes, highlight specific process types, and adjust the display to focus on relevant information.

Benefits of ‘htop’ over ‘top’

‘htop’ has several advantages, such as an easier-to-understand layout and the ability to scroll vertically and horizontally. So, it’s like comparing a regular traffic cam to an ultra-HD drone feed.

  1. Enhanced layout: The layout of htop is designed to be more user-friendly and easier to understand compared to top. It provides a clear and organized display of system information, making it easier to identify processes and their resource usage.
  2. Vertical and horizontal scrolling: Unlike top, htop allows both vertical and horizontal scrolling. This feature is especially useful when working with systems that have a large number of processes or when viewing wide command lines or process details that exceed the width of the terminal.
  3. Colorful and informative interface: htop utilizes colors and visual indicators to represent different types of processes and system resources. This enhances readability and allows users to quickly identify resource-intensive processes or anomalies in system usage.
  4. Interactive process management: htop enables users to interactively manage processes directly from the interface. It provides intuitive keybindings to perform actions like sending signals to processes (e.g., terminating, pausing) and changing process priority.
  5. Customization options: htop offers customization options to tailor the display according to individual preferences. Users can adjust the colors, sort processes based on various criteria (e.g., CPU usage, memory usage), and apply filters to focus on specific processes or process groups.
  6. Detailed system information: In addition to process information, htop provides detailed system information such as CPU utilization per core, memory usage, load averages, and network activity. This comprehensive overview allows users to monitor system resources more effectively.

Absolutely, I’ll update the commands into the code blocks:

Guide on How to Kill a Process by PID in Linux

In our bustling city of Linux processes, sometimes a vehicle (a process) breaks down in the middle of traffic, causing a jam. When you can’t get it moving again, the only option is to remove it entirely. This is akin to killing a process in Linux, and it often involves the Process ID (PID) – the license plate number for our ‘car’. Let’s break this down further:

Finding the PID

In Linux, you can find the PID by using commands such as ps, top, or htop. Here’s an example using ps:

ps -aux

This command displays a detailed list of all current processes. It’s equivalent to a registry of all vehicles currently on the road. The output includes columns for USER, PID, %CPU, %MEM, VSZ, RSS, TTY, STAT, START, TIME, and COMMAND. Here, PID is what we’re interested in.

For instance, you may find a line like this in the output:

root      1478  0.0  0.3 116952  7448 ?        Ss   Jun28   0:06 /usr/sbin/cron -f

Here, ‘1478’ is the PID, which is unique to this process.

Using ‘kill’ Command

Once you’ve identified the PID, the kill command is your tow truck. You can use it to terminate the process. Here’s an example:

kill 1478

This command sends a ‘SIGTERM’ signal to the process with PID 1478, asking it to terminate itself gracefully. It’s like a tow truck trying to nudge a broken-down car to the side of the road.

Common ‘kill’ Options

Different situations may call for different strategies. Here are a few options you can use with the kill command:

  1. Soft Kill (SIGTERM): This is the default signal sent by kill. The command kill 1478 or kill -SIGTERM 1478 both achieve this. It’s like asking the driver (the process) to move their car (terminate) politely. If the process is well-behaved, it will comply.
kill 1478
kill -SIGTERM 1478
  1. Hard Kill (SIGKILL): This signal is used when a process won’t terminate with SIGTERM. The command is kill -SIGKILL 1478 or kill -9 1478. This is the equivalent of forcibly towing away the broken-down vehicle. Be careful with this option, as it doesn’t allow the process to clean up its resources.
kill -SIGKILL 1478
kill -9 1478

Using ‘killall’ Command

The killall command is another powerful tool in your arsenal. It allows you to terminate all processes with a specific name, which is akin to removing all cars of a certain make or model from the road. Here’s an example:

killall cron

This command sends a termination signal to all instances of ‘cron’ running on your system.

When to Use ‘killall’

killall is particularly useful when you want to terminate multiple instances of a process at once. However, be aware that it is a potent command and, if used carelessly, can cause system instability. It’s like removing all cars of a specific model from the road – it might clear the

traffic, but it could also cause problems if those cars were actually important for the city’s functioning.

Conclusion

Process management is an integral part of Linux system administration. It involves viewing, managing, troubleshooting, and sometimes killing processes. It’s like managing traffic in a bustling city. Understanding how to use tools like ‘ps‘, ‘top‘, ‘htop‘, ‘kill‘, and ‘killall‘ will help keep your system running smoothly and avoid gridlocks. So keep honing your skills and happy driving on the highway of Linux processes!

August 25, 2023 0 comments
2 FacebookTwitterPinterestEmail
Newer Posts
Older Posts

Recent Posts

  • Creating Custom Nginx Rules for Different Subdomains in DirectAdmin
  • Nginx Reverse Proxy for Nextcloud: A Guide
  • How to Reverse Proxy in DirectAdmin with Nginx_Apache
  • How to install Python 3.10 on RHEL
  • How to install Python 3.10 on Ubuntu 20.04

Recent Comments

  1. Daron Buesgens on Introduction to PHP Server-Side Scripting Language
  2. Tim Slosek on How to install Python on CentOS 8
  3. аналитика леонида малолетова on 15,000 WordPress Sites hacked with Malicious Redirects
  4. 076 on Websites Posing as MSI Afterburner That Spread CoinMiner
  • Home
  • Tools
    • CHMOD Calculator
    • Subnet Calculator
  • Linux Guides & Tutorials
    • Beginner Guides
    • Linux Installation Tutorials
    • Command Line Tutorials
    • Server Administration Guides
    • Security Tutorials
    • Database Tutorials
    • Open-Source Software
      • Nextcloud Guides
      • Apache
    • Operating Systems
      • Ubuntu
      • RHEL/Rocky/Alma
  • Ransomware News
  • Cybersecurity Laws and Regulations

Recent Posts

Creating Custom Nginx Rules for Different Subdomains in DirectAdmin
Nginx Reverse Proxy for Nextcloud: A Guide
How to Reverse Proxy in DirectAdmin with Nginx_Apache
How to install Python 3.10 on RHEL

Most Viewed

Best Linux distribution (distros) in 2022
15,000 WordPress Sites hacked with Malicious Redirects
How to Install Python 3.9 on Ubuntu 18.04
6aabc923d85895a8823d81efa5e551d7
PCPlanet – Tech Blogs | Information
  • Home