PCPlanet – Tech Blogs | Information
  • Home
  • Tools
    • CHMOD Calculator
    • Subnet Calculator
  • Linux Guides & Tutorials
    • Beginner Guides
    • Linux Installation Tutorials
    • Command Line Tutorials
    • Server Administration Guides
    • Security Tutorials
    • Database Tutorials
    • Open-Source Software
      • Nextcloud Guides
      • Apache
    • Operating Systems
      • Ubuntu
      • RHEL/Rocky/Alma
  • Ransomware News
  • Cybersecurity Laws and Regulations
Top Posts
How to install Emby Server on Ubuntu
Best Linux distribution (distros) in 2022
15,000 WordPress Sites hacked with Malicious Redirects
How to Install Python 3.9 on Ubuntu 18.04
How to Install Python 3.9 on Ubuntu 16.04
How to Install MongoDB on Ubuntu 16.04 to...
How to enable HSTS on Apache
How to install Python on CentOS 8
How to install PHP 8.1 on RHEL based...
Comment activer HSTS pour Apache
Navigating CVE-2023-49103: Proactive Defense for ownCloud
Tuesday, July 8, 2025
PCPlanet – Tech Blogs | Information
  • Home
  • Tools
    • CHMOD Calculator
    • Subnet Calculator
  • Linux Guides & Tutorials
    • Beginner Guides
    • Linux Installation Tutorials
    • Command Line Tutorials
    • Server Administration Guides
    • Security Tutorials
    • Database Tutorials
    • Open-Source Software
      • Nextcloud Guides
      • Apache
    • Operating Systems
      • Ubuntu
      • RHEL/Rocky/Alma
  • Ransomware News
  • Cybersecurity Laws and Regulations
Copyright 2021 - All Right Reserved
LinuxUbuntu

How to install Emby Server on Ubuntu

by pcplanet July 8, 2022
written by pcplanet 3 minutes read

Emby Server is a powerful, open-source media solution that allows you to create your own personal streaming platform. With its user-friendly interface and extensive features, Emby simplifies the process of organizing and accessing your multimedia library from any device. In this comprehensive guide, we’ll walk you through the step-by-step installation and configuration of Emby Server on Ubuntu 20.04, along with expert tips to enhance performance and user experience.

https://emby.media/

Prerequisites:

  • A server running Ubuntu 20.04
  • SSH access to the server
  • Basic knowledge of Linux commands

Install Emby Server on Ubuntu

For the sake of this post, I have Ubuntu 20.04 server set up and running on a separate server. Therefore, most of the time I will connect to the server via SSH.

Step 1. Update Ubuntu

Before starting to install emby server on ubuntu, it’s crucial to ensure that your Ubuntu system is up to date. Open your terminal and run the following command:

Bash
sudo apt update && sudo apt upgrade

Step 2. Install Emby Server

To install Emby Server on ubuntu, you’ll need to download the appropriate package. Use the following command to download the latest stable release:

Bash
Wget https://github.com/MediaBrowser/Emby.Releases/releases/download/4.7.5.0/emby-server-deb_4.7.5.0_amd64.deb
sudo dpkg -i emby-server-deb_4.7.5.0_amd64.deb

Once the installation is complete, verify that the Emby service is running:

Bash
sudo systemctl status emby-server.service
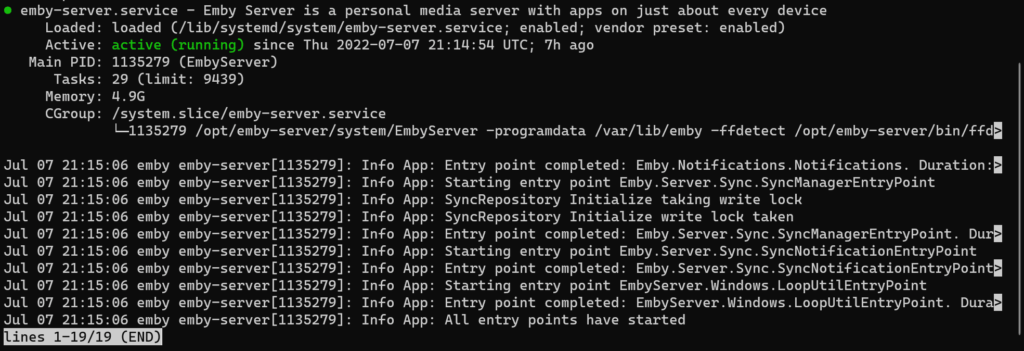
emby cli service information

Step 2.1 Install Emby Server Beta

If you prefer to use the beta version of Emby Server on ubuntu, follow these steps instead:

Bash
Wget https://github.com/MediaBrowser/Emby.Releases/releases/download/4.8.0.21/emby-server-deb_4.8.0.21_amd64.deb
sudo dpkg -i emby-server-deb_4.8.0.21_amd64.deb

Alternatively, you can use curl:

Bash
curl -O https://github.com/MediaBrowser/Emby.Releases/releases/download/4.8.0.21/emby-server-deb_4.8.0.21_amd64.deb
sudo dpkg -i emby-server-deb_4.8.0.21_amd64.deb

Step 3. Configure Emby

To access the Emby web interface, open a browser on another device connected to the same network and enter the server’s IP address followed by port 8096:

Bash
http://x.x.x.x:8096

The first step is to pick a language of preference.
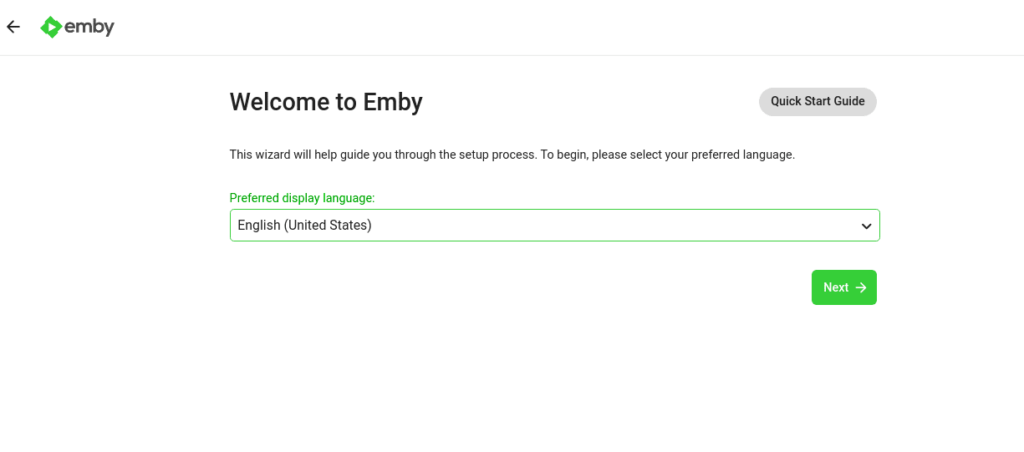
Create a new user by pressing Next.
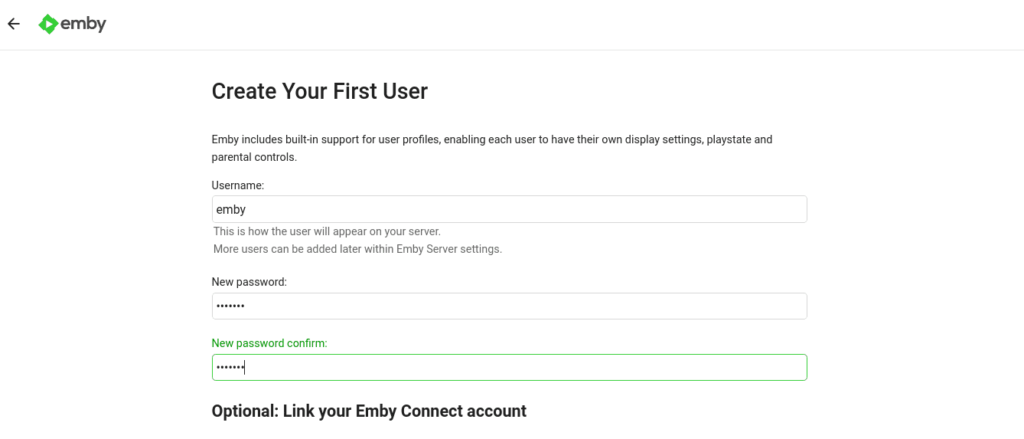
After that, we may begin building our media collections. For the time being, you may just click the next button.

Next, set up remote access. Emby can be accessed remotely in this scenario.
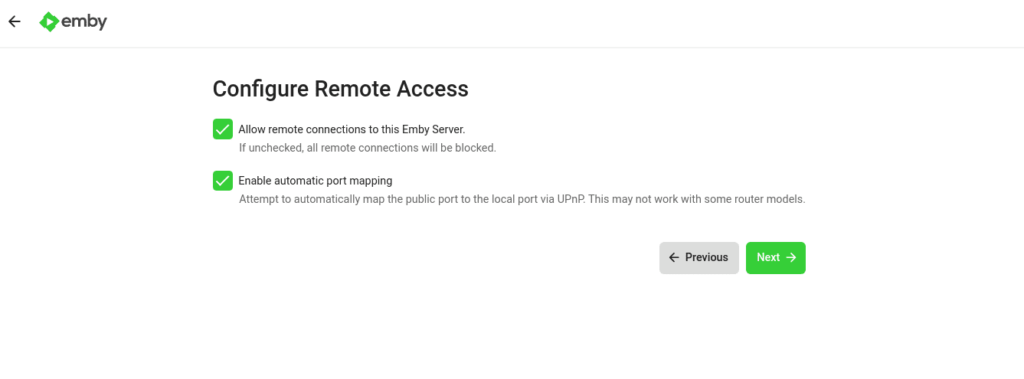
Finally, we’re all set.
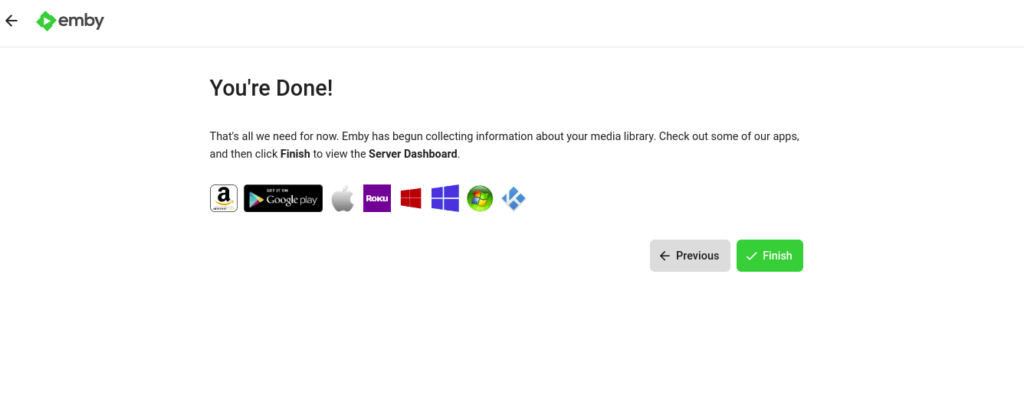
There is now a working emby server on ubuntu on the network. Adding your music and movies is all we need to do.

TIPS

Better performance

If you want better performance, I would highly suggest you use HTTPS when connecting externally. HTTP is not able to use HTTP/2 and is limited to http1.1. HTTPS on the other hand is able to provide better bandwidth and better performance due to the support of HTTP1.1 and most importantly, HTTP/2.

See here for more information about HTTP/2

HTTP/2 is able to handle multiple streams in a single connection while http1.1 sends them 1 by 1 and can have a hold up.. In the newer versions, emby has been confirmed having support for it

https://emby.media/community/index.php?/topic/36187-server-upgrade-code-to-http2-http11-successor/

Reverse Proxying

If you can avoid using a reverse proxy and let emby through the firewall using Port forward, 1:1 NAT, or any of the other ways described above, that would be the best way to use emby.

Otherwise, head into your reverse proxy server and open up either /etc/nginx/nginx.conf or /etc/apache2/sites-enabled/*.conf

Replace x.x.x.x with your emby machine ip and port if it applies.

NGINX

Bash
proxy_pass http://x.x.x.x:8096/;

Apache / HTTPD

Bash
ProxyPreserveHost On
proxypass / http://x.x.x.x:8096/
ProxyPassReverse / http://x.x.x.x:8096/
July 8, 2022 0 comments
1 FacebookTwitterPinterestEmail
LinuxUbuntu

Troubleshooting a Linux Web Server

by pcplanet July 7, 2022
written by pcplanet 3 minutes read

Introduction

At some point, everyone’s web server or site will have issues. As soon as you discover a problem, it’s important to know where to search and which components are most likely to be responsible.

This article will teach you how to fix these problems and get your website up and running again.

What are the most common issues?

While setting up a website, you’ll meet a wide range of issues that fall into predictable categories.

These will be discussed in further detail in the parts that follow, but first, here is a quick rundown of what you should bear in mind:

  • Is your web server up and operational?
  • Is your web server’s configuration file syntax correct?
  • Ensure that the ports you’ve specified are accessible (i.e., not blocked by firewalls).
  • Ensure that your DNS settings are accurate.
  • Is the root of your document pointing to where your files are?
  • Are the file and directory permissions and ownerships, correct?
  • Are you limiting access using your configuration files?
  • Is your database backend up and running?
  • Can your site properly connect to the database?

When a website stops functioning properly, administrators often encounter these issues. Examining the log files of various components and consulting error pages shown in your browser typically helps narrow down the specific problem.

So that you can ensure your services are set appropriately, we’ll go through each situation below.

THE LOGS!

Check the logs of your web server and any associated components before attempting to hunt down an issue blindly. These are often located in a service-specific subfolder of /var/log.

For instance, if you have an Apache server running on an Ubuntu server, by default the logs will be kept in /var/log/apache2. Look through the files in the directory below to see what kind of error messages are being generated. Any troublesome database backend logs may also be found in the “/var/log” directory.

Whether the processes themselves provide you error messages when the services are launched is another item to look at. If you try to access a website and encounter problems, the error page may also include useful information (although not as specific as the lines in the log files).

Try using a search engine to look for pertinent data that might lead you in the proper way. To locate other instances of the same problem, you might often find it useful to immediately put a portion of your logs into a search engine. You may continue your troubleshooting using the procedures listed below.

Is your Web Server Installed?

A web server is probably the first thing you’ll need to make sure your sites work right. In some cases, your web pages may be served directly by a Docker container or another application, and you won’t need to install a dedicated web server. However, most deployments will still have at least one web server.

Most people will have managed to install a server before reaching this point, but in some cases, you may have uninstalled the server by accident while doing something else with the package.

If you want to install the Apache web server on an Ubuntu or Debian system, you can type:

sudo apt-get update
sudo apt-get install apache2

The Apache process on these systems is called apache2.

If you are using Ubuntu or Debian but want the Nginx web server, you can type:

sudo apt-get update 
sudo apt-get install nginx

The Nginx process on these systems is called nginx.

If you are using RHEL, Rocky Linux, or Fedora and want to use the Apache, you can type:

sudo dnf install httpd

On these systems, httpd is the name of the Apache process.

You can type this if you are using RHEL, Rocky Linux, or Fedora and need to use Nginx. Again, if you are logged in as root, take out the “sudo”:

sudo dnf install nginx

On these particular machines, the Nginx process is referred to simply as nginx. On these RPM-based distributions, unlike Ubuntu, Nginx is not immediately launched after being installed. This contrasts with Ubuntu. Continue reading to find out how to get things going.


July 7, 2022 0 comments
1 FacebookTwitterPinterestEmail
LinuxUbuntu

How to install Ubuntu 16.04 to 22.04 LTS Desktop

by pcplanet June 16, 2022
written by pcplanet 7 mins read

Introduction

We will show you the steps on how to install Ubuntu on your machine/VM/VPS.

April 21, 2022 saw the release of Ubuntu 22.04 (also known as Jammy Jellyfish). It’s a Long-Term Support (LTS) release, which means it’ll be supported and updated through April 2027.

New Features

  • Creating Custom Nginx Rules for Different Subdomains in DirectAdmin
  • Nginx Reverse Proxy for Nextcloud: A Guide
  • How to Reverse Proxy in DirectAdmin with Nginx_Apache
  • How to install Python 3.10 on RHEL
  • How to install Python 3.10 on Ubuntu 20.04
  • Using zswap, the brand new Ubuntu 22.04 will be able to support Raspberry Pi models with a minimum of 2 GB of RAM. This is something that was previously impossible to do.
  • Grub 2.06 will not automatically scan for additional operating system installations and add them to the boot menu if it finds them. By the time the next release is made available, it may actually be fixed (read: returned to its normal behaviour).
  • A new In-kernel SMB server will enable Samba servers to share files more quickly and provide additional functionality.
  • New hardware support for AMD CPUs and GPUs, as well as Apple’s M1 chip, Intel Alder Lake CPUs, and other hardware, will also be included in the update.
  • The most recent daily builds of Ubuntu 22.04 have a notification that appears whenever the user logs in, asking them if they would like to enable Ubuntu Pro.

Prerequisites

  • System requirements (recommended):
    • 2 GHz dual-core processor
    • 4GB memory
    • 25GB available disk space for storage (less if installing the minimal version)
    • DVD drive or USB port
  • At least a 4GB USB drive

Step 1: Download the Installation Media

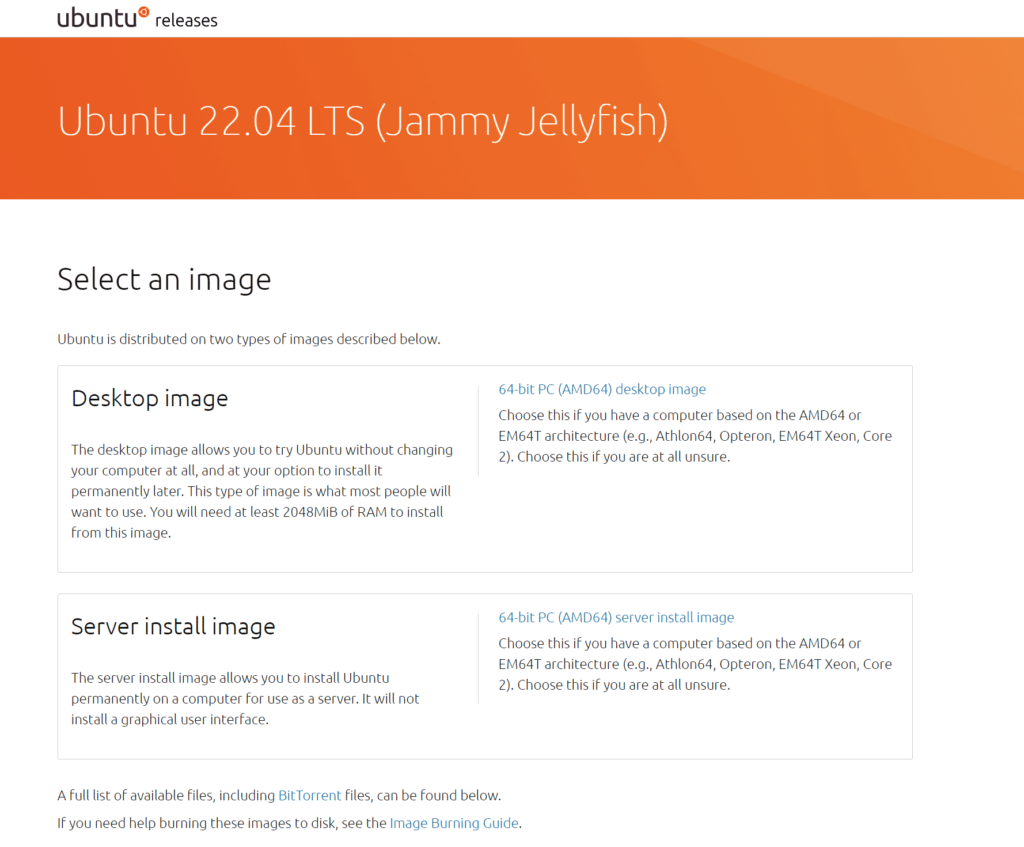
In a web browser, navigate to the Ubuntu download page and select the Ubuntu version that is appropriate for your machine. The most prevalent variations are as follows:

  • Desktop
  • Server
  • Ubuntu Flavors

When you’ve found the right version, download it. Your download should begin. (For desktops, we will download and install Ubuntu 22.04.)

Save the file to a convenient location.

Note: If you’re installing to a virtual computer (such as VirtualBox), you can immediately mount the.iso image.

Step 2: Create Bootable USB

You’ll need a USB drive with at least 4 GB of storage. The USB drive will be wiped clean after this procedure. Make a copy of any data that is currently stored on the flash device.

Option 1: Create a Bootable USB Drive on Ubuntu

Use the Creation startup disk tool:

  1. Type “create startup” into a search box.
  2. Choose USB disc from the Software Center’s Install option, and then open the utility to install it.
  3. Click Other in the top pane, then browse and pick the.iso file you downloaded for Ubuntu 22.04.
  4. Select your USB drive from the list in the bottom pane.
  5. Make a startup disc by clicking the Make startup disc button.

Option 2: Create Bootable USB Drive on Windows

To make a USB flash drive bootable, you’ll need to download and run Rufus, a third-party application.

Start by downloading the Rufus tool.

Once you’ve downloaded the file, you can run it.

A new window or dialogue box will appear. You’ll be asked whether you want to go online and see if there are any new updates. Select No from the drop-down menu (or yes, your choice, really).

Rufus is now running in the background. You should be able to view the USB drive as soon as you plug it in.

  • Write data to the USB drive by selecting it as the target device.
  • You can select either a disc or an ISO image from the Boot Selection drop-down menu.
  • Right-click on the Select button and select the desired option.
  • Open the.iso Ubuntu file that you downloaded previously and choose it.

Step 3: Boot up the Ubuntu installation from USB

  1. Shut off your computer. Check to see if there are any other USB devices connected to the computer. Remove non-relevant sticks
  2. Plug the Ubuntu USB stick into your computer and turn it on.

One of the following three possibilities exists:

  • The computer boots the USB drive automatically.
  • You need to manually configure USB booting in the Boot Menu or BIOS/UEFI.
  • You need to press the boot menu key and select the USB drive

To manually initiate it:

  1. As soon as the computer turns on, touch the boot menu key around twice per second to manually configure the boot sequence.

Your computer’s manufacturer may have a different boot menu key. Boot keys connected with a certain brand are listed below:

ManufacturerKey
AsusF8 or Esc
AcerF12, F9 or Esc
CompaqF9 or Esc
DellF12
FujitsuF12
HPF9 or Esc
LenovoF8, F10 or F12
SamsungF2, F12 or Esc
ToshibaF12
  1. Once you see your boot menu, use the arrows to pick the Ubuntu media to boot from. For a DVD, the entry will usually have DVD or Optical in the name. USB is typically labeled USB.

Your system should start loading the Ubuntu live disc menu.

Note: If you are experiencing issues when booting the USB from the boot menu, try to boot the USB from BIOS/UEFI.

Step 4: Run Ubuntu

Before you fully commit to installing Ubuntu 22.04, you have the option to try it first. The.iso file has a live mode that can only be executed in memory.

Image

Step 5: Install Ubuntu 22.04 LTS Desktop

To begin the installation, click Install Ubuntu.

You may choose the layout of your keyboard

The system will choose English by default.

You may pick a non-standard keyboard from the drop-down menu. Alternatively, you may click on Detect Keyboard Layout to have the system pick your keyboard for you. Use the designated box to check your keyboard.

Click Continue when you’re ready.

Select Starting Applications

  • Normal Installation – You’ll find all of your favorite applications, games, and media players on this Ubuntu Desktop.
  • Minimal Installation – If you don’t plan on utilizing media players or productivity applications, this is a good option for saving space on your computer’s hard drive.

You’ll be asked to confirm other options as well:

  • Download updates while installing Ubuntu – During the installation process, this takes care of downloading any big package files that may be required. When the installation process is complete, the packages will be in a state where they are ready to be updated.
  • Install third-party software for graphics and Wi-Fi hardware and additional media formats – Some pieces of hardware, including as graphics cards and wireless network interface cards, do not have support for open-source driver software. Additionally, the GPL licence does not apply to all video formats; this includes the.wmv file extension, for example. If you want assistance with these, you will be required to consent to extra terms and conditions of use.

Disk Partitioning

After that, a dialogue box titled Installation Type will appear before you. By selecting the Erase disc and install Ubuntu option before installing Ubuntu, you will be able to thoroughly clean the hard drive. If you want to proceed in this manner, you may go on to the following stage.

Users with advanced skills may choose to change the Advanced Features section. You may select your own disc partitions with this, as well as configure other advanced options:

  • With the latest Ubuntu installation, use LVM: LVM is an abbreviation for Logical Volume Management. This is a utility for managing various virtual discs on your system in real time. It’s like an improved version of the gparted utility.
  • Encrypt Ubuntu for security: This encrypts the contents of the storage device. You will have the option to choose a security key, which will be needed to decrypt and use the drive.
  • Experimental: Erase disk and use ZFS:  ZFS stands for Zettabyte File System, but it’s evolved into a file system and volume management in one. Use caution when using this setting on critical production systems.

Click Something Else if you’d like to create your own hard disc partitions from the ground up.

Creating your own partition table and logical discs may be done on the following screen. Using this, you may partition a hard disc into many sections. The operating system treats partitions as separate discs.

Note: Some people build a second partition for their /home directory. If the operating system must be reinstalled, the /home directory partition remains unharmed.

To apply the modifications to the drive partitions, click Continue.

You’ll be prompted to Write disc changes? Before clicking Continue on this page, none of the settings you’ve picked are permanent until you’ve clicked Continue to continue.

Select Time Zone

Once the system has formatted the disc partitions, the installation will prompt for confirmation, Where are you?

Enter the name of the nearest major city, and the system will determine your local time zone.

Click Continue.

Note: It is always possible to alter the timezone on Ubuntu in the future.

Create User Account

Next, you’ll need to configure a user account. Fill in the following fields:

  • Name: Your actual name.
  • Computer name: This is the hostname or network name.
  • Username: The user account name you want to use.
  • Password: Enter and confirm a strong password – the installer will automatically evaluate your password strength.
  • Log in automatically: This is not recommended for publicly accessible servers.
  • Require my password to log in: This is recommended for publicly accessible servers.

Click Continue to install Ubuntu.

Once the installer finishes, remove the Ubuntu installation media. You’ll be prompted to Restart Now.

The system should boot into your fresh Ubuntu install 22.04.

Check out this guide to get familiar with Ubuntu!

June 16, 2022 0 comments
1 FacebookTwitterPinterestEmail
LinuxUbuntu

Introduction to Ubuntu 16.04/18.04/20.04/21.04

by pcplanet June 14, 2022
written by pcplanet 5 min read

What exactly is Ubuntu?

Canonical manages Ubuntu, a major Linux distribution and open-source operating system. Canonical provides support and security upgrades for all Ubuntu releases and manages the project’s continuous development. Ubuntu comes in several versions, including core, server, and desktop, allowing it to run on a variety of computers. It may be utilized on desktop PCs, servers, supercomputers, cloud computing, and other platforms.

Why should you use Ubuntu?

Ubuntu is popular for a variety of reasons, including its appeal to builders seeking a free, open source solution that is safe and simple to use. Ubuntu is well-supported among the Canonical community due to the popularity of the software and the collaborative nature of open source. The operating system is user-friendly and configurable, and Ubuntu’s OS provides better security.

Ubuntu Installation

The installation of Ubuntu is simple, and the basic configuration of your server can be completed simply.

Create a new user as root. You’ll need your server’s public IP address and the root password or private key (if you installed an SSH key for authentication). After logging in as root, you can add a new user and apply administrative rights. Set up SSH for the new user if you need to. After making a regular user, let other people access the account from the outside and SSH into it.

Next, a firewall needs to be put in place. The Uncomplicated Firewall (UFW) is built into Ubuntu 20.04 servers to make sure that connections can only be made to certain services.

Finally, you may install whatever software you require on your server!

Check this article out for a step-by-step guide to installing Ubuntu

Getting to Know the Command Line

Linux beginners should learn the terminal. When dealing with a Linux server, understanding the Linux terminal and running commands through the command line is an excellent place to start. Because most users use a GUI for day-to-day computing, Linux includes a terminal emulator that allows the terminal to be used in a graphical environment.

The shell is a command-line interface in the Linux system that interprets a user’s commands and script files and instructs the server’s operating system what to do with them. After connecting to your server with SSH, you’ll be taken to a remote shell, or command prompt, from which you can issue commands to the server.

Ubuntu 20.04 includes many common Linux utilities by default. Some tools navigate the file system, others install software, and others customise the system and apps. There are several ways to execute commands. This lesson explains command execution basics.

Configuration examples for servers

Installing Webmin on your Ubuntu server or configuring your server to use SSH keys are two common methods for configuring your Ubuntu servers. SSH, which stands for “secure shell,” is a protocol used to manage servers and encrypt communications with them. Installing Webmin gives you the ability to administer your server through a browser-based interface, making it simple for you to manage user accounts, configure DNS settings, and perform other administrative tasks.

Basically, Webmin is the free-ish alternative to cPanel. I highly suggest Webmin/Virtualmin

Software installation and setup

Check this article out for a step-by-step guide to installing Ubuntu

Installing software on your server can begin once you have established remote access to the server using SSH and have configured a firewall. We’ll show you how to use some common software that you might find useful as you get started with Ubuntu 20.04:

  • VNC is a connection system that lets you interact with a remote graphical desktop using your local keyboard and mouse. It simplifies managing files, software, and settings on a remote server for users unfamiliar with the command line. To install VNC on an Ubuntu 20.04 server, first set up a VNC server using TightVNC and then connect using an SSH tunnel.
  • Containers are lightweight, isolated environments for running apps. Containers let you develop and deploy apps on your server. Containerizing a Laravel application for development uses Docker Compose. Application development, testing, and deployment are all done in containerized environments.
  • On your Ubuntu 20.04 server, Nextcloud gives you a central place to store personal files like photos and documents. Nextcloud, an open-source cloud service, gives you full control over your private data.
  • TensorFlow is a machine learning library available under an open-source licence. It helps teach neural networks. TensorFlow on Ubuntu 20.04 allows you to create computer vision, NLP, and sequence modelling projects.
  • Postfix is a well-known and widely used mail transfer agent that is open source (MTA). In order to deliver and route email on a Linux system, you will need to install Postfix on your Ubuntu 20.04 server.
  • Install LEMP (Linux, nginx , MySQL, PHP/Perl/Python), on your Ubuntu 20.04 server to serve PHP web pages and applications. Nginx serves web pages in LEMP, MySQL stores backend data, and PHP handles dynamic processing.
    If you want to host dynamic PHP websites and web applications on Ubuntu 20.04 via Apache, install a “LAMP” (Linux, Apache, MySQL, PHP/Perl/Python) stack.
  • Python excels in scripting, automation, data analysis, machine learning, and back-end development. Python inspired its name. This tutorial will help you install Python on Ubuntu 20.04 and set up a programming environment.
  • Elastic’s Elastic Stack enables centralized logging with open-source software. Elastic Stack lets you search, analyze, and visualize logs from any source in any format.

Ubuntu is a great option if you want a cloud-friendly, versatile, and community-supported operating system. If you want these features, use Ubuntu. Developers looking for Ubuntu 20.04 resources should read our community articles.

June 14, 2022 0 comments
1 FacebookTwitterPinterestEmail
LinuxUbuntu

How to Install Samba & Configure Samba on Ubuntu

by pcplanet June 12, 2022
written by pcplanet 3 min read

1. Overview

A Samba file server allows file sharing over a network between multiple operating systems. It allows you to share files with Windows and macOS users and access your desktop files from a laptop.

This guide covers the installation and configuration of Samba on Ubuntu.

What you’ll learn

  • How to set up a Samba file server
  • How to share files across a local network

What you’ll need

  • Ubuntu 16-21.04 LTS
  • A Local Area Network (LAN) to share files over

If you have everything ready, let’s dive straight into the installation process on the next step!

2. Installing Samba File Share server

To install Samba, we run:

sudo apt update
sudo apt install samba

We can check if the installation was successful by running:

whereis samba

The following should be its output:

samba: /usr/sbin/samba /usr/lib/samba /etc/samba /usr/share/samba /usr/share/man/man7/samba.7.gz /usr/share/man/man8/samba.8.gz

Now that Samba has been installed, we need to make a directory that it can share with other computers:

mkdir /home/<username>/sambashare/
The command that you just ran creates a new folder in our home directory called sambashare. We will share this folder later.

The file that is used to configure Samba may be found in the /etc/samba/smb.conf directory. Editing the file in the following manner allows us to make the new directory available for sharing:

sudo nano /etc/samba/smb.conf

Add the lines that are shown below at the very end of the file:

[sambashare]
    comment = Samba on Ubuntu
    path = /home/username/sambashare
    read only = no
    browsable = yes

Then, to save your work and leave the nano text editor, hit the Ctrl-S and Ctrl-X keys simultaneously.

What we’ve just added

  • comment: A brief description of the share.
  • path: The directory pertaining to our shared files.
  • read only: Only when the value of this directive is set to “no” is the user permitted permission to make changes to the contents of the shared folder.
  • browsable: If set to yes, file managers like Ubuntu’s default file manager will list this share under “Network” (it could also seem to be accessible).

Now that our new share has been set up, let’s save the configuration and restart Samba so that it can take effect.:

sudo service smbd restart

Modify the firewall rules so that Samba traffic can get through:

sudo ufw allow samba

4. Creating User Accounts and Establishing a Connection to the file share

Because Samba doesn’t use the password for the system account, we need to set up a password specifically for our user account in Samba:

sudo smbpasswd -a username

Note
In order to be saved, the username entered must be associated with a system account.

Establishing a Connection with the Share server

On Ubuntu: Launch the file manager that is installed by default, click the Connect to Server button, and then enter:

On macOS: In the Finder menu, click Go > Connect to Server then enter: macosctn

On Windows, open up File Manager and edit the file path to:

\\ip-address\sambashare

Note: ip-address is the Samba server IP address and sambashare is the name of the share.

You’ll be prompted for your credentials. Enter them to connect! 

Samba

June 12, 2022 0 comments
1 FacebookTwitterPinterestEmail
LinuxUbuntu

Install and Configure Virtualmin & Webmin on Ubuntu 16.04 to 22.04

by pcplanet June 12, 2022
written by pcplanet 6 minutes read

Virtualmin is an open-source web hosting and cloud control panel. Virtualmin has the right features and controls over managing all the different domains at the same portal. It allows access to the server via an SSL-encrypted HTTP line. For example,. via a standard browser and provides a clear user interface.

Virtualmin is free, although it has a paid version called Virtualmin PRO that offers specialized support and includes more tools than the normal version.

In this article, you will learn how to install Virtualmin Ubuntu control panel on 20.04 LTS Server.

Prerequisites:

A fully qualified domain name (FQDN) ***Optional: mostly used if you have an external server such as a VPS***

You need to have root access on your server through SSH for this guide to work.

Main Installation:

Step # 1: Update server and all install packages:

First, make sure all the existing packages on your system are up to date.

apt update
apt upgrade

OR

 apt upgrade -y
 hostnamectl set-hostname host1.virtualmin.com
 vi /etc/hosts

Step # 3: Download the Virtualmin installation script.

let’s download the install script using wget that will install both Webmin and Virtualmin on our Ubuntu 20.04 server.

 wget http://software.virtualmin.com/gpl/scripts/install.sh

Step # 4: Make the script executable.

Now, change to permission of install.sh so that we can execute it on the system.

 chmod a+x install.sh

Step # 5: Run the script to install both Webmin and Virtualmin.

./install.sh

Step # 6: Allow access to Virtualmin through the firewall.

Make sure that Virtualmin port: 10000 is allowed in your network/firewall.

ufw allow 10000

Step # 7: Access virtialmin url on web browser:

Navigate to port 10000 at the server’s fully qualified domain name to access the Virtual Web Interface using server DNS or server IP address. For example:

http://x:10000

As you see the login page.

Enter your server’s root username and its password. Example username– root password– the one you have set for the root user on your server.

Finally, you will have the Dashboard from where you can access the various settings and options required to start hosting websites.

Post-Installation of Virtualmin Server:

Step 1: Post-Installation wizard

This post-installation wizard allows you to configure Virtualmin optimally for your system. You can make selections depending on whether you want to host websites, email, or databases, and based on your system’s memory and CPU power.
To continue, click the Next button below. To skip it and use the default settings, click Cancel.

Step 2: Memory use

Virtualmin can be tuned to improve performance in its user interface and email processing but at the cost of increased memory use. The best choice depends on how your system will be used. Thus, as per your need select the options or leave the default as it is.

Step 3:  Enable virus scanning with ClamAV:

If your system is going to host domains that will receive a large amount of email, scanning incoming messages for viruses can generate a high CPU load. Because scanning is done using the ClamAV scanning server clamd, it will consume RAM even when not processing email. If your system will not be hosting email, virus scanning can be disabled. Or let it be on-demand scanning

Step 4: Run SpamAssassin server filter? 

If your system is going to host domains that will receive a large amount of email, filtering incoming messages for spam can generate a significant CPU load. This is due to CPU use by the SpamAssassin mail filter when it is started, which can be avoided by running the SpamAssassin filter server spamd in the background. This consumes RAM, but reduces CPU load and makes mail processing faster.

Step 5: Working with VirtualMin

 Virtualmin supports both the MySQL and PostgreSQL database servers, but you might

want to run only one (or neither) on your system. Each consumes RAM when running, even if they are not being used.
Depending on the websites and applications you plan to host, running MySQL only may be enough, as most web applications do not support or require PostgreSQL. If your system will only be used for mail or DNS hosting, there is no need to run either.

Step 6: DNS Zones

For DNS zones created by Virtualmin to be resolvable, the primary nameserver record for each zone must be set to something that can itself be resolved by other systems on the Internet.

Just hit the Next button and Virtualmin will automatically set it after ensuring the availability of the same.

Step 7: Password Storage

Virtualmin gives you the option of storing plain-text passwords for virtual servers and mailboxes or storing only one-way encrypted (hashed) passwords. Plain text passwords are more convenient, but less secure if your system is compromised.

Remember:  when hashed passwords are used, password recovery for virtual servers will no longer be possible. In addition, the MySQL password for new servers will be different from the administration password and will be randomly generated.

Step 8: Webmin and databases

To prevent other users on your system from managing the MYSQL database, a password for the root user should be set.

MYSQL can be configured to trade off memory use for performance, depending on how much Ram your system has and how heavily you expect the database to be used. Select the options as per your requirements.

Virtualmin can create a default virtual server that will serve web requests to your system that don’t match any other domain. It can also be used to request a Let’s Encrypt SSL certificate for use by Virtualmin’s own UI.

Virtualmin post-installation configuration is now complete! Press Next.

Checking the configuration

 Virtualmin configuration has not been checked since it was last updated. Click the button below to verify it now.

Just click on the Re-check and refresh configuration.

 The status of your system is being checked to ensure that all enabled features are available that the mail server properly configured and that quotas are active..

By default, if you access the domain set on Virtualmin, the host1 HTML page will appear saying “Under construction”.

Virtualmin on Ubuntu 20.04

Final steps for intalling Virtualmin on Ubuntu 20.04

Now, if you want to install any content management system such as WordPress, click on the Filemanager, under Public_html you will find the index.html file. Delete it and upload the WordPress file there by clicking on the File menu and corresponding upload option. Once that is done. Create a database using Webmin. After that refresh, your domain URL showing the Under construction page. Thiis time you will see the WordPress setup page, furnish the required details.

June 12, 2022 0 comments
1 FacebookTwitterPinterestEmail
LinuxUbuntu

How to install MySQL on Ubuntu 16.04 to 22.04 (CLI)

by pcplanet June 12, 2022
written by pcplanet 2 mins read

Introduction

In this tutorial, we will explain how you need to install MySQL on Ubuntu 21.04 and Ubuntu 20.04. MySQL uses a relational database and SQL (Structured Query Language) to manage its data. It is an open-source database management system. That is commonly used in the popular LAMP (Linux, Apache, MySQL, PHP/Python/Perl) stack.

Prerequisites

To follow this tutorial you’ll need the following:

  • One Ubuntu 20.04 server including a non-root user or a root user account.
    • Make sure you’ve installed Ubuntu correctly, follow this guide if you need to do it still!

Short Version

The short version of the installation is very simple. You need to update the package manager. After that you need to install MySQL and start the configuration. Use the following commands.

sudo apt-get update -y
sudo apt-get install mysql-server -y
mysql_secure_installation

Detailed Version

Step 1 – Installing MySQL

We first need to update the package manager to get the newest available packages. Use the following command:

sudo apt-get update -y

Now we can install MySQL. Use the following command:

sudo apt-get install mysql-server -y

Step 2 – Configuring MySQL

For a fresh installation of MySQL you probably want to run the security script that comes with it. This script will ask you a couple of questions regarding security. Awnser them to your likings. To run the script you’ll need to run the following command:

mysql_secure_installation

Step 3 – Testing MySQL

When installed MySQL should have started running automatically. This can be checked with the following command.

systemctl status mysql.service

You’ll see output similar to this.

* mysql.service - MySQL Community Server
     Loaded: loaded (/lib/systemd/system/mysql.service; enabled; vendor preset:>
     Active: active (running) since Fri 2022-04-01 15:47:58 CEST; 18min ago
    Process: 3494 ExecStartPre=/usr/share/mysql/mysql-systemd-start pre (code=e>
   Main PID: 3502 (mysqld)
     Status: "Server is operational"
      Tasks: 37 (limit: 2217)
     Memory: 352.7M
     CGroup: /system.slice/mysql.service
             |___3502 /usr/sbin/mysqld

Apr 01 15:47:57 ubuntu-115 systemd[1]: Starting MySQL Community Server...
Apr 01 15:47:58 ubuntu-115 systemd[1]: Started MySQL Community Server.

This output shows that MySQL is up and running

June 12, 2022 0 comments
1 FacebookTwitterPinterestEmail
LinuxUbuntu

How to Add User to Sudoers in Ubuntu

by pcplanet June 12, 2022
written by pcplanet 3 mins read

sudo is a command-line utility that enables authorized users to run commands as root or another user.

This article will demonstrate two methods for granting sudo capabilities to a user.

The first step is to include the user in the sudoers file. This file lists which users and groups have sudo rights and how much those rights give them.

The second way is to add the user to the sudoers file’s sudo group. On Ubuntu and Linux Mint, which are both based on Debian, all members of the “sudo” group have sudo privileges automatically granted to them when they log in.

Incorporating users into the sudo group

The simplest approach to provide sudo capabilities to a user on Ubuntu is to add the user to the “sudo” group. Members of this group may run any command as root using sudo and will be required to provide their password when doing so.

We’ll assume the user already exists. Check out this instruction if you wish to create a new user.

Run the command below as root or another sudo user to add the user to the group. Make careful to replace “username” with the name of the user whose rights you wish to provide.

usermod -aG sudo username

This approach of granting sudo access is enough for most use situations.

Run the whoami command to verify that the user has sudo capabilities.:

sudo whoami

You will be asked to enter your password. If the user has sudo privileges, the command will output “root”:

root

An error message stating “user is not in the sudoers file” indicates that the user does not have sudo rights.

Incorporating Users into the Sodoers File

The /etc/sudoers file specifies which users and groups have sudo access. Customized command access and security policies may be set up by adding the user to this file.

You may alter the sudoers file or create a new file in the /etc/sudoers.d directory to set the user’s access to sudo. The sudoers file includes the files under this directory.

/etc/sudoers should only be edited using visudo. When you save the file, this command checks for syntax mistakes. The file will not be saved if there are any mistakes. It’s possible that a syntax mistake may result in the sudo access being lost if the file is opened in text editor.

To access the sudoers file, visudo usually utilises vim. If you’re not familiar with vim and want to use nano instead, execute the following command to make nano the default editor:

EDITOR=nano visudo

The user may wish to perform sudo commands without being prompted for a password. Open the /etc/sudoers file to do so:

visudo

Towards the end of the document, type the following:

/etc/sudoers
username  ALL=(ALL) NOPASSWD:ALL

Then exit the editor and save your work. Ensure that “username” is replaced with the username you want to provide access.

Another common example is allowing the user to perform just a limited number of tasks with the command sudo. You may use the following command to restrict access to just two commands: mkdir and rmdir.

/etc/sudoers
username ALL=(ALL) NOPASSWD:/bin/mkdir,/bin/rmdir

Create a new file in the /etc/sudoers.d directory with authorisation rules instead of updating the sudoers file. This will achieve the same thing as modifying it directly. Rule addition is similar to that of a sudoers file:

echo "username  ALL=(ALL) NOPASSWD:ALL" | sudo tee /etc/sudoers.d/username

This method makes it easier to keep the sudo privileges. The file’s name is irrelevant. The name is typically the same as the user’s login name.

Conclusion

Adding a user to the “sudo” group is all that is required to provide that user with sudo privileges in Ubuntu; the process is quite straightforward.

Feel free to leave a comment below with any queries you may have.

June 12, 2022 0 comments
1 FacebookTwitterPinterestEmail
LinuxUbuntu

How To Create a Sudo User in Ubuntu (CLI)

by pcplanet June 12, 2022
written by pcplanet 3 minutes read

The sudo command is designed to allow users to run programs with the security privileges of another user, by default the root user.

In this tutorial, we’ll teach you how to create a new user on an Ubuntu system with sudo access. You may then use this user account to run administrative commands on your Ubuntu server without having to log in as root.

Prerequisites

Make sure you’ve installed Ubuntu correctly, follow this guide if you need to do it still!

  • Root Access
  • Ubuntu Server installed

Steps to Create a Sudo User

Follow the steps below to create a new user account and give it sudo access. If you want to configure sudo for an existing user, skip to step 3.

1. Log in to your server.

Log in to your system as the root user:

ssh root@server_ip_address

2. Create a new user account.

Create a new user account using the adduser command. Don’t forget to replace username with the username that you want to create:

adduser username

You will be prompted to set and confirm the new user password. Make sure that the password for the new account is as strong as possible.

Adding user `username' ...
Adding new group `username' (1001) ...
Adding new user `username' (1001) with group `username' ...
Creating home directory `/home/username' ...
Copying files from `/etc/skel' ...
New password:
Retype new password:
passwd: password updated successfully

Once the password has been entered, the command will create a home directory for the user, copy numerous configuration files to the home directory, and prompt you to provide the new user’s details. If you prefer to accept the defaults and leave all of this information blank, simply hit ENTER.

Changing the user information for username
Enter the new value, or press ENTER for the default
    Full Name []:
    Room Number []:
    Work Phone []:
    Home Phone []:
    Other []:
Is the information correct? [Y/n]

3. Add the new user to the sudo group

By default, on Ubuntu systems, members of the group sudo are granted with sudo access. To add the user you created to the sudo group, use the usermod command:

usermod -aG sudo username

Test the access

Switch to the newly created user:

su - username

Use sudo to run the whoami command:

sudo whoami

If the user has sudo access then the output of the whoami command will be “root”:

root

How to use sudo

To use sudo, simply prefix the command with sudo and space:

sudo ls -l /root

The first time you use sudo in a session, you will be prompted to enter the user password:

[sudo] password for username:

Conclusion

You have learned how to create a user with sudo privileges. You can now log in to your Ubuntu server with this user account and use sudo to run administrative commands.

Feel free to leave a comment if you have any questions.

June 12, 2022 0 comments
1 FacebookTwitterPinterestEmail
LinuxUbuntu

How to Add and Remove Users on Ubuntu 16.04 to 22.04

by pcplanet June 12, 2022
written by pcplanet 3 mins read

Adding and deleting ubuntu user accounts is one of the first steps when configuring a new Ubuntu system. Each user may have unique permission levels and settings for command-line and graphical user interface apps.

This article describes how to create and delete Ubuntu user accounts.

Before You Begin

Make sure you’ve installed Ubuntu correctly, follow this guide if you need to do it still!

Only root or users with sudo permissions may create or delete users..

There are two methods to create new users:

  1. Using the terminal.
  2. Using the GUI.

Adding a User from the Command Line

You may create a new user account in Ubuntu using one of two command-line tools called useradd or adduser. Both of these tools are available to you.

useradd is a fundamental tool.

adduser is a Perl script that was designed to serve as a user-friendly and interactive interface for the useradd command.

Invoking the adduser command followed by the username is all that is required to create a new user in a flash and with no effort. For instance, if you wanted to establish a new ubuntu user account and give it the name username, you would run:

sudo adduser username
Adding user `username' ...
Adding new group `username' (1001) ...
Adding new user `username' (1001) with group `username' ...
Creating home directory `/home/username' ...
Copying files from `/etc/skel' ...

There will be a number of questions directed at you. Please enter the new user password and confirm it. It is not required that you provide a response to any of the other questions.

Enter new UNIX password:
Retype new UNIX password:
passwd: password updated successfully
Changing the user information for username
Enter the new value, or press ENTER for the default
	Full Name []:
	Room Number []:
	Work Phone []:
	Home Phone []:
	Other []:
Is the information correct? [Y/n]

You will be asked to verify the accuracy of the information that you supplied before the process is complete.

The command will establish a home directory for the new ubuntu user and then transfer files from the /etc/skel directory into it. The user has the ability to create, modify, and remove files and folders while working inside their home directory.

You need to add the new user to the sudo group in order for the user to have the ability to carry out administrative responsibilities:

sudo usermod -aG sudo username

Add a User Via the Graphical User Interface (GUI)

You may create a new user account using the GUI if you are uncomfortable working with the command line. To do this, please proceed as outlined below:

  1. Launch the window that controls the settings, then go to the “Users” tab.
  2. To unlock your account, click the option labelled “Unlock,” and then enter your user password when required to do so.
  3. When you have successfully entered the correct password, the “Unlock” button will transform into a green “Add User” button.
  4. When you choose the “Add User” option from the drop-down menu, the Add user dialogue box will display.
  5. Enter details about the new user after selecting whether they should be a normal user or an administrative user. After you have finished, click the “Add” button.

Deletion of a User from the Command Line

In Ubuntu, you can use two commands to delete a user account: userdel and its interactive frontend deluser.

To delete the user, invoke the deluser command and pass the username as the argument:

sudo deluser username

The command above will not remove the user files.

If you want to delete the user and its home directory and mail spool, use the --remove-home flag:

sudo deluser --remove-home username

Removing a User through the GUI

  1. Open the settings window and click on the “Users” tab.
  2. Click on the “Unlock” button, and enter your user password when prompted.
  3. Click on the username you want to delete, and you will see a red “Remove User..” button in the bottom right corner.
  4. Click the “Remove User..” button, and you will be prompted whether to keep or delete the user home directory. Clicking on one of those buttons removes the user.

Conclusion

Managing user accounts in Ubuntu is a fundamental skill for system administrators and power users alike. Whether you prefer the command-line interface or the graphical user interface, Ubuntu provides straightforward methods for adding and removing user accounts.

By following the steps outlined in this guide, you can efficiently create new user accounts, granting them appropriate permissions and access levels. Remember to use strong passwords and consider adding users to the sudo group only when necessary for administrative tasks.

When it comes to removing user accounts, exercise caution and always double-check before proceeding, especially when deleting home directories. This ensures that important data isn’t accidentally lost during the process.

FAQ

Q: Can I change a user’s password after creating their account?
A: Yes, you can change a user’s password using the passwd command followed by the username. For example: sudo passwd username

Q: How can I view a list of all users on my Ubuntu system?
A: You can view a list of all users by examining the /etc/passwd file. Use the command: cat /etc/passwd

Q: Is it possible to create a user without a home directory?
A: Yes, when using the useradd command, you can add the -M flag to create a user without a home directory. For example: sudo useradd -M username

Q: Can I delete a user account without deleting their home directory?
A: Yes, using the deluser command without the –remove-home flag will delete the user account but leave their home directory intact.

Q: How do I change a user’s default shell?
A: You can change a user’s default shell using the chsh command. For example: sudo chsh -s /bin/bash username

Q: Is it possible to create a user with a specific user ID (UID)?
A: Yes, you can specify a UID when creating a user with the useradd command by using the -u flag. For example: sudo useradd -u 1500 username

June 12, 2022 0 comments
2 FacebookTwitterPinterestEmail
Newer Posts
Older Posts

Recent Posts

  • Creating Custom Nginx Rules for Different Subdomains in DirectAdmin
  • Nginx Reverse Proxy for Nextcloud: A Guide
  • How to Reverse Proxy in DirectAdmin with Nginx_Apache
  • How to install Python 3.10 on RHEL
  • How to install Python 3.10 on Ubuntu 20.04

Recent Comments

  1. Daron Buesgens on Introduction to PHP Server-Side Scripting Language
  2. Tim Slosek on How to install Python on CentOS 8
  3. аналитика леонида малолетова on 15,000 WordPress Sites hacked with Malicious Redirects
  4. 076 on Websites Posing as MSI Afterburner That Spread CoinMiner
  • Home
  • Tools
    • CHMOD Calculator
    • Subnet Calculator
  • Linux Guides & Tutorials
    • Beginner Guides
    • Linux Installation Tutorials
    • Command Line Tutorials
    • Server Administration Guides
    • Security Tutorials
    • Database Tutorials
    • Open-Source Software
      • Nextcloud Guides
      • Apache
    • Operating Systems
      • Ubuntu
      • RHEL/Rocky/Alma
  • Ransomware News
  • Cybersecurity Laws and Regulations

Recent Posts

Creating Custom Nginx Rules for Different Subdomains in DirectAdmin
Nginx Reverse Proxy for Nextcloud: A Guide
How to Reverse Proxy in DirectAdmin with Nginx_Apache
How to install Python 3.10 on RHEL

Most Viewed

Best Linux distribution (distros) in 2022
15,000 WordPress Sites hacked with Malicious Redirects
How to Install Python 3.9 on Ubuntu 18.04
6aabc923d85895a8823d81efa5e551d7
PCPlanet – Tech Blogs | Information
  • Home