

Introduction:
OpenWrt 23.05 brings a significant change in how VLANs are configured, introducing the DSA (Distributed Switch Architecture) system. This transition from the old swconfig method can be challenging, particularly for users upgrading from OpenWrt 19.07. In this comprehensive guide, we’ll walk you through the process of setting up VLANs on OpenWrt 23.05, using the WRT1900ac router as an example.
For optimal results, it’s highly recommended to perform these steps on a fresh OpenWrt 23.05 installation rather than copying and pasting configurations blindly. The starter configuration files are found at the bottom, read the article first, then edit the starter configuration file.
Network Overview:
For the purposes of this guide, we’ll use the following network setup:
- Wireless devices connected to a WRT1900ac router (LAN1 port used, WAN port empty)
- WRT1900ac from lan1 is connected to a Cisco switch (configured to accept VLANs)
- Cisco switch connected to a top-level firewall (where VLANs, DHCP, and DNS are managed)
The DSA Challenge:
When transitioning from swconfig to DSA, you may encounter a few hurdles:
- Different network configuration layout
- Loss of connection to the router’s IP address after applying settings
- Assigning wireless access points (SSIDs) to the correct VLANs
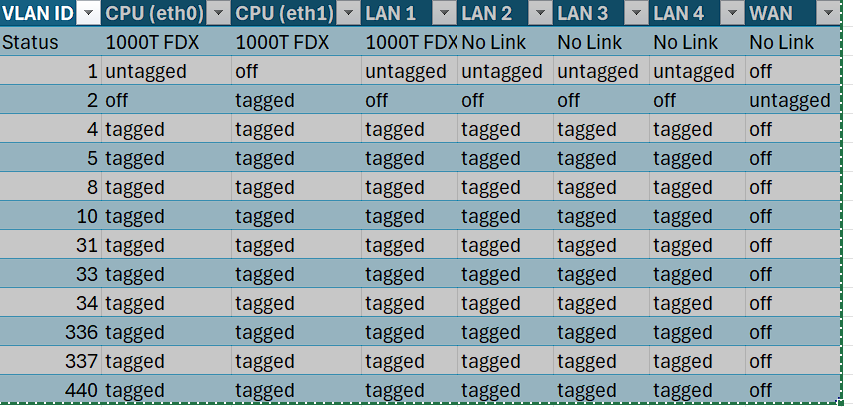
My old swconfig configuration looked like this:
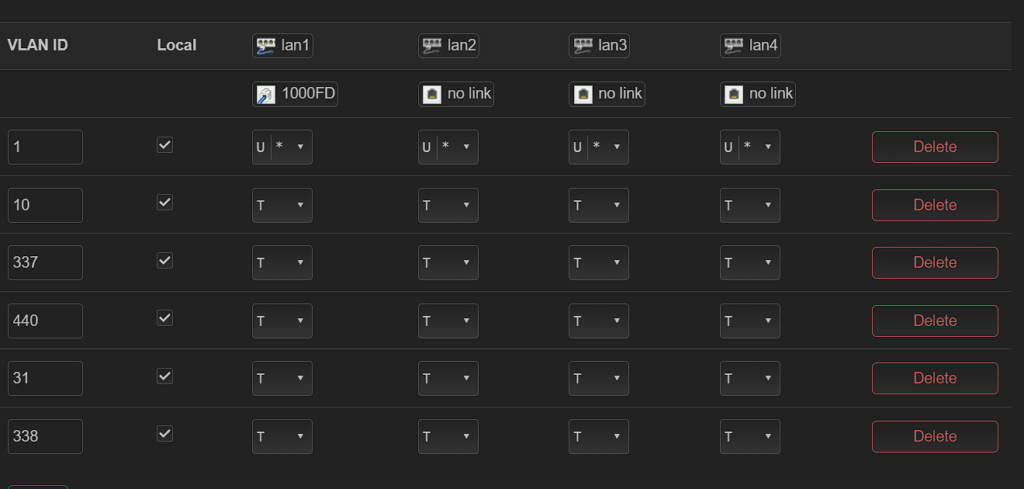
A similar configuration but in DSA looks like this:
Step 1: Configure the Main LAN Interface
To prevent losing connectivity to the router after applying settings, set your main LAN interface to br-lan.1. This is because VLAN ID 1 is the default for the internal network.
Step 2: Create Unmanaged Interfaces for VLANs
Create unmanaged interfaces for each VLAN you want to use. This allows you to assign the VLANs to specific ports and devices.

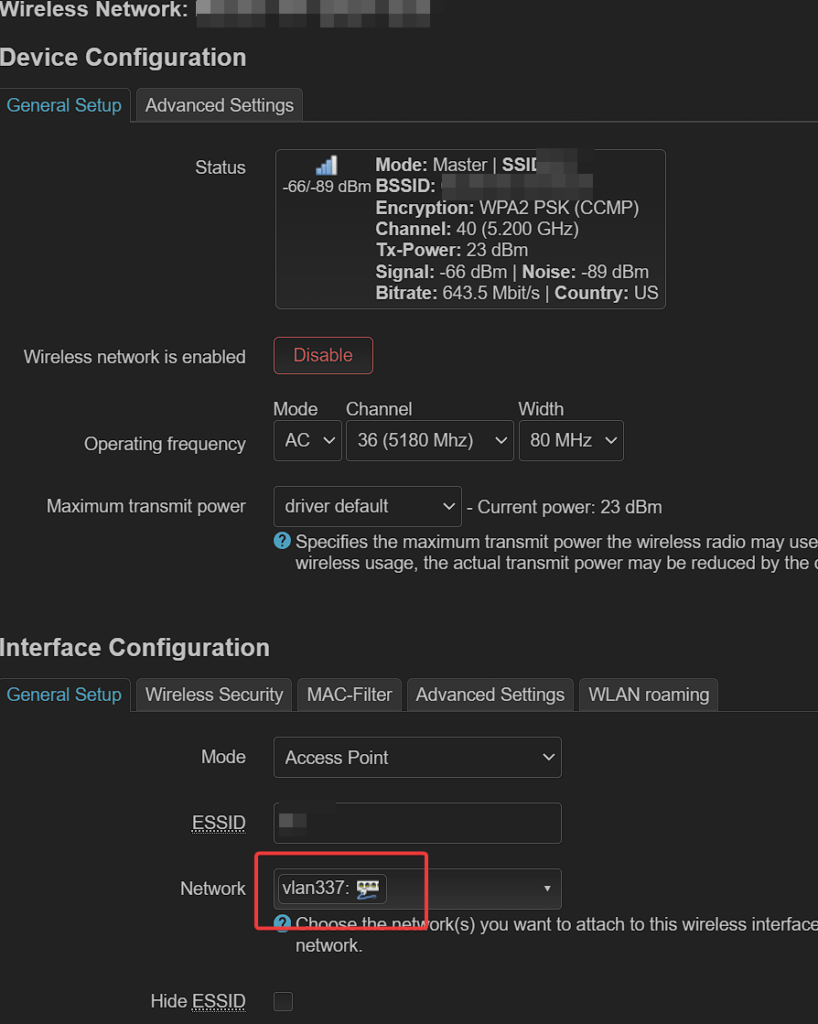
Step 3: Assign Wireless SSIDs to VLANs
Once the unmanaged interfaces are set up, assign the wireless SSIDs (OpenWrt access points) to the corresponding VLANs. This ensures that wireless devices connect to the correct VLAN based on the SSID they use.
Configuration Files
Here is what the standard stock configuration looks like when you drop into openwrt for the first time:
root@OpenWrt:~# cat /etc/config/network


config interface 'loopback'
        option device 'lo'
        option proto 'static'
        option ipaddr '127.0.0.1'
        option netmask '255.0.0.0'

config globals 'globals'
        option ula_prefix 'fdf7:4c8b:cbcd::/48'

config device
        option name 'br-lan'
        option type 'bridge'
        list ports 'lan1'
        list ports 'lan2'
        list ports 'lan3'
        list ports 'lan4'

config device
        option name 'lan1'
        option macaddr ''

config device
        option name 'lan2'
        option macaddr ''

config device
        option name 'lan3'
        option macaddr ''

config device
        option name 'lan4'
        option macaddr ''

config interface 'lan'
        option device 'br-lan'
        option proto 'dhcp'

config device
        option name 'wan'
        option macaddr 'x'

config interface 'wan'
        option device 'wan'
        option proto 'dhcp'

config interface 'wan6'
        option device 'wan'
        option proto 'dhcpv6'
To help you get started, here’s a template for adding two VLANs to your OpenWrt DSA configuration:
root@OpenWrt:~# cat /etc/config/network


config interface 'loopback'
        option device 'lo'
        option proto 'static'
        option ipaddr '127.0.0.1'
        option netmask '255.0.0.0'

config globals 'globals'
        option ula_prefix 'fdf7:4c8b:cbcd::/48'

config device
        option name 'br-lan'
        option type 'bridge'
        list ports 'lan1'
        list ports 'lan2'
        list ports 'lan3'
        list ports 'lan4'

config device
        option name 'lan1'
        option macaddr ''

config device
        option name 'lan2'
        option macaddr ''

config device
        option name 'lan3'
        option macaddr ''

config device
        option name 'lan4'
        option macaddr ''

config interface 'lan'
        option device 'br-lan.1'
        option proto 'dhcp'

config device
        option name 'wan'
        option macaddr 'x'

config interface 'wan'
        option device 'wan'
        option proto 'dhcp'

config interface 'wan6'
        option device 'wan'
        option proto 'dhcpv6'

config bridge-vlan
        option device 'br-lan'
        option vlan '1'
        list ports 'lan1:u*'
        list ports 'lan2:u*'
        list ports 'lan3:u*'
        list ports 'lan4:u*'

config bridge-vlan
        option device 'br-lan'
        option vlan '10'
        list ports 'lan1:t'
        list ports 'lan2:t'
        list ports 'lan3:t'
        list ports 'lan4:t'

config bridge-vlan
        option device 'br-lan'
        option vlan '337'
        list ports 'lan1:t'
        list ports 'lan2:t'
        list ports 'lan3:t'
        list ports 'lan4:t'

config interface 'vlan10'
        option device 'br-lan.10'
        option proto 'none'

config interface 'vlan337'
        option device 'br-lan.337'
        option proto 'none'
Conclusion:
At first, setting up VLANs on the WRT1900ac with the latest OpenWrt version can seem pretty confusing, but once you understand DSA, it’s straightforward. This setup makes your network more secure and runs better. Keep in mind that what worked for me might need some tweaks for your network. I’ll keep updating this guide to keep it helpful.
This is a solution that worked for me and may not be a one size fits all. This guide will be updated as more ways are found.