Introduction
Reverse proxying is a powerful technique that allows you to enhance the security, performance, and flexibility of your website hosted on a DirectAdmin server. By setting up a reverse proxy using Nginx or Apache, you can efficiently route traffic to backend servers, distribute load, and add an extra layer of protection. In this blog post, we’ll explore the concept of reverse proxying and guide you through the process of configuring a reverse proxy in DirectAdmin using either Nginx or Apache.

Prerequisites
Before diving into the reverse proxy setup, ensure that you have the following prerequisites in place:
- A DirectAdmin server with root access or appropriate permissions to modify server configurations.
- Nginx_Apache OR Nginx as webserver installed on your DirectAdmin server. DirectAdmin typically comes with Apache pre-installed, but you may need to install Nginx separately if desired.
- Basic understanding of web server configuration files and directives.
- Access to the DirectAdmin control panel to manage your server and website settings.
Nginx_Apache Setup benefits
When it comes to optimizing the performance of your website, implementing an Nginx_Apache reverse proxy setup can work wonders. This powerful combination leverages the strengths of both web servers to deliver a seamless and efficient user experience.
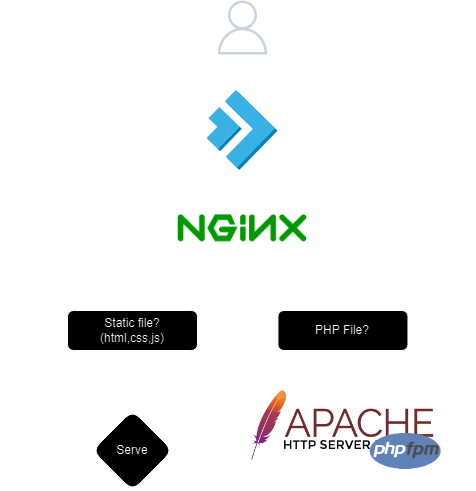
In an Nginx_Apache reverse proxy setup, Nginx takes the lead by handling incoming connections and serving static files, such as images, CSS, and JavaScript. Nginx’s lightweight architecture and optimized handling of static content make it exceptionally fast at delivering these files to users.
On the other hand, when a request for a PHP file arrives, Nginx forwards it to Apache. Apache, with its robust PHP processing capabilities, takes over and handles the dynamic content. If PHP-FPM (FastCGI Process Manager) is enabled, Apache seamlessly communicates with PHP-FPM to compile and execute the PHP script.
One significant advantage of this setup is its compatibility with .htaccess files. Apache’s rich feature set and extensive module support ensure that your existing .htaccess configurations will work smoothly, allowing you to maintain control over your website’s behavior and security.
The overall flow of a request in an Nginx_Apache reverse proxy setup can be summarized as follows:
- Nginx receives a new connection and determines if it is for a static file or a PHP script.
- If the request is for a static file, Nginx efficiently serves it directly to the user.
- If the request is for a PHP file, Nginx forwards it to Apache.
- Apache processes the PHP request, utilizing PHP-FPM (if enabled) to compile and execute the script.
- Apache sends the output of the PHP script back to Nginx.
- Nginx returns the final response to the user.

How to reverse proxy in DirectAdmin with Nginx_apache
Step 1: Access Server Management
- Log in to DirectAdmin as an administrator.
- Navigate to the Admin column in the sidebar.
- Select Server Manager -> Custom HTTPD Configurations.
- This page allows you to manage specific configurations for your hosted domains.

Step 2: Select Your Domain
- From the Custom HTTPD Configurations page, select the domain you wish to set up as a reverse proxy.
- You will see a list of your domains along with key configuration files such as
httpd.conf,nginx.conf, andphp-fpm.conf.
- You will see a list of your domains along with key configuration files such as
Step 3: Customize Nginx Configuration
- Click on the
nginx.conflink next to the domain you want to configure. This action opens the configuration editor for Nginx. - Press the Customize button to modify the existing configuration.
- It’s important to modify the correct sections to avoid misconfigurations.


Step 4: Edit Configuration
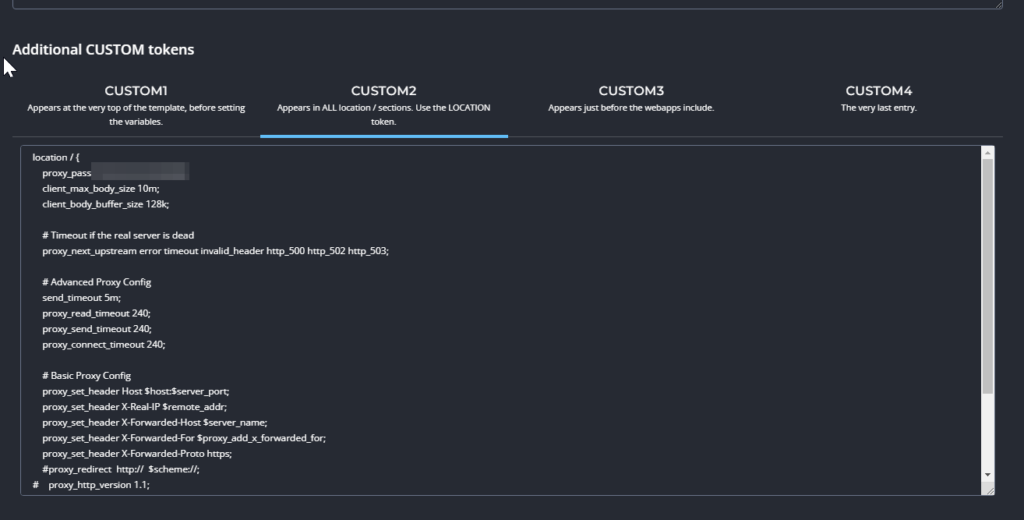
- Decide where to place your reverse proxy configuration:
- You can add your configuration directly at the top of the
nginx.conffile. This is suitable for general settings that apply irrespective of other conditional configurations. - Alternatively, place your reverse proxy settings within the
CUSTOM2token. This token is designed for user-specific customizations and ensures that your settings are preserved during automatic updates or rewrites by DirectAdmin.
- You can add your configuration directly at the top of the
Here’s a basic example of what the reverse proxy configuration might look like:
location / {
    proxy_pass http://yourbackendserver.com;
    proxy_set_header Host $host;
    proxy_set_header X-Real-IP $remote_addr;
    proxy_set_header X-Forwarded-For $proxy_add_x_forwarded_for;
    proxy_set_header X-Forwarded-Proto $scheme;
}

Step 5: Save and Test
- Save your changes by clicking the appropriate button in the DirectAdmin interface.
- Then go back until you can click on da build


