PCPlanet – Tech Blogs | Information
  • Home
  • Tools
    • CHMOD Calculator
    • Subnet Calculator
  • Linux Guides & Tutorials
    • Beginner Guides
    • Linux Installation Tutorials
    • Command Line Tutorials
    • Server Administration Guides
    • Security Tutorials
    • Database Tutorials
    • Open-Source Software
      • Nextcloud Guides
      • Apache
    • Operating Systems
      • Ubuntu
      • RHEL/Rocky/Alma
  • Ransomware News
  • Cybersecurity Laws and Regulations
Top Posts
How to install Emby Server on Ubuntu
Best Linux distribution (distros) in 2022
15,000 WordPress Sites hacked with Malicious Redirects
How to Install Python 3.9 on Ubuntu 18.04
How to Install Python 3.9 on Ubuntu 16.04
How to Install MongoDB on Ubuntu 16.04 to...
How to enable HSTS on Apache
How to install Python on CentOS 8
How to install PHP 8.1 on RHEL based...
Comment activer HSTS pour Apache
Navigating CVE-2023-49103: Proactive Defense for ownCloud
Thursday, May 15, 2025
PCPlanet – Tech Blogs | Information
  • Home
  • Tools
    • CHMOD Calculator
    • Subnet Calculator
  • Linux Guides & Tutorials
    • Beginner Guides
    • Linux Installation Tutorials
    • Command Line Tutorials
    • Server Administration Guides
    • Security Tutorials
    • Database Tutorials
    • Open-Source Software
      • Nextcloud Guides
      • Apache
    • Operating Systems
      • Ubuntu
      • RHEL/Rocky/Alma
  • Ransomware News
  • Cybersecurity Laws and Regulations
Copyright 2021 - All Right Reserved
LinuxUbuntu

Managing Users on Ubuntu: A Comprehensive Guide

by pcplanet July 11, 2023
written by pcplanet 10 minutes read

Introduction to User Management on Ubuntu

Managing users effectively is a crucial part of maintaining a secure and efficient Ubuntu system. But why exactly is user management so important on Ubuntu?

Why User Management is Crucial on Ubuntu

User management allows you to control who has access to your system and what they can do with it. By assigning specific permissions and roles, you ensure that users can perform their tasks without compromising the security or stability of the system.

Understanding the Basics of User Management

Before we delve deeper into the how-tos of user management, let’s first understand some basic concepts.

Distinguishing Between Root and Standard Users

In Ubuntu, there are two types of users – the Root and the Standard users. The Root user, also known as the ‘superuser’, has administrative access to the system, while Standard users have limited permissions. Understanding the distinction is vital to ensure the correct assignment of roles and prevent unauthorized access.

Understanding Permissions and Groups

Every user belongs to at least one group, which defines what they can or cannot do on the system. Permissions are attributes assigned to files and directories, dictating how the system handles interactions with users.

Getting Started: How to Add Users on Ubuntu

There are two ways you can add users on Ubuntu: through terminal commands and via the graphical interface.

Adding Users Through Terminal Commands

When you need to add a new user on Ubuntu, doing it through the terminal might be your fastest option, especially if you’re working on a remote server. Here’s a more detailed step-by-step guide:

  1. Open the Terminal: You can do this by searching for “Terminal” in your applications or by using the keyboard shortcut Ctrl+Alt+T.
  2. Use the ‘adduser’ Command: Type in sudo adduser [username], where [username] is the name you want to give the new user. Remember, usernames should be lowercase and without spaces for compatibility. Press Enter after typing the command. The ‘sudo’ prefix is necessary because this is an administrative action, and it prompts for your password to ensure authorized access. sudo adduser john
  3. Enter Your Password: If you invoked the command using ‘sudo’, you’d be prompted to enter your password to proceed. This is the password of the account you’re currently logged into, not the new user’s password.
  4. Set the New User’s Password: After providing your password, you’ll be prompted to set a password for the new user. Enter a strong password, then press Enter. You’ll be asked to retype the password for verification.
  5. Provide User Information: The ‘adduser’ command will also ask for additional information such as the full name of the user, room number, work phone, home phone, and other. This information is optional, and you can just press Enter to skip each of these if you prefer.
  6. Confirm the Information: Finally, you’ll be asked to confirm that the information provided is correct. If it is, type ‘Y’ and then press Enter. If it’s not, type ‘N’ and press Enter. If you typed ‘N’, you’d have to repeat the process from step 4.

Your new user is now created and ready to use. They’ll have their home directory under /home/[username] where they can store personal files. They’ll also be able to use the ‘sudo’ command if they need to perform actions that require administrative access, like installing new software.

Here’s an example of what adding a new user might look like:

$ sudo adduser john
Adding user `john' ...
Adding new group `john' (1002) ...
Adding new user `john' (1002) with group `john' ...
Creating home directory `/home/john' ...
Copying files from `/etc/skel' ...
Enter new UNIX password: ****
Retype new UNIX password: ****
passwd: password updated successfully
Changing the user information for john
Enter the new value, or press ENTER for the default
    Full Name []: John Doe
    Room Number []:
    Work Phone []:
    Home Phone []:
    Other []:
Is the information correct? [Y/n] Y

Adding Users Through the Graphical Interface

Alternatively, you can use the User Accounts tool in the System Settings. Click ‘Unlock’ and enter your password, then click ‘+’, select the account type, and fill in the necessary information.

Modifying and Deleting Users

Ubuntu’s flexibility shines when it comes to user management. Not only can you add new users, but the system provides you with the tools necessary to modify user information, permissions, and even delete users when they’re no longer needed. Let’s delve into these capabilities in more detail.

Modifying User Information and Permissions

Modifying a user’s information and permissions in Ubuntu is a common task, especially in dynamic environments where user roles can change frequently. For such tasks, the usermod command is a powerful tool.

Changing a User’s Login Name

Suppose you’ve added a new user, but later you realize that the username needs to be changed. Ubuntu provides a simple way to do this using the usermod command:

sudo usermod -l new_username old_username

In this command, old_username is the current username that you want to change, and new_username is the new name you want to assign. After running this command, the user will have to use the new username to log in to the system.

Changing a User’s Home Directory

Another common task is to change a user’s home directory. This is particularly useful when managing disk spaces or when the user’s role requires them to shift to a different directory. Here’s how you can do this:

sudo usermod -d /new/home/dir -m username

The -d option followed by the /new/home/dir specifies the new home directory for the user. The -m option is used to move the contents of the user’s current home directory to the new home directory. username is the name of the user.

Modifying User Group Affiliations

A user’s permissions on the system are often tied to the groups they belong to. When a user’s permissions need to be changed, this can often be accomplished by adding or removing the user from certain groups. For example, to add a user to a new group, you would use the following command:

sudo usermod -aG groupname username

In this command, groupname is the name of the group you want to add the user to, and username is the name of the user. The -aG option tells usermod to add the user to the supplementary group(s) mentioned.

Remember that the changes made using the usermod command will take effect the next time the user logs in, so you might need to ask them to log out and log back in if the changes need to be applied immediately.

Deleting Users

There are situations when a user account becomes redundant or the user no longer requires access to the Ubuntu system. In such cases, you can use Ubuntu’s built-in commands to delete the user and manage their associated files.

Deleting Users Using deluser Command

Ubuntu’s deluser command offers a straightforward way to remove a user from the system. The syntax for this command is as follows:

sudo deluser username

Here, replace username with the name of the user you wish to delete. This command will effectively remove the user from the system, but it will leave the user’s home directory and personal files intact. This feature is beneficial when you might need to recover files or data associated with the user.

Deleting Users Along with Their Home Directory

In some cases, you might want to delete not only the user but also all their associated files, including their home directory and mail spool. Ubuntu provides an option for this:

sudo deluser --remove-home username

In this command, replace username with the user’s name you want to delete. The --remove-home option tells the system to delete the user’s home directory and all its contents. Be cautious while using this option as it will permanently remove all the user’s files and cannot be undone.

Managing User Files Post Deletion

After deleting a user, especially when keeping their home directory intact, you might want to review the files they left behind. These files can be found in the deleted user’s home directory, typically /home/username. You can move these files to another location, back them up, or remove them as needed.

Deleting Users via Graphical Interface

While the terminal offers robust control and flexibility, some might prefer using a graphical interface. You can achieve the same user deletion functionality via the User Accounts tool found in Ubuntu’s System Settings. This tool offers a user-friendly way to manage users, including modifying their information or deleting them.

Managing Groups on Ubuntu

Group management on Ubuntu is a critical aspect of system administration. A group is a collection of users, simplifying permission management by allowing you to assign permissions to many users at once. Let’s delve deeper into creating and deleting groups, as well as adding and removing users from these groups.

Creating and Deleting Groups

The ability to create and delete groups is fundamental in Ubuntu. Groups help you manage users with similar roles or permissions in a more organized manner.

Creating Groups

To create a new group, you’ll use the groupadd command followed by the desired group name. Let’s say you want to create a group called “developers”:

sudo groupadd developers

This command creates a new group named “developers”. The sudo prefix is necessary because creating a new group is a system operation and requires superuser privileges.

Deleting Groups

When a group is no longer needed, you can delete it using the groupdel command, followed by the group’s name. Be cautious as this action can’t be undone. To delete the “developers” group:

sudo groupdel developers

After running this command, the “developers” group will be removed from your system.

Adding and Removing Users from Groups

Once your groups are set up, you’ll often need to add users to them or remove users from them. The usermod command, combined with the appropriate options, will enable you to do this.

Adding Users to Groups

To add a user to a group, you can use the usermod command with the -aG options. The -a option tells usermod to append the user to the supplementary groups mentioned. The -G option is followed by the name of the group. Let’s say you want to add a user called “john” to the “developers” group:

sudo usermod -aG developers john

After running this command, the user “john” will be a member of the “developers” group.

Removing Users from Groups

To remove a user from a group, the gpasswd command is generally preferred. The -d option followed by the user’s name and the group’s name will remove the user from the group. If you wanted to remove “john” from the “developers” group:

sudo gpasswd -d john developers

After running this command, the user “john” will no longer be a member of the “developers” group.

Understanding how to manage groups in Ubuntu is essential for efficient user and permission management. By following these steps, you’ll be well-equipped to handle user groupings in your Ubuntu system. Remember, inappropriate group management can affect system security and operations, so always be cautious.

Conclusion

Effective user management on Ubuntu not only helps in maintaining a secure and stable system but also increases productivity by ensuring users have the appropriate access and permissions. It’s a powerful tool in the hands of system administrators and one that should not be overlooked.

FAQs

  1. How do I list all users in Ubuntu?
    You can list all users in Ubuntu using the `getent` command in the terminal.
  1. Can I change a user’s password as a Root user?
    Yes, as a Root user, you can change any user’s password. Use the passwd command followed by the username in the terminal.
  2. What is the difference between adduser and useradd?
    adduser is a more user-friendly command that automatically sets up a home directory, copies skeletal files, and allows for custom scripts. useradd is a lower level utility often used by scripts and admins, it simply creates a new user record in the system files.
  3. What does a group do in Ubuntu?
    A group in Ubuntu is a mechanism to manage a set of privileges such as reading, writing, or executing permission for a given resource that can be shared among the users within the group.
  4. How can I see which groups a user belongs to?
    You can see which groups a user belongs to by using the groups command followed by the username in the terminal.
July 11, 2023 0 comments
2 FacebookTwitterPinterestEmail
Linux

Guide to Linux Command Line Text Editors

by pcplanet July 7, 2023
written by pcplanet 24 minutes read

Introduction

Linux command line text editors are essential tools for Linux users, offering a powerful and efficient way to edit and manipulate text files directly from the terminal. In this comprehensive guide, we will explore the importance and benefits of using Linux command line text editors, as well as provide an overview of some popular choices.

Importance and Benefits of Linux Command Line Text Editors:

  1. Versatility: Command line text editors like vi/Vim, nano, Emacs, and sed provide a flexible and lightweight environment for editing files, allowing users to work efficiently on remote servers or low-resource systems without the need for a graphical user interface.
  2. Efficiency: Command line text editors are designed for keyboard-centric editing, enabling users to navigate, edit, and save changes quickly using keyboard shortcuts and commands. This saves time and reduces the need to switch between a mouse and keyboard.
  3. Automation and Scripting: Command line text editors seamlessly integrate with scripting and automation workflows. They can be used to edit and modify configuration files, write scripts, or perform batch processing on files, making them ideal for system administrators and developers.
  4. Customization: Many command line text editors are highly customizable, allowing users to tailor the editor’s behavior, appearance, and key mappings to suit their preferences. This level of customization enhances productivity and user experience.

Overview of Popular Linux Command Line Text Editors:

  1. vi/Vim: vi (visual editor) and its improved version, Vim (Vi IMproved), are widely used and powerful command line text editors. They offer extensive features, including modes for command, insert, and visual editing, as well as advanced capabilities such as macros and syntax highlighting.
  2. nano: nano is a user-friendly and beginner-focused command line text editor. It offers a straightforward interface, intuitive keybindings, and helpful on-screen prompts, making it an accessible choice for new Linux users or those who prefer a simpler editing experience.
  3. Emacs: Emacs is a highly extensible and feature-rich command line text editor known for its powerful editing capabilities and built-in Lisp programming environment. It offers a vast array of functions and plugins, making it a favorite among power users and programmers.
  4. sed: sed (stream editor) is a unique command line tool designed for text manipulation. While not a traditional text editor, sed excels in performing stream editing tasks, such as search and replace, filtering, and transforming text using regular expressions.

By understanding the importance and benefits of Linux command line text editors and exploring popular options, you will be equipped with the knowledge to choose the right editor for your needs and leverage its capabilities to streamline your text editing tasks in the Linux environment.

Section 1: vi/Vim: Mastering the Powerful Editor

vi/Vim is a highly versatile and widely used command line text editor available on various Linux distributions. Its extensive features, coupled with efficient navigation and editing capabilities, make it a popular choice for both beginner and experienced users.

OS Compatibility and Availability

vi/Vim is pre-installed on most Linux distributions, ensuring its availability across different systems. It can be accessed from the command line interface, making it easily accessible for editing files in a terminal environment. Whether you’re using Ubuntu, Fedora, CentOS, or any other Linux distribution, you can rely on vi/Vim to be there by default.

Modes, Navigation, and Editing in vi/Vim

vi/Vim operates in different modes, namely the command mode, insert mode, and visual mode. Understanding and switching between these modes is essential for efficient editing.

  • Command Mode: The default mode upon opening a file, it allows you to execute various commands for file navigation, searching, and editing.
  • Insert Mode: To insert or modify text, switch to insert mode by pressing the ‘i’ key. Here, you can freely type and edit your text.
  • Visual Mode: This mode enables you to select and manipulate text in blocks, lines, or characters.

Navigation and editing in vi/Vim involve a range of commands and shortcuts. For example:

  • Moving the cursor: Use ‘h’, ‘j’, ‘k’, and ‘l’ keys for left, down, up, and right movements, respectively.
  • Searching: Press ‘/’ followed by the search term to find text within the file.
  • Editing and Saving: Enter insert mode, make changes, and press ‘Esc’ to return to command mode. Save and exit using ‘:wq’ or ‘:x’ command.

Advanced Features and Customization

vi/Vim offers a wide range of advanced features that enhance productivity and efficiency in text editing:

  • Macros: Record and replay a series of commands to automate repetitive tasks.
  • Plugins and Extensions: Extend vi/Vim’s functionality through a vast collection of plugins and scripts available from the vibrant Vim community.
  • Syntax Highlighting: Enable syntax highlighting for various programming languages, making code easier to read and understand.
  • Split Windows: Divide the editing window into multiple sections, allowing simultaneous editing of different parts of the same file or multiple files.

Customization is another strength of vi/Vim. You can tailor its behavior, appearance, and key mappings to suit your preferences. Configuration files such as .vimrc allow you to define custom settings, install plugins, and personalize your editing experience.

Tips and Tricks for Efficient Editing

  • Familiarize yourself with essential vi/Vim commands, such as ‘dd’ for deleting lines, ‘yy’ for copying lines, and ‘p’ for pasting.
  • Utilize marks (‘m’) to bookmark specific locations within a file for easy navigation.
  • Take advantage of the powerful global command (‘:g’) to apply operations to multiple lines or patterns in a file.
  • Explore various movement commands, such as jumping to specific line numbers or using regular expressions to search and navigate efficiently.

Real-Life Scenarios:

  • Editing configuration files: vi/Vim is commonly used for modifying system configuration files, such as /etc/ssh/sshd_config or /etc/fstab.
  • Writing and editing code: vi/Vim is favored by many developers due to its robust syntax highlighting, seamless integration with version control systems, and extensive customization options.

Using vi/Vim efficiently requires practice and familiarity with its commands and features. With time, you’ll discover its immense power and realize how it can significantly enhance your productivity and editing capabilities in Linux environments.

Section 2: nano: User-Friendly and Beginner-Focused

nano is a user-friendly and beginner-focused command line text editor available on various Linux distributions. It offers a straightforward interface, intuitive keybindings, and helpful on-screen prompts, making it an accessible choice for new Linux users or those seeking a simpler editing experience.

OS Compatibility and Availability

nano is widely available and compatible with most Linux distributions, including Ubuntu, Fedora, CentOS, and Debian. It is often included as a default text editor, ensuring its availability across different systems. You can launch nano from the terminal by simply typing nano.

Key Features and Usage in nano

Key features of nano include:

  • Syntax Highlighting: nano supports syntax highlighting for numerous programming languages, making code more readable and easier to edit.
  • On-Screen Help: nano provides contextual help at the bottom of the screen, displaying the most commonly used commands and shortcuts.
  • Search and Replace: You can search for specific words or phrases within a file and replace them with ease.
  • Multiple Buffers: nano allows you to open multiple files simultaneously and switch between them using simple commands.
  • Line Numbering: You can enable line numbering, which aids in referencing and navigating within large files.
  • Copy and Paste: nano provides simple copy-and-paste functionality for selected text.

Navigation, Editing, and Basic Operations

  • Moving the Cursor: You can use the arrow keys to move the cursor around the file, or you can utilize the Ctrl key in combination with other keys for quicker navigation.
  • Editing Text: Editing in nano is straightforward. Simply position the cursor at the desired location and start typing. You can insert, delete, or replace text using intuitive key combinations.
  • Saving Changes: To save changes made in nano, press Ctrl+O and then Enter. This writes the modified buffer to the original file.
  • Exiting nano: To exit nano, press Ctrl+X. If any unsaved changes exist, nano will prompt you to save or discard them.

Customization and Advanced Options

While nano is designed to be user-friendly out of the box, it also offers customization options and advanced features. You can modify its behavior and appearance by creating or modifying the ~/.nanorc configuration file. This allows you to define custom keybindings, enable additional features, and customize color schemes.

Advanced options in nano include the ability to create and execute macros, define shortcuts for frequently used commands, and configure word wrapping, tab spacing, and backup options.

Real-Life Scenarios:

  • Editing Configuration Files: nano is commonly used to edit system configuration files like /etc/network/interfaces or /etc/apt/sources.list, making it ideal for system administrators and users who need to make quick modifications.
  • Writing Scripts: nano’s user-friendly interface and syntax highlighting make it suitable for writing and editing scripts in various programming languages.

nano’s simplicity and ease of use make it an excellent choice for beginners and those who prefer a straightforward text editing experience. However, it also offers advanced features and customization options for users to tailor their editing environment to their liking.

(I use nano!)

Section 3: Emacs: The Extensible Editor

Emacs is a highly extensible and feature-rich command line text editor available on various Linux distributions. It offers a wide range of editing capabilities and provides an environment for programming with its built-in Lisp interpreter. Let’s explore the OS compatibility, key concepts, editing features, and customization options of Emacs.

OS Compatibility and Availability

Emacs is compatible with Linux, macOS, and Windows operating systems. It can be easily installed on most Linux distributions, including Ubuntu, Fedora, Debian, and CentOS. Emacs has a vibrant community and is actively maintained, ensuring its availability and support across different platforms.

Overview of Emacs Modes and Key Concepts

Emacs introduces the concept of modes, which are specific configurations or behaviors designed for different tasks. Some key modes include:

  • Fundamental Mode: The default mode when editing text files. It provides standard editing features and functionalities.
  • Major Modes: Major modes are tailored to specific file types or programming languages, providing syntax highlighting, indentation, and advanced editing capabilities tailored to the specific context.
  • Minor Modes: Minor modes offer additional functionalities and enhancements to the editing experience. They can be enabled or disabled to suit the user’s requirements.

Emacs also introduces the concept of buffers, which are in-memory representations of files being edited. Multiple buffers can be opened simultaneously, allowing seamless switching between different files.

Editing, Navigation, and Advanced Features in Emacs

Emacs provides a rich set of editing and navigation features:

  • Efficient Navigation: Emacs offers various commands for moving the cursor, such as Ctrl+F for forward, Ctrl+B for backward, Ctrl+A for moving to the beginning of a line, and Ctrl+E for moving to the end of a line.
  • Editing Text: Emacs supports a wide array of editing commands, including copy, cut, paste, and undo operations. It also provides advanced functionalities like multiple cursors, rectangular editing, and case manipulation.
  • Syntax Highlighting and Code Completion: Major modes in Emacs provide syntax highlighting, helping to identify different elements in the code. Code completion features, such as auto-indentation, bracket matching, and function signatures, assist in writing code efficiently.

Extensibility and Customization with Emacs Lisp

Emacs stands out for its unparalleled extensibility and customization capabilities. It allows users to extend and modify its behavior using Emacs Lisp, a dialect of the Lisp programming language. Users can write their own functions, create custom keybindings, define new modes, and build elaborate workflows to tailor Emacs to their specific needs.

Emacs Lisp enables users to create and use macros, which are sequences of commands that can be recorded and replayed to automate repetitive tasks. This powerful feature significantly boosts productivity and streamlines complex editing operations.

Real-Life Scenarios:

  • Software Development: Emacs is widely used by developers for coding in various languages, thanks to its powerful editing features, syntax highlighting, and integration with version control systems.
  • Text Editing and Authoring: Emacs is also suitable for writing documents, notes, and even entire books, offering advanced text manipulation, outlining, and formatting capabilities.

The extensibility and customization of Emacs make it a preferred choice for power users, programmers, and those seeking a highly customizable editing environment. With its vast array of features and the ability to adapt to specific requirements through Emacs Lisp, Emacs empowers users to create an editing experience tailored to their preferences.

Section 4: sed: Stream Editing Made Easy

sed is a command line tool designed for stream editing, allowing for efficient and powerful text transformations. It is available on various Linux distributions and offers extensive capabilities for manipulating text data. Let’s explore the OS compatibility, regular expressions, command syntax, and advanced text transformations of sed.

OS Compatibility and Availability

sed is compatible with Linux, macOS, and other Unix-like systems. It is included as a standard utility on most Linux distributions, ensuring its availability. You can run sed by executing the sed command in the terminal.

Understanding Regular Expressions in sed

Regular expressions play a vital role in sed for pattern matching and text manipulation. They are a powerful language for specifying patterns and allow for complex matching and substitution. Some common regular expression constructs used in sed include:

  • Character Classes: [abc] matches any of the characters a, b, or c.
  • Quantifiers: *, +, and ? specify the number of occurrences of the preceding pattern.
  • Anchors: ^ and $ match the start and end of a line, respectively.
  • Grouping and Alternation: (pattern) captures and groups a pattern, while pattern1|pattern2 matches either pattern1 or pattern2.

Understanding regular expressions is crucial for effectively using sed, as they enable precise pattern matching and text manipulation.

Editing Files with sed: Command Syntax and Examples

The basic syntax of a sed command is sed 'command' filename. The command part can consist of one or more operations, such as search and replace, deletion, or insertion. Here are some commonly used sed commands:

  • Search and Replace: The s/pattern/replacement/ command searches for occurrences of pattern and replaces them with replacement. For example, sed 's/foo/bar/' file.txt replaces the first occurrence of “foo” with “bar” in file.txt.
  • Deletion: The d command deletes lines that match a specified pattern. For instance, sed '/pattern/d' file.txt deletes lines containing pattern.
  • Insertion: The i command inserts text before a specified line. For example, sed '3i\This is a new line' file.txt inserts “This is a new line” before line 3 in file.txt.

These are just a few examples of the many commands and options available in sed. Advanced usage involves combining multiple commands, using regular expression modifiers, and applying sed commands to specific line ranges.

Advanced Text Transformations and Manipulation

sed offers advanced capabilities for text transformations and manipulation:

  • Backreferences: Backreferences allow you to refer to captured groups in the replacement part of a command. For example, sed 's/\(pattern\).*/\1/' file.txt replaces the entire line with the first occurrence of pattern.
  • Conditional Operations: Conditional operations, such as the t command, enable conditional branching and looping within sed scripts. They allow you to perform complex text transformations based on specific conditions.
  • File Processing: sed can process multiple files simultaneously, apply commands only to specific lines or ranges, and even edit files in place using the -i option.

Real-Life Scenarios:

  • Batch Find and Replace: sed is commonly used for making global changes in multiple files, such as replacing text strings across an entire codebase.
  • Log File Processing: sed is useful for extracting specific information from log files or reformatting them for analysis.

The power and flexibility of sed make it an invaluable tool for stream editing and text manipulation tasks. By understanding regular expressions, mastering sed’s command syntax, and exploring advanced text transformations, you can harness sed’s capabilities to efficiently process and transform large volumes of text data.

Section 5: Comparing Linux Command Line Text Editors

When it comes to Linux command line text editors, there are several options available, each with its own set of features, use cases, and differentiation points. In this section, we will explore how different editors compare in terms of their capabilities and discuss considerations for choosing the right editor for your needs. We will also explore workflow considerations and productivity tips to enhance your editing experience.

Features, Use Cases, and Differentiation Points

  • vi/Vim: vi/Vim is a powerful and widely-used editor known for its extensive features, modal editing, and robust customization options. It is favored by experienced users and programmers who value its efficiency and advanced functionalities. vi/Vim excels in editing code, handling large files, and working in remote environments.
  • nano: nano stands out for its user-friendly interface and simplicity, making it an excellent choice for beginners or users who prefer a straightforward editing experience. It offers basic editing features, syntax highlighting, and an intuitive set of keybindings. nano is ideal for quick edits, writing simple scripts, or editing configuration files.
  • Emacs: Emacs is a highly extensible editor that appeals to power users, programmers, and those who value customization. It provides a rich set of editing features, including syntax highlighting, code navigation, and advanced text manipulation capabilities. Emacs excels in writing and editing code, creating documents, and offers an integrated development environment (IDE) for various programming languages.
  • sed: While not a traditional text editor, sed specializes in stream editing and text transformations. It is a valuable tool for processing large volumes of text data, performing search and replace operations, and applying complex text transformations using regular expressions. sed is commonly used in scripting, batch processing, and log file manipulation.

Each text editor has its strengths and best suited use cases, so it’s essential to consider your specific requirements and preferences when selecting an editor.

Choosing the Right Editor for Your Needs

When choosing a Linux command line text editor, consider the following factors:

  • Complexity: Consider the learning curve and complexity of each editor. vi/Vim and Emacs have steeper learning curves but offer more advanced features and customization options. nano, on the other hand, has a simpler interface and is more beginner-friendly.
  • Use Case: Identify the primary purpose of the editor. Are you primarily editing code, working with configuration files, or processing text data? Different editors have different strengths in specific areas.
  • Familiarity: Consider your familiarity with the editor. If you already have experience with a particular editor or are comfortable with its workflow, it may be more efficient to stick with what you know.
  • Workflow Integration: Consider how the editor integrates with your workflow. Does it support the programming languages or file formats you work with? Does it have plugins or extensions that enhance your productivity? Consider these aspects to ensure a smooth workflow.

Workflow Considerations and Productivity Tips

Regardless of the text editor you choose, the following tips can enhance your workflow and productivity:

  • Learn the Keyboard Shortcuts: Mastering the keyboard shortcuts specific to your chosen editor can significantly improve your editing speed and efficiency. Invest time in learning and practicing these shortcuts.
  • Utilize Plugins and Extensions: Take advantage of plugins and extensions to extend the functionality of your editor. These can provide syntax highlighting, code completion, version control integration, and more.
  • Customize Your Editor: Customize your editor to suit your preferences and workflow. Adjust keybindings, enable features that improve your productivity, and tailor the appearance to enhance readability.
  • Utilize Snippets and Templates: Use snippets or templates for commonly used code snippets or text patterns to save time and reduce repetitive typing.
  • Take Advantage of Macros: If your editor supports macros, record and utilize them for automating repetitive tasks or complex editing operations.

By considering your needs, exploring the available features, and adopting productivity-enhancing strategies, you can make the most of your chosen Linux command line text editor and streamline your editing workflow. Experiment with different editors and find the one that aligns best with your requirements and personal preferences.

Section 6: Advanced Techniques and Tips for Linux Command Line Text Editors

To further enhance your proficiency with Linux command line text editors, it’s beneficial to delve into advanced techniques and adopt productivity-enhancing tips. In this section, we will explore mastering cursor movement and selection, efficient text editing, search and replace, navigating large files and multiple buffers, as well as customization and productivity enhancements.

Mastering Cursor Movement and Selection

Efficiently navigating through your text files is essential for productive editing. Consider the following techniques:

  • Utilize Keyboard Shortcuts: Each editor has its own set of keyboard shortcuts for moving the cursor quickly. Master these shortcuts to navigate effortlessly.
  • Line and Word Manipulation: Learn the commands to move the cursor to the beginning or end of a line, or to jump forward or backward by words. These shortcuts can save time when navigating through long lines of code or text.
  • Selecting Text: Familiarize yourself with the commands to select text efficiently. Whether it’s selecting a word, a line, or a block of code, knowing the shortcuts will expedite your editing process.

Efficient Text Editing, Search, and Replace

To streamline your editing workflow, consider the following techniques:

  • Macros: Take advantage of macros to record and replay a series of editing actions. This allows you to automate repetitive tasks and save time.
  • Multiple Cursors: Some editors support multiple cursors, allowing you to edit multiple occurrences of a word or phrase simultaneously. This feature is useful when making changes in multiple locations.
  • Advanced Search and Replace: Familiarize yourself with the advanced search and replace functionalities of your editor. This may include using regular expressions, specifying search ranges, or applying case-sensitive replacements.

Navigating Large Files and Multiple Buffers

When working with large files or multiple files simultaneously, these techniques can be helpful:

  • File Splitting: If a file is too large to handle comfortably, consider splitting it into smaller parts for easier navigation and editing. This can be done using commands or plugins specific to your editor.
  • Using Tabs or Windows: Some editors support tabs or windows, allowing you to work on multiple files side by side. This makes it easier to switch between files and compare content.
  • Bookmarks: Many editors provide bookmarking features that allow you to mark specific lines or locations in a file. This is useful for quick navigation to important sections.

Customization and Productivity Enhancements

Tailoring your editor to suit your preferences and workflow can significantly improve productivity. Consider the following customization options:

  • Configuration Files: Explore the configuration files of your editor to modify settings, keybindings, or appearance to align with your preferences.
  • Plugins and Extensions: Take advantage of plugins and extensions to extend the functionality of your editor. This can include additional syntax highlighting, linting, or integration with external tools.
  • Snippets and Templates: Utilize snippets or templates for frequently used code snippets or text patterns. This allows you to insert predefined code with a few keystrokes, saving time and reducing repetitive typing.
  • Keybinding Customization: Some editors allow you to customize keybindings to match your preferred shortcuts or align with those from other editors you are familiar with.

By mastering these advanced techniques and incorporating productivity-enhancing tips, you can maximize the efficiency and effectiveness of your Linux command line text editor. Experiment with different features, customize your editor, and adopt practices that suit your editing style and needs.

Section 7: Exploring Alternative Linux Command Line Text Editors

While popular Linux command line text editors like vi/Vim, nano, and Emacs dominate the landscape, there are several lesser-known alternatives worth exploring. In this section, we will introduce some of these editors, highlight their noteworthy features and unique offerings, and evaluate their suitability for specific use cases.

Introduction to Lesser-Known Text Editors

  • Joe: Joe is a small, simple, and easy-to-use command line text editor. It provides basic editing functionalities, syntax highlighting, and a menu-driven interface. Joe is particularly popular among users who prefer a minimalistic editor with a small footprint.
  • mcedit: mcedit is the text editor component of the Midnight Commander file manager. It offers a user-friendly interface, syntax highlighting, mouse support, and multiple undo/redo capabilities. mcedit is well-suited for users who prefer a text editor integrated with a file manager.
  • micro: micro is a modern, intuitive, and feature-rich terminal-based text editor. It boasts a clean and customizable interface, split editing, multiple cursors, and real-time linting. micro is designed to be user-friendly and highly extensible, making it an attractive choice for both beginners and power users.

Noteworthy Features and Unique Offerings

Each alternative text editor has its own distinctive features:

  • Joe: Joe focuses on simplicity and ease of use. It offers menu-driven commands, mouse support, and basic editing functionalities. Its lightweight nature makes it ideal for users seeking a fast and straightforward editing experience.
  • mcedit: As part of the Midnight Commander, mcedit benefits from its integration with a comprehensive file management tool. It provides a range of editing features, syntax highlighting, and a user-friendly interface, making it suitable for those who value convenience and ease of use.
  • micro: micro stands out for its modern interface and extensive customization options. It offers features like split editing, multiple cursors, real-time linting, and a plugin system for further extensibility. micro is well-suited for users who desire a versatile and visually appealing editor.

Evaluating Suitability for Specific Use Cases

When considering these alternative text editors, it’s important to evaluate their suitability for specific use cases:

  • Joe: Due to its simplicity, Joe is best suited for basic text editing tasks, quick edits, or users who prefer a minimalistic approach. It may not be as suitable for complex programming or advanced customization.
  • mcedit: mcedit’s integration with Midnight Commander makes it an excellent choice for users who frequently navigate and edit files within a file manager. It provides a convenient and cohesive environment for file management and editing.
  • micro: With its modern features and high extensibility, micro is a compelling choice for programmers and power users. It excels in code editing, thanks to its multiple cursors, linting capabilities, and customizable interface.

Ultimately, the choice of text editor depends on personal preferences, workflow requirements, and the specific tasks at hand. It’s worth exploring these alternative editors to discover their unique offerings and determine which aligns best with your needs.

Conclusion

Throughout this blog post, we have explored various aspects of Linux command line text editors, including their features, OS compatibility, usage, and intricacies. Let’s summarize the key concepts we’ve covered, highlight the benefits and applications of these text editors, and discuss the next steps for advancing your skills in Linux text editing.

Summary of Key Concepts Learned:

  1. Linux Command Line Text Editors: We discussed popular editors like vi/Vim, nano, Emacs, and sed, along with their features, modes, and customization options.
  2. OS Compatibility: These editors are compatible with Linux, macOS, and Windows, with availability varying across different operating systems.
  3. Features and Usage: Each editor has its unique set of features, ranging from modal editing and powerful scripting capabilities to user-friendliness and simplicity.
  4. Advanced Techniques: We explored advanced techniques such as cursor movement and selection, efficient editing, search and replace, navigating large files, and utilizing customization options.

Benefits and Applications of Linux Command Line Text Editors:

  • Code Editing: Linux command line text editors excel in editing code files, providing syntax highlighting, code navigation, and customization options that enhance the coding experience.
  • Stream Editing and Text Manipulation: Tools like sed are specifically designed for stream editing and complex text transformations, making them invaluable for tasks such as batch processing, search and replace operations, and log file manipulation.
  • Flexibility and Customization: Linux text editors offer extensive customization options, allowing users to tailor their editing environment, keybindings, and appearance to suit their preferences and workflows.

Next Steps for Advancing Your Skills in Linux Text Editing:

  1. Practice Regularly: The more you use the text editors, the more proficient you will become. Regular practice will help you internalize the commands, shortcuts, and advanced techniques.
  2. Explore Advanced Features: Dive deeper into the advanced features and capabilities of your chosen text editor. Learn about macros, plugins, and scripting to enhance your productivity.
  3. Read Documentation and Resources: Refer to the official documentation and explore online resources, tutorials, and forums to expand your knowledge and discover new tips and tricks.
  4. Join Communities and User Groups: Engage with communities and user groups centered around your preferred text editor. This allows you to learn from experienced users, ask questions, and share your own knowledge.
  5. Experiment with Different Editors: Don’t be afraid to try out alternative text editors to explore different workflows and find the one that best aligns with your needs and preferences.

By summarizing the key concepts, understanding the benefits and applications of Linux command line text editors, and taking proactive steps to advance your skills, you can become proficient in these powerful tools. Embrace continuous learning, practice regularly, and leverage the versatility of these editors to streamline your text editing workflow and boost your productivity.

July 7, 2023 0 comments
2 FacebookTwitterPinterestEmail
NGINX-logo-rgb-large
LinuxUbuntu

How to Install NGINX on Ubuntu 22.04

by pcplanet July 5, 2023
written by pcplanet 10 minutes read

Introduction

Why Install NGINX on Ubuntu 22.04?

one of the reasons to install NGINX on Ubuntu 22.04 combines the best of both worlds. You get the versatility and robust performance of NGINX on a secure, user-friendly, and widely supported operating system. This setup is ideal for hosting high-traffic websites, building application backends, and setting up a cloud infrastructure.

What is NGINX?

NGINX is a high-performance, open-source web server, known for its stability, rich feature set, simple configuration, and low resource consumption. Beyond just a web server, it can also function as a reverse proxy, load balancer, mail proxy, and HTTP cache, making it a versatile tool in any developer’s toolkit.

What is Ubuntu 22.04?

Ubuntu 22.04 is a version of Ubuntu, one of the most popular distributions of the Linux operating system. It is known for its user-friendliness, security, and extensive community support. Whether you’re a beginner venturing into the world of Linux or an experienced professional managing servers, Ubuntu 22.04 can meet your needs.

Prerequisites

System Requirements

Before starting the installation, ensure your system meets the following requirements:

  1. Ubuntu 22.04 LTS installed
  2. Sudo privileges for software installation
  3. Access to a terminal/command line
  4. Stable internet connection for package download

Necessary Skills and Tools

A basic understanding of Linux commands is necessary for this tutorial. Familiarity with the command line, file permissions, and package management will make the process smoother. An SSH tool, like PuTTY, will also be helpful if you’re accessing a remote server.

Installing NGINX on Ubuntu 22.04

Now we’re getting to the heart of the matter—installing NGINX on your Ubuntu 22.04 system.

Step One: Update Your System

First, update your package lists for upgrades and new package installations.

sudo apt update
sudo apt upgrade

Step Two: Install NGINX

Next, install NGINX using the apt package manager.

sudo apt install nginx

Step Three: Adjusting the Firewall

If you have ufw (Uncomplicated Firewall) enabled, you’ll need to allow connections to NGINX.

sudo ufw allow 'Nginx HTTP'

Step Four: Checking your Web Server

Now, you should verify that NGINX is running successfully.

systemctl status nginx

If NGINX is running properly, you should be able to access your server’s public IP address in your web browser and see the default NGINX landing page.

Configuring NGINX

Basic Configuration

once you install NGINX, The main configuration file for NGINX is located at /etc/nginx/nginx.conf. However, for individual site configurations, you’ll use the server block files located in /etc/nginx/sites-available/. After creating a new configuration file in this directory, you’ll typically create a symbolic link to it in the /etc/nginx/sites-enabled/ directory.

Here’s a basic server block configuration:

server {
    listen 80 default_server;
    listen [::]:80 default_server;

    root /var/www/html;
    index index.html index.htm index.nginx-debian.html;

    server_name _;

    location / {
        try_files $uri $uri/ =404;
    }
}

Remember to always verify the configuration syntax before reloading NGINX:

sudo nginx -t

If the syntax is correct, reload NGINX to apply the new configuration:

sudo systemctl reload nginx

Absolutely, let’s go into a bit more detail:

4.2. Advanced Configuration

Once you install NGINX, you’re ready to dive deeper into its capabilities, there are a number of advanced configurations you can set up. Below are a few examples:

Setting Up a Reverse Proxy

A reverse proxy accepts a request from a client, forwards it to a server that can fulfill it, and returns the server’s response to the client. This can be useful in a number of scenarios, including load balancing, A/B testing, and serving static content from a separate server. Here’s a basic example of setting up a reverse proxy in your server block:

server {
    listen 80;
    server_name example.com;
    location / {
        proxy_pass http://localhost:3000;
    }
}

In this example, NGINX accepts incoming requests and forwards them to a server running on localhost at port 3000.

Load Balancing

NGINX can distribute incoming requests to multiple backend servers, a method known as load balancing. This can increase your application’s capacity and reliability. Here’s a simple example:

http {
    upstream backend {
        server backend1.example.com;
        server backend2.example.com;
        server backend3.example.com;
    }

    server {
        listen 80;
        location / {
            proxy_pass http://backend;
        }
    }
}

In this case, incoming requests are distributed evenly among the three backend servers.

Setting Up SSL Certificates

Secure Sockets Layer (SSL) and its successor, Transport Layer Security (TLS), are protocols for establishing authenticated and encrypted links between networked computers. By installing an SSL certificate, you can enable HTTPS on your website, providing secure connections for your users. Here’s a basic example:

server {
    listen 80;
    server_name example.com;
    return 301 https://$host$request_uri;
}

server {
    listen 443 ssl;
    server_name example.com;

    ssl_certificate /etc/nginx/ssl/nginx.crt;
    ssl_certificate_key /etc/nginx/ssl/nginx.key;

    location / {
        root /var/www/html;
        index index.html;
    }
}

In this configuration, any incoming HTTP requests are redirected to HTTPS, and NGINX serves your site over a secure connection using the provided certificate and key files.

Keep in mind that these are just the basics. Each of these topics is vast and may require further reading and experimentation to fully grasp. Make sure you understand each concept and its implications before implementing it in a production environment.

Troubleshooting Common Issues

Issue One: 404 Not Found

This error typically indicates that the requested resource is not available. Check that your root directive points to the correct directory and that the requested file exists in that directory.

Issue Two: 403 Forbidden

A 403 Forbidden error is an HTTP status code signaling that the server understood the request, but it can’t fulfill it. In the context of an NGINX server, this often means that the NGINX process doesn’t have sufficient permissions to read the requested file or directory.

Here are some possible reasons for a 403 Forbidden error and how to troubleshoot them:

Incorrect File Permissions

In Linux, each file and directory has an owner and a group, along with a set of permissions that specify who can read, write, or execute the file. If the user running the NGINX process (typically www-data or nginx) doesn’t have read permission on the requested file, or execute permission on all directories leading up to the file, it can’t serve the file to clients.

You can use the ls -l command to list files with their permissions. For example:

ls -l /var/www/html/

The output will look something like this:

-rw-r--r-- 1 www-data www-data 418 Sep 25  2013 index.html

This tells you that the file index.html is owned by the user www-data and the group www-data, and it has read and write permissions for the owner, and read permissions for the group and others.

To give the NGINX user read permission on a file, you can use the chmod command. For example, the following command gives read permission to all users on index.html:

sudo chmod a+r /var/www/html/index.html

And the following command gives the NGINX user execute permission on all directories leading up to index.html:

sudo chmod a+x /var /var/www /var/www/html

Incorrect Ownership

If the requested files are owned by a different user and that user hasn’t given sufficient permissions to other users, the NGINX process won’t be able to read them. You can change the ownership of a file or directory using the chown command. For example:

sudo chown www-data:www-data /var/www/html/index.html

This command changes the owner and group of index.html to www-data.

NGINX Configuration Issues

Sometimes, the problem might lie within the NGINX configuration itself. For example, the deny directive in an NGINX configuration can be used to deny access to a specific IP address or range of IP addresses. If you’re receiving a 403 Forbidden error, ensure there are no deny directives in your NGINX configuration that might be blocking your requests.

To check your NGINX configuration, you can use the nginx -T command, which will output the entire configuration:

sudo nginx -T

In all of these cases, remember to restart or reload the NGINX server after making changes to ensure they take effect:

sudo systemctl reload nginx

Sure, let’s delve into that:

Issue Three: Connection Refused

A “Connection Refused” error occurs when your NGINX server is not accepting connections on the port a client is attempting to connect to. This error is usually due to either the NGINX service not running, or firewall rules preventing the connection.

Ensure NGINX is Running

Before examining the firewall, make sure NGINX is actually running. Use the following command to check the status of the NGINX service:

sudo systemctl status nginx

If NGINX is not running, you can start it with:

sudo systemctl start nginx

Check Firewall Rules

If NGINX is running but you’re still experiencing “Connection Refused” errors, the issue might be related to your firewall settings. If your firewall is not configured to allow incoming connections on the port that NGINX is listening on (usually port 80 for HTTP and port 443 for HTTPS), clients won’t be able to connect to your server.

If you’re using ufw (Uncomplicated Firewall), a common firewall utility on Ubuntu, you can view your current firewall rules with:

sudo ufw status

If the status is inactive, that means there are currently no rules set up. If it’s active, you should see a list of rules and which ports are allowed.

If you don’t see a rule allowing traffic on port 80 (HTTP) and 443 (HTTPS), you will need to add one:

sudo ufw allow 80
sudo ufw allow 443

If you’re using a different firewall tool, the specific commands will differ, but the general approach remains the same: you need to ensure your firewall is allowing incoming connections on the ports that NGINX is listening on.

Check NGINX Configuration

If NGINX is running and your firewall settings are correct, another place to look is your NGINX configuration file. Ensure that NGINX is set to listen on the correct port and that it is set to the correct server block.

A basic configuration might look like this:

server {
    listen 80 default_server;
    listen [::]:80 default_server;

    server_name _;
    root /var/www/html;
    index index.html;

    location / {
        try_files $uri $uri/ =404;
    }
}

In this example, NGINX is set to listen on port 80. If you’ve set NGINX to listen on a different port, you’ll need to update your firewall rules to allow that port.

Remember to check your configuration file syntax with nginx -t and reload the service with systemctl reload nginx after making any changes.

Best Practices for Using NGINX on Ubuntu 22.04

Updating Regularly

Keep your system and NGINX updated to ensure you’re getting the latest features, performance improvements, and security patches.

sudo apt update
sudo apt upgrade

Monitoring Performance

Use monitoring tools like htop, top, and nginx -V to monitor your server’s performance. This can help you identify potential issues before they impact your users.

Conclusion

Installing NGINX on Ubuntu 22.04 is a straightforward process that can be done in a few steps. With NGINX, you have a powerful tool that can serve websites, act as a reverse proxy, and much more. While this guide provides a basic introduction, there’s much more to explore with NGINX on Ubuntu 22.04.

FAQs

  1. Is NGINX free? Yes, the open-source version of NGINX is free. There is also a paid version called NGINX Plus that offers additional features.
  2. Can I install NGINX on other Linux distributions? Yes, NGINX can be installed on any Linux distribution, including CentOS, Debian, and Fedora.
  3. What’s the difference between Apache and NGINX? Both are powerful web servers, but they handle traffic differently. NGINX is known for its ability to handle a large number of simultaneous connections with low memory usage.
  4. How can I remove or uninstall NGINX from my Ubuntu system? You can uninstall NGINX using the command sudo apt remove nginx.
  5. Can NGINX handle dynamic content? While NGINX can serve static content directly, it typically passes dynamic content requests to an application server.
July 5, 2023 0 comments
2 FacebookTwitterPinterestEmail
LinuxUbuntu

How to install phpmyadmin on Ubuntu 22.04

by pcplanet July 4, 2023
written by pcplanet 6 minutes read

System requirements

To install phpMyAdmin, you need an Ubuntu 22.04 LTS system with at least 1 GB of RAM and sufficient storage space for the LAMP stack and phpMyAdmin itself. Also, make sure you have a stable internet connection.

You should be comfortable using the terminal, have basic knowledge of Linux commands, and understand the basics of the LAMP (Linux, Apache, MySQL, and PHP) stack.

Introduction

What is phpMyAdmin?

phpMyAdmin is a popular, open-source tool written in PHP, designed for managing MySQL databases through a user-friendly web interface. Whether you are a database novice or a seasoned developer, phpMyAdmin’s feature-rich environment is an ideal platform to interact with MySQL databases, offering capabilities such as browsing, modifying, creating, and managing databases, tables, fields, and rows.

Importance of phpMyAdmin

The value of phpMyAdmin lies in its ability to handle administrative tasks effortlessly. You can run SQL queries, optimize your databases, export and import data, and even set up replication – all without having to use command-line interface.

Step-by-Step Guide

Installing LAMP Stack

Before installing phpMyAdmin, you need a working LAMP stack. Here’s how to set it up.

Updating Ubuntu

To ensure your system is up-to-date, run the following commands:

sudo apt update
sudo apt upgrade

Installing Apache

Apache is a popular web server. Install it using the following command:

sudo apt install apache2

To verify, access http://localhost or your server IP in a web browser. You should see the Apache2 Ubuntu Default Page.

Installing MySQL

MySQL is a relational database management system. Install it with:

sudo apt install mysql-server

During installation, set a secure password when prompted.

Installing PHP

Lastly, install PHP along with some common extensions:

sudo apt install php libapache2-mod-php php-mysql

One-Liner

Here is a one line command to install the lamp stack, enable Apache2 on boot, secure MySQL and allow Apache through UFW.

sudo apt update && sudo apt upgrade -y && sudo apt install apache2 mysql-server php libapache2-mod-php php-mysql -y && sudo systemctl enable apache2 && sudo mysql_secure_installation && sudo ufw allow in "Apache Full"

Securing MySQL

Run the MySQL security script:

sudo mysql_secure_installation

Follow the prompts to set up a secure environment.

Install phpMyAdmin

Now, you’re ready to install phpMyAdmin:

sudo apt install phpmyadmin

During the installation, you’ll be asked to choose a web server. Select Apache2 and press Enter. When asked if you would like dbconfig-common to configure a new database for phpmyadmin, choose Yes.

Accessing phpMyAdmin

Accessing phpMyAdmin might differ based on whether you’re trying to access it on the same system where it’s installed (locally) or from a different system (remotely).

Via localhost

When you install phpMyAdmin on your local machine, the default URL to access phpMyAdmin interface would be http://localhost/phpmyadmin. Let’s break this down:

  • http://: This is the protocol used for transferring data over the web.
  • localhost: This is the hostname that means ‘this computer,’ or more accurately, ‘the computer I’m working on.’ It’s used to access the network services that are running on the host via the loopback network interface.
  • /phpmyadmin: This is the path to the phpMyAdmin application.

To access phpMyAdmin on your local machine:

  1. Open a web browser.
  2. In the address bar, type http://localhost/phpmyadmin.
  3. Press Enter.

You’ll be greeted with the phpMyAdmin login screen. Here, you’ll need to enter your MySQL username and password that you set during installation.

Via remote access

Accessing phpMyAdmin remotely involves connecting to phpMyAdmin installed on a server from a separate machine. Instead of using ‘localhost’ in the URL, you will need to use the server’s IP address or domain name (if it has one).

To access phpMyAdmin remotely:

  1. Open a web browser.
  2. In the address bar, type http://SERVER_IP_OR_DOMAIN/phpmyadmin.
  3. Press Enter.

Again, you’ll see the phpMyAdmin login screen. Enter the MySQL username and password to log in.

Note: Depending on your server’s firewall rules and settings in Apache and phpMyAdmin configuration files, you might need additional steps to enable remote access. Always ensure secure access by using VPNs or SSH tunnels and avoid enabling open access to the phpMyAdmin interface on the public internet.

Troubleshooting Common Errors

Working with web applications like phpMyAdmin can occasionally lead to errors. The “Forbidden” and “Access denied” errors are quite common. However, they can typically be resolved by adjusting certain configuration settings.

‘Forbidden’ Error

The ‘Forbidden’ error usually appears when there’s an issue with Apache’s configuration files or file permissions. This error might prevent you from accessing your phpMyAdmin interface.

To resolve this issue:

  1. Check your Apache configuration: Make sure the following line is present in /etc/apache2/apache2.conf: Include /etc/phpmyadmin/apache.conf This line ensures that Apache knows the location of the phpMyAdmin configuration file and can correctly process requests for the phpMyAdmin application. Open the Apache configuration file with a text editor, such as nano: sudo nano /etc/apache2/apache2.conf If the line is missing, add it to the bottom of the file, save the changes, and exit the editor.
  2. Restart Apache: To apply the changes, restart the Apache service using the following command: sudo systemctl restart apache2 If Apache restarts without any error messages, try accessing your phpMyAdmin interface again.

If the ‘Forbidden’ error persists even after these steps, check the file permissions for the phpMyAdmin directory and ensure that Apache has sufficient permissions to read and execute the files.

‘Access denied’ Error

The ‘Access denied for user ‘root’@’localhost” error typically appears when you try to log into phpMyAdmin using the root user, and MySQL’s new authentication method isn’t compatible with phpMyAdmin.

To resolve this issue, you need to change the authentication method for the MySQL root user:

  1. Open MySQL’s command-line client: sudo mysql -u root -p Enter your password when prompted.
  2. Change the authentication method: In the MySQL shell, run the following command: ALTER USER 'root'@'localhost' IDENTIFIED WITH mysql_native_password BY 'your_password'; Replace ‘your_password’ with your actual password. This command changes the authentication method for the root user to ‘mysql_native_password’, which is compatible with phpMyAdmin.
  3. Refresh MySQL’s privileges: FLUSH PRIVILEGES;
  4. Exit the MySQL shell: exit Now, you should be able to log into phpMyAdmin with the root user.

Remember, when working with web applications and databases, always backup your data and configurations to prevent potential data loss during troubleshooting.

Maintaining phpMyAdmin

Regularly updating phpMyAdmin

To keep phpMyAdmin secure, regularly update it. Use:

sudo apt update
sudo apt upgrade

Setting up automatic updates

For automatic updates, install the unattended-upgrades package:

sudo apt install unattended-upgrades

Configure it to fit your needs.

Conclusion

Congratulations! You’ve successfully installed phpMyAdmin on Ubuntu 22.04. Remember to keep it updated to ensure a secure and smooth user experience.

FAQs

  1. What is the LAMP stack?
    • LAMP stands for Linux, Apache, MySQL, and PHP. Together, they provide a complete web application platform.
  2. Why can’t I log in to phpMyAdmin?
    • Check your username and password. If still unsuccessful, there might be an issue with your MySQL configuration.
  3. How can I access phpMyAdmin remotely?
    • Replace ‘localhost’ with your server’s IP in the URL.
  4. What do I do if I forget my phpMyAdmin password?
    • You’ll need to reset the MySQL root password.
  5. How do I uninstall phpMyAdmin?
    • Use sudo apt remove phpmyadmin to uninstall. To remove configuration data, use sudo apt purge phpmyadmin.
July 4, 2023 0 comments
1 FacebookTwitterPinterestEmail
Linux

How to use the SCP command in linux

by pcplanet July 4, 2023
written by pcplanet 5 minutes read

Introduction

Managing data is a critical part of any system administration — and that often involves transferring files between systems. In the Linux world, there are several commands you can use to securely move your data, and the SCP (Secure Copy Protocol) command is one of them.

Understanding Linux and the Importance of File Transfer

Linux is an open-source operating system that powers many servers worldwide. A fundamental skill for any Linux user is the ability to transfer files between systems — for backups, migration, synchronization, or sharing data with colleagues.

What is the SCP Command?

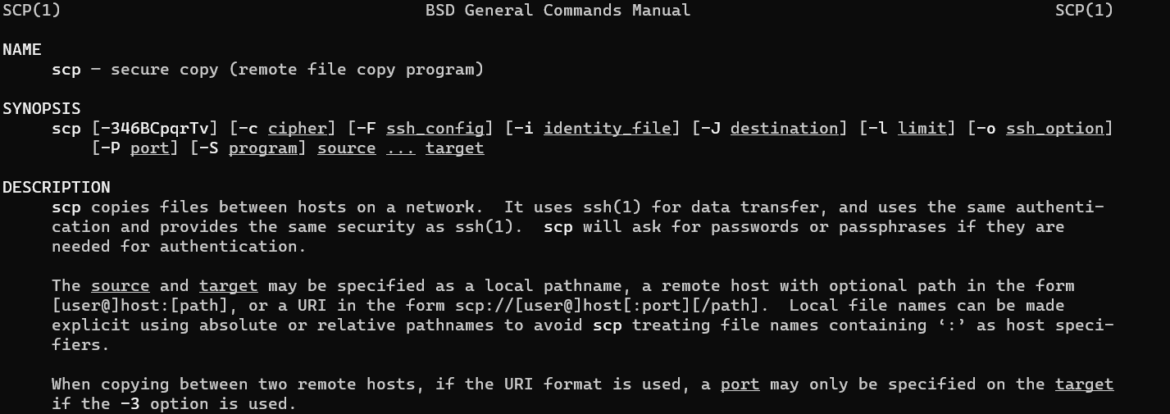
The SCP command is a secure means for transferring files between hosts on a network. It uses the SSH (Secure Shell) protocol for data transfer and provides the same level of security and benefits, such as strong encryption and identity verification.

Structure of the SCP Command

Basic Syntax

The basic structure of an SCP command is as follows:

scp [options] [user@]src_host:]file_path [user@]dest_host:]destination_path

Where ‘options’ are additional parameters, ‘user@src_host:’ and ‘user@dest_host:’ are the source and destination hosts, and ‘file_path’ and ‘destination_path’ are the source and destination paths respectively.

Key Components of the SCP Command

Each SCP command consists of the following key components: the command itself, the source file location, and the destination file location. Note that a username and host are required for remote transfers.

Installing SCP on Linux

SCP comes pre-installed on most Linux distributions. However, if it isn’t present, you can install it by installing the OpenSSH client package, often named “openssh-client”.

How to Use SCP for Local File Transfer

Step-by-Step Guide

You can use SCP for local file transfers as well. Here’s a step-by-step guide:

  1. Open your terminal.
  2. Use the SCP command, followed by the path of the file you want to copy, and the destination path.

Example Use Case

scp /home/user/documents/file.txt /home/user/Desktop/

This command will copy ‘file.txt’ from the ‘documents’ directory to the ‘Desktop’ directory.

How to Use SCP for Remote File Transfer

Step-by-Step Guide

For remote file transfers, you’ll need to include the username and the host. Here’s a step-by-step guide:

  1. Open your terminal.
  2. Use the SCP command, followed by the path of the file you want to copy, and the destination path, prefixed by the username and host.

Example Use Case

scp /home/user/documents/file.txt remoteuser@remotehost:/remote/directory/

This command will copy ‘file.txt’ from the local ‘documents’ directory to the ‘remote/directory/’ on the remote host.

Understanding SCP Options

Commonly Used Options

The SCP command also includes several options for customized file transfers. Some of the most commonly used options include:

  • -r: This option allows you to copy directories recursively.
  • -p: Preserves the modification and access times, as well as the permissions of the source file.
  • -q: This option enables quiet mode, which suppresses the progress meter and warning messages.
  • -C: Compresses the data as it is sent to the destination machine, which can speed up transfers of small files across slow networks.

Examples and Use Cases

To copy a directory recursively from a local to a remote host:

scp -r /home/user/documents remoteuser@remotehost:/remote/directory/

To copy a file from a remote host to a local host with compression:

scp -C remoteuser@remotehost:/remote/directory/file.txt /home/user/documents/

SCP Versus Other File Transfer Methods

Comparison with FTP

While FTP is a widely-used file transfer protocol, SCP generally provides a higher level of security because of its utilization of the SSH protocol, which encrypts data during transit.

Comparison with SFTP

SFTP is another secure file transfer method that also uses SSH. However, unlike SCP, SFTP allows for a range of operations on remote files — it’s more like a remote file management system.

Troubleshooting Common SCP Issues

Identifying Common Errors

While SCP is generally straightforward to use, you may encounter issues such as permission denied, lost connection, or slow transfer speed.

Solutions to Common Problems

Permission issues usually stem from the destination directory’s write permissions, so ensuring the proper permissions should resolve this problem. Connection issues could be due to problems with SSH, so checking your SSH setup is crucial. Finally, slow transfer speeds can often be improved by compressing files during transfer with the -C option.

Best Practices When Using SCP

When using SCP, always ensure that your SSH configuration is secure. Use strong, unique passwords for SSH connections, or even better, use key-based authentication. Remember, SCP transfers are only as secure as the weakest link in your SSH setup!

Conclusion

SCP is a powerful and secure tool for transferring files between hosts on a network. By understanding its basic syntax and options, you can effectively and securely manage your file transfers.

Frequently Asked Questions

  1. Can I use SCP to transfer directories? Yes, using the -r option, you can transfer directories recursively.
  2. Why is my SCP transfer slow? This could be due to network latency, a high server load, or a lack of resources on your local machine. Using the -C option to compress files can sometimes help speed up transfers.
  3. How secure is SCP? SCP is very secure — it uses the SSH protocol for data transfer, which includes strong encryption and identity verification.
  4. Can SCP resume interrupted transfers? No, SCP cannot resume interrupted transfers natively. However, the rsync command can resume interrupted transfers and can be used over SSH, providing a similar level of security.
  5. How can I increase the speed of SCP transfers? Compressing the data during transfer with the -C option or using a faster network can increase the speed. Also, ensuring that the systems involved in the transfer are not resource-starved can help improve speeds.
July 4, 2023 0 comments
5 FacebookTwitterPinterestEmail
Linux

How to use ZSH

by pcplanet July 3, 2023
written by pcplanet 10 minutes read

Why Zsh Matters

As we step into the world of coding, we often overlook the shell’s role, the unsung hero of our development process. The shell is more than just a medium to run our scripts; it’s the heart of our interactions with the system. The Z Shell (or Zsh) elevates this interaction to new heights, enhancing productivity, customization, and efficiency. So why does Zsh matter, you ask? Let’s dive in and explore.

What is Zsh?

Zsh, short for the Z shell, is a Unix shell that was built on the foundations of the Bourne Shell (sh) and incorporates features from Bash, ksh, and tcsh. It’s known for its command-line completion, advanced scripting capabilities, spelling correction, and plenty of customization options.

The Difference Between Zsh and Bash

While Bash (the Bourne Again SHell) is the default shell for many Unix-based systems, Zsh offers features that Bash lacks. Think of Zsh as a superset of Bash: it does what Bash does, and then some more. Zsh’s autocorrect feature, shared command history, and sophisticated globbing patterns make it more powerful and user-friendly.

Part 1: Getting Started with Zsh

Before we can harness Zsh’s power, we must first install it and make it our default shell.

Installing Zsh

Zsh is readily available in most package managers. For a Debian-based system, use the following command:

sudo apt-get install zsh

For Mac users, you can install Zsh through Homebrew:

brew install zsh

Making Zsh Your Default Shell

Once installed, you can make Zsh your default shell with the chsh command:

chsh -s $(which zsh)

Upon next login, you’ll be greeted with the Zsh prompt.

Tailoring Your Shell Experience

The true power of Zsh lies not just in its built-in features, but also in the extensive customizations it allows. This level of personalization is primarily managed through a file named .zshrc, located in your home directory. Zsh reads this file each time a new session is initiated, applying any configurations found within.

Creating Your .zshrc File

The .zshrc file does not exist by default, so your first step in embarking on a journey of Zsh customization is to create it. This is a straightforward task achieved with a single command:

touch ~/.zshrc

The touch command generates an empty .zshrc file in your home directory. Now, you have a canvas to start tailoring Zsh to your liking.

Diving into Zsh Configuration

The .zshrc file can be seen as a powerful tool, allowing you to customize your terminal behavior, appearance, and shortcuts. Here are some common examples of what you can achieve:

1. Configuring Aliases:

Aliases are shortcuts or abbreviations for commands, and can significantly speed up your command line operations. For instance, instead of typing ls -al every time you want a detailed directory listing, you could set up an alias like so:

echo "alias ll='ls -al'" >> ~/.zshrc

Now, you can just type ll, and Zsh will substitute ls -al.

2. Setting Prompt Appearance:

The Zsh prompt can be customized to show a variety of information. For example, you might want it to display your current directory, the time, or your Git status. You can do this by adjusting the PROMPT variable in your .zshrc:

echo "PROMPT='%n@%m %~ %D{%T} %d $ '" >> ~/.zshrc

This command configures your prompt to show your username, hostname, current directory, and the time, followed by a $ symbol.

3. Loading Plugins and Themes:

If you have installed the Oh My Zsh framework, you can specify the plugins and themes you want to load in your .zshrc:

echo "plugins=(git z)" >> ~/.zshrc
echo "ZSH_THEME='agnoster'" >> ~/.zshrc

The first command enables the Git and z plugins, and the second sets the theme to agnoster.

4. Adding Custom Functions:

You can define custom shell functions in your .zshrc. For instance, you might want to create a function that opens a file in your favorite editor:

echo "edit() { vim \$1; }" >> ~/.zshrc

Now, if you type edit file.txt, it will open file.txt in Vim.

Remember, after making changes to your .zshrc file, you need to either start a new terminal session or source your .zshrc to apply the changes:

source ~/.zshrc

Part 2: Customizing Zsh

Zsh’s ability to customize your command-line experience is where it truly shines. Let’s understand this better.

Understanding .zshrc

.zshrc is your playground. You can customize the prompt, define aliases, load plugins, and set environment variables here. For instance, to customize your prompt, you can add this line:

PROMPT='%n@%m %~ %# '

This displays the username, machine name, current directory, and a special character (%#) that indicates user privileges.

Aliases and Functions

Aliases in Zsh help save time by allowing you to abbreviate commands. You can add an alias to .zshrc like so:

alias ll='ls -l'

This makes ll a shortcut for ls -l.

Functions are similar, but they allow more complex command chains. Here’s an example:

extract() {
  if [ -f $1 ] ; then
    case $1 in
      *.tar.bz2) tar xjf $1 ;;
      *.tar.gz) tar xzf $1 ;;
      *.bz2) bunzip2 $1 ;;
      *.rar) rar x $1 ;;
      *.gz) gunzip $1 ;;
      *.tar) tar xf $1 ;;


 *.tbz2) tar xjf $1 ;;
      *.tgz) tar xzf $1 ;;
      *.zip) unzip $1 ;;
      *.Z) uncompress $1 ;;
      *.7z) 7z x $1 ;;
      *) echo "'$1' cannot be extracted via >extract<" ;;
    esac
  else
    echo "'$1' is not a valid file"
  fi
}

The function extract allows you to extract various types of compressed files using a single command.

Zsh Plugins and Themes

When it comes to versatility and customization, Zsh stands unrivaled, largely due to its extensive support for plugins and themes. These add-ons extend Zsh’s capabilities, transforming your shell into a powerful and personalized workspace.

Oh My Zsh: An Open-Source Triumph

One of the most popular frameworks that enriches Zsh’s functionality is “Oh My Zsh”. Developed and maintained by the open-source community, this robust platform provides an impressive catalog of plugins and themes for Zsh. If you can imagine a feature you’d like in your terminal, chances are there’s an Oh My Zsh plugin that provides it.

You can install Oh My Zsh by executing the following command in your terminal:

sh -c "$(curl -fsSL https://raw.github.com/ohmyzsh/ohmyzsh/master/tools/install.sh)"

This command fetches the installation script from the Oh My Zsh repository and runs it, thereby seamlessly setting up Oh My Zsh on your system.

Plugins: Boosting Productivity and Efficiency

The extensive list of Oh My Zsh plugins is sure to include something to tickle every developer’s fancy. These plugins extend the functionality of Zsh, adding new commands, improving existing ones, and automating complex tasks, thereby enhancing your productivity.

For instance, the git plugin provides several handy aliases and functions that make Git commands simpler and faster to type. The docker plugin, on the other hand, offers autocomplete features for docker commands, making your interactions with Docker more streamlined.

Installing a new plugin is as simple as adding its name to the plugins array in your .zshrc file:

plugins=(git docker)

Themes: Dressing up Your Terminal

But Oh My Zsh is not just about boosting functionality; it’s also about aesthetics. This framework provides a multitude of themes to customize how your terminal looks. From the classic simplicity of robbyrussell to the informative and sleek agnoster, there’s a theme for every preference.

Setting a theme involves a simple change in your .zshrc file:

ZSH_THEME="agnoster"

Then, you just reload your terminal or source your .zshrc file to apply the changes:

source ~/.zshrc

And voila! Your terminal’s appearance is transformed, making your interactions with the shell not only productive but also visually appealing.

Part 3: Advanced Zsh Features

Zsh goes beyond cosmetic improvements, providing powerful features that boost productivity.

Autocompletion: Aiding Swift Command Execution

Arguably, one of Zsh’s most impressive capabilities is its autocompletion feature. It’s not just a mere convenience – it’s a powerful tool that makes working with complex commands a breeze. With Zsh, you can autocomplete commands, file names, hostnames, and even Git branches.

The way it works is simple yet effective. When typing a command, you start with a few characters and then hit the Tab key. Zsh jumps into action, suggesting possible completions based on what you’ve typed.

Let’s say you’re working with Git, and you type git ch then hit Tab. Zsh offers possible commands that match, such as git checkout and git cherry-pick. The more you use it, the more time it saves, making your command line operations faster and more efficient.

Globbing and Parameter Expansion: Enriching Command Syntax

Another feature that sets Zsh apart is its support for advanced globbing and parameter expansion, which introduce a new dimension of flexibility and complexity to command syntax.

Globbing in Zsh refers to the shell’s ability to use wildcard characters to match filenames and directories. This feature becomes incredibly powerful with advanced patterns. Consider this command: ls **/*.txt. This lists all .txt files, not only in your current directory but also recursively through all subdirectories. It’s a small command that accomplishes a large task, all thanks to the power of globbing.

Zsh also features advanced parameter expansion capabilities, which allow for sophisticated manipulation of shell parameters and command outputs. For instance, suppose you have a variable filename='example.txt'. With parameter expansion, you can strip the file extension using the command echo ${filename:r}, and it would output just example. This feature provides a significant boost when handling strings and command outputs, improving script efficiency.

Command History and Searching: Never Lose a Command

In the world of the command line, history is never a thing of the past. Zsh keeps a comprehensive record of the commands you’ve executed, enabling quick recall and reuse. But it doesn’t stop there. Zsh takes command history to the next level by offering a shared history across all your terminal sessions and a search feature.

Suppose you’re looking for a particular command you executed previously but can’t quite remember it. Zsh has you covered. Just start typing a portion of the command, and you can navigate the matching history entries with the arrow keys.

Alternatively, you can use the history command coupled with grep to search your command history. For instance, history | grep 'apt-get' would list all instances of apt-get you’ve used in your terminal. It’s like having a powerful search engine, right in your command history.

Conclusion: Harnessing the Power of Zsh

As we’ve seen, Zsh is more than just a shell; it’s a powerful tool that can enhance your command-line experience. Whether it’s autocompletion, advanced scripting, or simple time-saving aliases, Zsh has you covered.

FAQs

  1. Why should I switch to Zsh from Bash?
  • Zsh provides features not found in Bash, such as advanced tab completion, command correction, and shared history across sessions.
  1. How do I install Oh My Zsh?
  • You can install Oh My Zsh using the following command: sh -c "$(curl -fsSL https://raw.github.com/ohmyzsh/ohmyzsh/master/tools/install.sh)".
  1. What are some popular Zsh plugins?
  • Some popular Zsh plugins include git, docker, npm, yarn, and sudo.
  1. How do I create a function in Zsh?
  • Functions in Zsh can be created by defining a name and adding code inside curly brackets. The function can then be used like a command.
  1. What is globbing in Zsh?
  • Globbing refers to using wildcard characters to match files and directories. Zsh supports advanced globbing patterns, enabling complex file and directory operations.
July 3, 2023 0 comments
3 FacebookTwitterPinterestEmail
Linux

How to install Docker on Ubuntu 22.04

by pcplanet July 2, 2023
written by pcplanet 10 minutes read

Introduction

As we delve into the digital age, two names in the tech world stand out: Docker and Ubuntu. It’s almost impossible not to encounter these tools when navigating the vast landscape of modern technology. This comprehensive guide aims to walk you through on how to install docker on Ubuntu 22.04, the latest LTS (Long Term Support) version of one of the most popular Linux distributions.

What is Docker?

Docker is a leading force in the world of containerization. It provides an isolated environment, known as a container, where applications run independently from the underlying system. Docker’s major advantage lies in its ability to ensure that these applications function identically across any system that supports Docker. This consistency eliminates the all-too-common issues associated with varying software environments, affirming the classic saying: “If it works on my machine, it will work on yours”.

Why use Docker?

Simplicity and consistency are the twin pillars that form Docker’s appeal. Docker eliminates many of the challenges associated with deploying software by bundling an application and its dependencies into a single, self-sufficient unit, called a container. This simplicity, combined with Docker’s scalability and efficient use of system resources, makes it a favorite tool among developers, system administrators, and DevOps engineers.

Preparing for Docker Installation

Just like a skilled craftsman prepares his workspace before commencing work, we too must prepare our system before installing Docker. Let’s navigate this preparatory phase step-by-step.

System requirements for Docker on Ubuntu

Before we begin, it’s crucial to ensure that your system meets the minimum requirements to run Docker. For Ubuntu 22.04, these include:

  • A 64-bit version of Ubuntu 22.04
  • At least 2GB of RAM
  • 10GB of storage space

These specifications will allow Docker to run smoothly without straining your system’s resources.

Updating the Ubuntu system

Next, it’s always best practice to make sure your Ubuntu system is up-to-date before installing any new software. You can achieve this by opening a terminal and running the following commands:

sudo apt update
sudo apt upgrade

These commands will fetch and install the latest updates available for your Ubuntu system.

Installing Docker on Ubuntu 22.04

Finally, we arrive at the core part of this guide – installing Docker on your Ubuntu 22.04 system.

Step 1: Downloading Docker

To begin, you need to download Docker from its official repositories. You can accomplish this by running the following commands in your terminal:

sudo apt install apt-transport-https ca-certificates curl software-properties-common
curl -fsSL https://download.docker.com/linux/ubuntu/gpg | sudo apt-key add -
sudo add-apt-repository "deb [arch=amd64] https://download.docker.com/linux/ubuntu $(lsb_release -cs) stable"
sudo apt update

These commands will add the Docker repository to your system and update your package list.

Step 2: Installing Docker

With the Docker package downloaded, the next step is to install Docker. In your terminal, run the following command:

sudo apt install docker-ce

This command will install Docker on your system.

Step 3: Verifying the Docker Installation

After installing Docker, it’s crucial to

verify the installation to ensure that everything is running as it should. You can do this by running:

sudo systemctl status docker

If Docker has been installed correctly, you will see Docker’s status as active (running).

Understanding Docker Basics

Now that you have Docker installed, it’s time to understand some Docker basics to help you make the most of this powerful tool.

Docker Terminology

Docker, like any technical tool, comes with its own set of terminology. Here are some essential terms:

  • Image: A Docker image is a lightweight, standalone, and executable software package that includes everything needed to run a piece of software.
  • Container: A Docker container is a running instance of an image.
  • Dockerfile: A Dockerfile is a text file that contains all the commands to assemble an image.

Basic Docker Commands

Proficiency in Docker comes with understanding and using its commands. Here are some of the most commonly used Docker commands:

  • docker run <image>: This command is used to create and start a container from an image.
  • docker ps: This command is used to list all the running Docker containers.
  • docker stop <container-id>: This command is used to stop a running container.

Understanding Docker’s Important Files and Folders

Docker uses a variety of files and directories to manage its operation. Knowing where these files are and their roles can help you better understand and manage your Docker environment.

Docker Directory

The main Docker directory is usually located at /var/lib/docker. This directory houses all the information relating to Docker images, containers, volumes, and networks. Each of these components has its corresponding subdirectory:

  • /var/lib/docker/containers: Each Docker container has its directory here, named with a long id. It includes the container’s JSON configuration file, log files, and a directory representing the container’s file system.
  • /var/lib/docker/image: This is where Docker stores images. It contains a subdirectory for each different storage driver (like overlay2) that Docker supports.
  • /var/lib/docker/volumes: This is the default directory where Docker will store volume data.
  • /var/lib/docker/network: Files for managing networks are stored here.

Please note that it is generally not advisable to manually alter these files. Docker manages these directories and files itself, and making manual changes can disrupt its operation.

Dockerfile

The Dockerfile is a key component when building your own Docker images. It’s a text file that Docker reads to automatically build an image. It can include instructions to copy files into the image, install software packages, set environment variables, and more.

docker-compose.yml

The docker-compose.yml file is where Docker Compose looks for instructions on which images to use, how to configure them, and how they should interact with each other. Like the Dockerfile, it’s a plain text file and typically resides in the root directory of your project.

Docker Best Practices

To optimize your Docker experience and usage, we will delve into some best practices in handling Docker containers and images:

Regularly Prune Unnecessary Docker Objects

Over time, Docker can consume a considerable amount of disk space. Docker creates and stores images, containers, volumes, and networks, some of which may not always be in active use. These “orphaned” or “dangling” objects can take up significant space, leading to disk space exhaustion, a common problem for Docker users.

To avoid this, regularly prune your Docker system. Docker provides the docker system prune command, which can remove all stopped containers, all networks not used by at least one container, all dangling images, and all build cache. If you want to remove all unused images and not just the dangling ones, add the -a option to the command, making it docker system prune -a.

Remember to be careful when using these commands, and only prune your system when you’re sure that you won’t lose important data.

Always Use Dockerfiles for Creating Images

While you can create Docker images by manually configuring a container and then using the docker commit command, this approach is not recommended. Manual configuration is error-prone, not easily repeatable, and offers poor documentation.

Instead, always use a Dockerfile to create images. Dockerfiles are simple text files that contain the commands you would execute on the command line to create an image. They provide documentation of the image creation process, and they can be stored in version control, enabling collaboration and ensuring you can easily recreate the image in the future.

Regularly Update Images and Promptly Apply Security Patches

Security is a major concern in the software world, and Docker is no exception. Regularly update your Docker images to their latest versions to benefit from the latest features and security patches.

Apart from updating, you should also remove vulnerabilities from your images. Tools like Docker’s own Docker Scan, based on the open-source tool Trivy, can scan images for vulnerabilities, providing you with the information you need to secure your images.

Limit the Use of Latest Tag

When pulling images without a tag specified, Docker will use the “latest” tag by default. However, the “latest” tag can be misleading as it doesn’t necessarily point to the latest version of an image. It’s just a default tag that image creators can assign to any version of their image.

To ensure you’re using a specific version of an image, always specify the image’s tag when pulling it.

Run Only Necessary Processes in Your Container

Containers are designed to be lightweight and ephemeral, meaning they can be started and stopped quickly. To achieve this, you should only run the necessary processes in your container. Ideally, each container should be responsible for executing a single process. This approach leads to easier management, clearer responsibility boundaries, and better use of Docker’s process management.

Leverage .dockerignore Files

Just like you can use .gitignore to exclude files from being version-controlled in Git, you can use .dockerignore files to prevent files and directories from being included in a Docker image. This is crucial for security and efficiency as it allows you to exclude sensitive files and large, unnecessary files, making your Docker images lean and secure.

Don’t Run Processes as Root in Containers

Running processes as root, even in containers, is a security risk. If an attacker manages to break out of the container, they could gain root access to the Docker host. To mitigate this, you should use the USER directive in your Dockerfile to ensure that services are running as a non-root user.

Use Docker’s Build Cache Wisely

Docker’s build cache can drastically reduce build times by reusing layers from previous builds. However, if not used wisely, it could lead to outdated layers being used. Structure your Dockerfile properly to make the best use of the cache. The build cache follows a top-down approach, so put instructions that change more frequently (like code copy instructions) at the bottom of the Dockerfile to avoid invalidating the cache unnecessarily.

Take Advantage of Docker Health Checks

Docker includes a HEALTHCHECK instruction in Dockerfiles that can be used to check the health of your applications within Docker containers. This can be incredibly helpful in understanding the state of your application and is particularly valuable in production environments where it’s crucial to detect and recover from unhealthy states quickly.

If you want to learn more, see this article!

Conclusion

By following the steps outlined in this guide, you now have Docker installed on your Ubuntu 22.04 system. Whether you’re a developer, a system administrator, or just a tech enthusiast, having Docker in your toolkit will open up a world of possibilities.

Frequently Asked Questions (FAQs)

Finally, we’ll address some frequently asked questions about Docker and Ubuntu 22.04:

  1. Can I install Docker on other versions of Ubuntu?
    Yes, Docker can be installed on other versions of Ubuntu as well, though the process may slightly differ.
  2. Is Docker free to use?
    Yes, Docker offers a free Community Edition (CE) that can be used for general purposes.
  3. Can I run multiple Docker containers at the same time?
    Yes, Docker allows you to run multiple containers simultaneously.
  4. What’s the difference between a Docker image and a Docker container?
    A Docker image is a standalone, executable package that includes everything needed to run a piece of software, while a Docker container is a running instance of an image.
  5. Does Docker work only on Linux systems?
    No, Docker is platform-independent and can run on Linux, Windows, and macOS.
July 2, 2023 0 comments
3 FacebookTwitterPinterestEmail
Linux

Docker CLI: A Comprehensive Guide to Mastering Docker Command Line Interface

by pcplanet July 1, 2023
written by pcplanet 15 minutes read

Introduction

In today’s rapidly evolving software development landscape, containers have become a fundamental technology. Docker, one of the most popular containerization platforms, allows developers to create, deploy, and manage applications in isolated environments. To harness the full power of Docker, it is essential to have a solid understanding of the Docker Command Line Interface (CLI). In this article, we will delve into the intricacies of the Docker CLI, providing you with a comprehensive guide to mastering its commands and unleashing the potential of containerization.

What is Docker CLI?

Understanding the role of Docker CLI

At its core, the Docker CLI is a command-line tool that provides a user-friendly interface to interact with Docker and manage containerized applications. It allows developers and system administrators to perform various tasks such as creating, starting, stopping, and removing containers, managing images, configuring networks, and more.

The Docker CLI serves as a gateway to Docker’s vast ecosystem, enabling users to leverage the power of containers and streamline their development workflows. With its intuitive command structure and extensive feature set, Docker CLI empowers users to orchestrate and manage containers efficiently.

Key benefits of using Docker CLI

The Docker CLI offers several benefits that make it a popular choice among developers and DevOps professionals:

  1. Simplicity and Efficiency: Docker CLI provides a straightforward and efficient way to manage containers and images, allowing users to perform complex operations with minimal effort.
  2. Portability: Docker CLI enables seamless portability of applications across different environments. Developers can package applications and their dependencies into containers, ensuring consistent behavior regardless of the underlying infrastructure.
  3. Rapid Deployment: With Docker CLI, deploying applications becomes a breeze. It allows users to spin up containers quickly, enabling faster testing, deployment, and scaling of applications.
  4. Version Control: Docker CLI facilitates version control for container images, enabling users to track changes, roll back to previous versions, and collaborate effectively with other team members.

Now that we understand the importance and benefits of Docker CLI, let’s dive into the practical aspects of using it.

Installation and Configuration

Before you can start using Docker CLI, you need to install it on your machine and perform basic configuration. Here’s a brief overview of the installation process and basic configuration steps for different operating systems:

Installing Docker CLI on different operating systems

1. Windows

To install Docker CLI on Windows, follow these steps:

  1. Download the Docker Desktop installer from the official Docker website.
  2. Run the installer and follow the on-screen instructions.
  3. Once installed, Docker CLI will be available through the Docker Desktop application.

2. macOS

To install Docker CLI on macOS, follow these steps:

  1. Download the Docker Desktop installer for macOS from the official Docker website.
  2. Double-click the installer and follow the installation wizard.
  3. After installation, Docker CLI will be accessible through the Docker Desktop application.

3. Linux

The installation process for Docker CLI on Linux may vary depending on your Linux distribution. It is recommended to consult the official Docker documentation for detailed installation instructions specific to your distribution.

Configuring Docker CLI with basic settings

After installing Docker CLI, it’s essential to configure it with basic settings to customize its behavior according to your requirements. Here are some essential configuration steps:

  1. Configuring Docker Daemon: Docker CLI interacts with the Docker Daemon, which is responsible for managing containers and images. You can configure the Docker Daemon settings using the `daemon.json` file, which allows you to specify options like storage drivers, network settings, and more.
  1. Setting Up Docker Registry: Docker CLI allows you to push and pull container images to and from Docker registries. You can configure your Docker CLI to use a specific registry, either a public one like Docker Hub or a private registry hosted on-premises or in the cloud.
  2. Authentication and Security: Docker CLI supports authentication mechanisms to secure access to Docker registries and repositories. You can configure authentication credentials to ensure only authorized users can interact with Docker CLI and perform sensitive operations.

Now that we have Docker CLI installed and configured, let’s explore its powerful capabilities for managing containers.

Managing Containers

Containers are at the heart of Docker’s value proposition. Docker CLI provides a comprehensive set of commands to manage containers efficiently. Let’s explore some of the essential container management tasks using Docker CLI:

Creating containers using Docker CLI

To create a container with Docker CLI, you can use the docker create command followed by the image name and optional parameters. For example:

docker create --name mycontainer myimage:tag

This command creates a new container named “mycontainer” using the specified image “myimage” with the desired tag.

Starting, stopping, and restarting containers

Once you have a container, you can start, stop, and restart it as needed using Docker CLI commands:

  • To start a container, use the docker start command followed by the container name or ID.
  • To stop a running container, use the docker stop command followed by the container name or ID.
  • To restart a container, use the docker restart command followed by the container name or ID.
docker start mycontainer
docker stop mycontainer
docker restart mycontainer

Listing and inspecting containers

To get an overview of the containers running on your system, you can use the docker ps command. This command lists all the running containers along with their basic information such as the container ID, image used, status, and names.

docker ps

If you want to view detailed information about a specific container, you can use the docker inspect command followed by the container name or ID:

docker inspect mycontainer

Removing containers

To remove a container that is no longer needed, you can use the docker rm command followed by the container name or ID:

docker rm mycontainer

Note that you cannot remove a running container unless you add the -f or --force flag to the command.

These are just a few examples of the container management capabilities offered by Docker CLI. With Docker CLI, you have fine-grained control over your containers, allowing you to create, start, stop, inspect, and remove them with ease.

Working with Images

Docker CLI provides powerful commands for managing container images. Let’s explore some of the essential image-related tasks using Docker CLI:

Pulling Docker images from repositories

To pull a Docker image from a repository, you can use the docker pull command followed by the image name and optional tag:

docker pull myimage:tag

This command fetches the specified image from the repository and stores it locally on your machine.

Building custom Docker images

If you need to create custom container images, Docker CLI allows you to build images from Dockerfiles. A Dockerfile is a text file that contains instructions for building a Docker image. Here’s an example of a simple Dockerfile:

FROM baseimage:tag
COPY app /app
CMD ["python", "/app/main.py"]

To build an image from a Dockerfile

, use the docker build command followed by the build context directory:

docker build -t myimage:tag .

This command builds an image with the specified tag using the Dockerfile located in the current directory.

Pushing and pulling images to and from registries

Once you have a custom image, you can push it to a registry for sharing with others or pull images from registries for deployment. Docker CLI provides commands for these operations:

  • To push an image to a registry, use the docker push command followed by the image name and optional tag:
  docker push myimage:tag
  • To pull an image from a registry, use the docker pull command followed by the image name and optional tag:
  docker pull myimage:tag

Managing image versions

With Docker CLI, you can manage multiple versions of container images effectively. Docker CLI allows you to tag and manage images based on versions or labels. By tagging images, you can differentiate between different versions and track their usage.

To tag an image, use the docker tag command followed by the source image name and the target tag:

docker tag myimage:latest myimage:1.0

This command tags the existing image “myimage” with the tag “1.0”.

Now that we have covered the basics of managing containers and images, let’s explore networking and volumes in Docker CLI.

Networking and Volumes

Docker CLI provides robust networking and volume management capabilities. Let’s explore how you can configure networking and manage volumes using Docker CLI:

Managing container networks with Docker CLI

Docker CLI allows you to create and manage networks for your containers. By default, Docker creates a bridge network for each host, but you can create custom networks for better control over container communication.

To create a network, you can use the docker network create command followed by the network name:

docker network create mynetwork

This command creates a new network named “mynetwork”.

Exposing container ports

To expose container ports and make them accessible from the host or other containers, you can use the -p flag with Docker CLI commands. For example, to expose port 8080 of a container, you can run:

docker run -p 8080:80 myimage:tag

This command maps port 8080 of the host to port 80 of the container.

Creating and managing volumes

Volumes allow you to persist data generated or used by containers. Docker CLI provides commands to create and manage volumes:

  • To create a volume, use the docker volume create command followed by the volume name:
  docker volume create myvolume
  • To mount a volume to a container, use the -v flag followed by the volume name and the container path:
  docker run -v myvolume:/data myimage:tag
  • To list all volumes on your system, use the docker volume ls command:
  docker volume ls
  • To remove a volume, use the docker volume rm command followed by the volume name:
  docker volume rm myvolume

With Docker CLI’s networking and volume management capabilities, you can create and manage complex container setups with ease.

Docker Compose

Docker Compose is a powerful tool that allows you to define and manage multi-container applications using a declarative YAML file. Let’s explore the basics of Docker Compose and how it integrates with Docker CLI:

Understanding Docker Compose and its benefits

Docker

Compose simplifies the management of multi-container applications by defining the services, networks, and volumes required for the application in a single file. With Docker Compose, you can easily spin up and orchestrate multiple containers with a single command.

The benefits of using Docker Compose include:

  • Simplified Configuration: Docker Compose allows you to define and manage complex application configurations in a human-readable YAML file.
  • Easy Reproducibility: With a Docker Compose file, you can easily share and reproduce the exact application setup across different environments.
  • Service Dependencies: Docker Compose handles service dependencies, ensuring that dependent services start in the correct order.

Writing a Docker Compose file

A Docker Compose file consists of services, networks, and volumes. Each service represents a containerized application, and you can define various properties for each service, such as image, ports, environment variables, and more.

Here’s an example of a simple Docker Compose file:

version: '3'
services:
  web:
    image: myimage:tag
    ports:
      - 8080:80
    environment:
      - ENV_VAR=value
  db:
    image: mysql:latest
    environment:
      - MYSQL_ROOT_PASSWORD=secret

This Docker Compose file defines two services: “web” and “db”. The “web” service uses the “myimage” image, maps port 8080 of the host to port 80 of the container, and sets an environment variable. The “db” service uses the “mysql” image and sets the root password.

Managing multi-container applications

To start a multi-container application defined in a Docker Compose file, you can use the docker-compose up command:

docker-compose up

This command reads the Docker Compose file in the current directory and starts the services defined in the file.

Docker Compose also provides commands for stopping and managing the lifecycle of multi-container applications, such as docker-compose stop, docker-compose restart, and more.

With Docker Compose and Docker CLI, you can easily manage complex multi-container applications and streamline your development workflows.

Dockerfile and Build Process

To automate the process of building container images, Docker provides Dockerfiles. A Dockerfile is a text file that contains instructions for building a Docker image.

Creating Dockerfiles to automate image builds

A Dockerfile typically starts with a base image and then defines a series of instructions to configure the image and install necessary dependencies. Here’s an example of a Dockerfile for a Python web application:

FROM python:3.9
WORKDIR /app
COPY requirements.txt .
RUN pip install --no-cache-dir -r requirements.txt
COPY . .
CMD ["python", "app.py"]

In this example, the Dockerfile starts with the official Python 3.9 image, sets the working directory, copies the requirements.txt file, installs dependencies, copies the application code, and specifies the command to run the application.

Writing efficient Dockerfile instructions

When writing Dockerfile instructions, it’s important to follow best practices to optimize the image build process. Some tips for writing efficient Dockerfile instructions include:

  • Use Multi-Stage Builds: Multi-stage builds allow you to use different images for different stages of the build process, reducing the size of the final image.
  • Leverage Caching: Docker uses a layer caching mechanism. By ordering instructions intelligently, you can take advantage of caching to speed up the image build process.
  • Minimize Image Size: Avoid including unnecessary files and dependencies in your image to reduce its size and improve performance.

Building Docker images with the Docker CLI

To build a Docker image using a

Dockerfile, you can use the docker build command followed by the build context directory:

docker build -t myimage:tag .

This command builds an image with the specified tag using the Dockerfile located in the current directory.

The Docker build process follows the instructions specified in the Dockerfile and generates an image that can be used to run containers.

Container Orchestration with Docker CLI

Docker CLI provides built-in support for container orchestration through Docker Swarm mode. Docker Swarm allows you to create and manage a cluster of Docker nodes and deploy services across the cluster.

Exploring Docker Swarm mode

Docker Swarm mode turns a group of Docker nodes into a distributed system, providing features like service discovery, load balancing, and high availability.

To initialize a Docker Swarm, you can use the docker swarm init command:

docker swarm init

This command initializes the current Docker host as a Swarm manager.

Deploying and managing services with Docker CLI

In Docker Swarm, services are used to define and manage the desired state of containers. Docker CLI provides commands to deploy and manage services in a Swarm cluster:

  • To deploy a service, use the docker service create command followed by the desired image and other configuration options.
  • To scale a service, use the docker service scale command followed by the service name and the desired number of replicas:
  docker service scale myservice=5
  • To update a service with a new image or configuration, use the docker service update command followed by the service name and the desired updates.

Docker Swarm allows you to create resilient and scalable applications by leveraging the power of container orchestration.

Docker CLI Tips and Tricks

To master Docker CLI, here are some advanced tips and tricks:

  • Docker CLI Shortcuts: Docker CLI provides a set of shortcuts for commonly used commands. For example, docker ps is equivalent to docker container ls, and docker rm is equivalent to docker container rm. These shortcuts can save you typing time.
  • Docker CLI Alias: You can create aliases for frequently used Docker CLI commands in your shell configuration file. For example, you can create an alias like alias d=docker to shorten the command.
  • Docker CLI Extensions: Docker CLI can be extended with third-party tools and plugins. Explore the Docker ecosystem to discover useful extensions that enhance your Docker CLI experience.
  • Docker CLI Documentation: Docker provides comprehensive documentation for Docker CLI, covering all the commands and their options. Refer to the official Docker documentation for detailed information on specific commands and use cases.

Conclusion

Mastering the Docker Command Line Interface (CLI) is essential for efficient and effective container management. In this article, we explored the various aspects of Docker CLI, including installation and configuration, managing containers and images, working with networks and volumes, leveraging Docker Compose, automating image builds with Dockerfiles, container orchestration with Docker Swarm, and advanced tips and tricks.

By becoming proficient in Docker CLI, you gain the ability to create, deploy, and manage containerized applications with ease, enabling faster development cycles, improved scalability, and streamlined workflows. Keep exploring and experimenting with Docker CLI to unlock its full potential and elevate your containerization journey.

FAQs

1. Is Docker CLI the only way to interact with Docker?

No, Docker provides other interfaces for interacting with Docker, such as the Docker API, Docker SDKs for various programming languages, and graphical user interfaces (GUI) like Docker Desktop.

2. Can I use Docker CLI to manage containers and images on remote hosts?

Yes, Docker CLI allows you to connect to remote Docker hosts and manage containers and images on those hosts.

You can use the DOCKER_HOST environment variable to specify the remote host URL.

3. What are some alternative containerization platforms similar to Docker?

Some alternative containerization platforms similar to Docker include Kubernetes, Podman, and containerd. These platforms offer their own command-line interfaces and features for container management.

4. How can I troubleshoot common issues with Docker CLI?

If you encounter issues with Docker CLI, you can refer to the Docker documentation, search online communities and forums, or use the docker logs command to inspect container logs for error messages and debug information.

5. Is Docker CLI suitable for production environments?

Yes, Docker CLI is widely used in production environments. However, in production, it is common to use higher-level orchestration platforms like Kubernetes for advanced container management and deployment scenarios.

Remember, mastering Docker CLI takes practice and hands-on experience. Keep exploring and experimenting with Docker CLI to sharpen your skills and become a proficient containerization expert.

July 1, 2023 0 comments
3 FacebookTwitterPinterestEmail
LinuxUbuntu

How to Install AWS CLI on Ubuntu 20.04

by pcplanet July 1, 2023
written by pcplanet 3 minutes read

Introduction

In this tutorial, we will walk you through the process of installing the AWS Command Line Interface (CLI) on Ubuntu. The AWS CLI is a powerful tool that allows you to interact with various AWS services and manage your cloud resources from the command line. By following the steps outlined below, you will be able to set up the AWS CLI on your Ubuntu machine and start leveraging its capabilities.

1. Prerequisites

Before proceeding with the installation, ensure that you have the following prerequisites in place:

  • Ubuntu operating system
  • Administrative access or sudo privileges

2. Update System Packages

Before installing any new software, it is recommended to update your system packages to their latest versions. Open the terminal and execute the following command:

sudo apt update && sudo apt upgrade

3. Install Python and Pip

AWS CLI requires Python and Pip to be installed on your system. If you already have them, you can skip this step. To install Python and Pip, enter the following command:

sudo apt install python3 python3-pip

4. Install AWS CLI Using Pip

With Python and Pip installed, you can now proceed to install the AWS CLI. Run the following command:

sudo pip3 install awscli

5. Configure AWS CLI

After successfully installing the AWS CLI, you need to configure it with your AWS credentials. This will allow the CLI to access and interact with your AWS resources. Execute the following command:

aws configure

You will be prompted to enter your AWS Access Key ID, Secret Access Key, default region name, and default output format. These details can be obtained from the AWS Management Console. Provide the required information as prompted.

6. Verify the Installation

To verify that the AWS CLI has been installed correctly, you can run a simple command to list your S3 buckets. Enter the following command:

aws s3 ls

If the installation was successful and your AWS credentials are correctly configured, you should see a list of your S3 buckets displayed in the terminal.

7. Conclusion

Congratulations! You have successfully installed the AWS CLI on your Ubuntu machine. You can now start using the AWS CLI to interact with various AWS services and manage your cloud resources efficiently.

8. Frequently Asked Questions

Q1: Can I install AWS CLI on other operating systems?

Yes, the AWS CLI is available for various operating systems, including Windows, macOS, and Linux distributions such as Ubuntu, CentOS, and Fedora.

Q2: How can I update the AWS CLI to the latest version?

To update the AWS CLI to the latest version, you can use the following command:

sudo pip3 install --upgrade awscli

Q3: Can I use the AWS CLI with multiple AWS accounts?

Yes, the AWS CLI allows you to configure multiple profiles, each associated with a different AWS account. You can switch between profiles by using the --profile option in your CLI commands.

Q4: Can I use the AWS CLI to create and manage AWS resources?

Yes, the AWS CLI provides comprehensive command-line options to create, manage, and interact with various AWS resources, such as EC2 instances, S3 buckets, RDS databases, and more.

Q5: Are there any alternatives to the AWS CLI?

Yes, apart from the AWS CLI, there are other tools available for interacting with AWS, such as AWS SDKs for various programming languages and third-party tools like Terraform and Ansible.

July 1, 2023 0 comments
2 FacebookTwitterPinterestEmail
Linux

Introduction to the Linux Terminal

by pcplanet June 30, 2023
written by pcplanet 23 minutes read

The Importance and Benefits of the Terminal in Linux

The Linux terminal, also known as the command line interface (CLI), is a powerful tool that allows users to interact with the operating system using text-based commands. While graphical user interfaces (GUIs) provide a user-friendly and visually appealing interface, the terminal offers a level of flexibility, control, and efficiency that is unmatched.

Using the terminal in Linux provides several key benefits:

  1. Increased Efficiency: With the terminal, tasks can often be performed more quickly and efficiently compared to GUI-based methods. Command line operations can be automated, repeated, and scripted, saving valuable time and effort.
  2. Deeper System Understanding: By using the terminal, users gain a deeper understanding of how the Linux operating system works. It allows direct interaction with the underlying system, providing insights into file systems, processes, and system configurations.
  3. Remote Access and Server Management: The terminal is an essential tool for remotely accessing and managing Linux servers. With secure shell (SSH) protocol, users can connect to remote machines and perform administrative tasks efficiently, even without a graphical environment.
  4. Access to Advanced Tools and Utilities: Many powerful tools and utilities are available exclusively through the terminal. These include package managers for software installation and updates, text processing tools, system monitoring utilities, and much more.

Overview of the Command Line Interface and its Advantages

The command line interface (CLI) is a text-based method of interacting with a computer’s operating system. Unlike a graphical user interface (GUI) that relies on icons, windows, and menus, the CLI relies on typed commands to execute tasks. The Linux terminal is a popular implementation of the CLI in the Linux operating system.

Advantages of the command line interface in Linux include:

  1. Flexibility and Control: The CLI offers unparalleled control over the system, allowing users to perform complex tasks, automate operations, and customize their environment.
  2. Efficiency and Speed: With the CLI, users can execute commands quickly and perform tasks efficiently, especially when working with repetitive or batch operations.
  3. Resource Efficiency: The CLI has a smaller resource footprint compared to GUIs, making it ideal for low-resource environments, remote connections, or headless servers.
  4. Scripting and Automation: The CLI enables the creation of scripts and automated workflows, allowing for the execution of multiple commands in a sequence, streamlining repetitive tasks, and improving productivity.

By mastering the Linux terminal and command line interface, users gain a powerful set of tools and skills that can enhance their efficiency, system management, and problem-solving capabilities. In the following sections, we will delve into various aspects of the Linux terminal, including file system navigation, file management, text processing, package management, process management, customization, and more.

Navigating the File System

Understanding the File System Hierarchy in Linux

In Linux, the file system is organized in a hierarchical structure, starting from the root directory denoted by a forward slash (/). Understanding this hierarchy is crucial for efficient navigation and management of files and directories. Here are the key directories in the Linux file system:

  1. / (Root): The root directory is the top-level directory in the file system. All other directories and files stem from the root.
  2. /bin (Binary): This directory contains essential executable files and commands used by both the system and users.
  3. /etc (System Configuration): The /etc directory stores system-wide configuration files, including network settings, user management, and system startup scripts.
  4. /home (Home Directories): Each user on the system has their own subdirectory within /home, where personal files and settings are stored.
  5. /var (Variable Data): This directory holds variable data, such as log files, temporary files, and other data that may change during system operation.

Essential Commands for Navigating and Exploring Directories

To navigate and explore directories in Linux, several essential commands come in handy:

  1. pwd (Print Working Directory): This command displays the current directory’s absolute path, helping you identify your current location in the file system.
  2. ls (List): The ls command lists the contents of a directory. It provides information about files, directories, permissions, ownership, and timestamps.
  3. cd (Change Directory): Use the cd command followed by the directory’s name to navigate to a specific directory. For example, cd /home/john takes you to John’s home directory.
  4. mkdir (Make Directory): The mkdir command creates a new directory within the current directory. For instance, mkdir documents creates a new directory named “documents.”
  5. rmdir (Remove Directory): The rmdir command deletes an empty directory. Be cautious as it will only work if the directory is empty.
  6. cp (Copy): The cp command allows you to copy files and directories. For example, cp file.txt /home/john copies the file.txt to John’s home directory.

Advanced Techniques for Efficient File System Navigation

To enhance your file system navigation efficiency, consider the following techniques:

  1. Relative Paths: Instead of using absolute paths, you can use relative paths to navigate within the file system. For example, cd .. moves you one directory up in the hierarchy.
  2. Tab Completion: By pressing the Tab key while typing a command or file/directory name, the terminal auto-completes it if there’s a unique match. This saves time and reduces typing errors.
  3. Wildcards: Wildcards like * and ? can be used with commands to match multiple files or directories based on patterns. For instance, ls *.txt lists all files ending with .txt in the current directory.
  4. Symbolic Links: Symbolic links, also known as symlinks, are files that point to other files or directories. They provide shortcuts and can be created using the ln command with the -s option.

By understanding the Linux file system hierarchy and mastering essential commands and techniques for navigation, you can efficiently explore, manage, and interact with files and directories. These skills form the foundation for various operations and tasks performed through the Linux terminal. In the next sections, we will delve deeper into file and directory management, text processing, package management, and more.

Working with Files and Directories

File and Directory Manipulation Commands: Creating, Renaming, and Deleting

In Linux, various commands are available for manipulating files and directories. Understanding these commands is essential for creating, renaming, and deleting files and directories.

Creating Files and Directories:

  • touch: The touch command creates an empty file. For example, touch file.txt creates a new file named “file.txt”.
  • mkdir: The mkdir command creates a new directory. For instance, mkdir directory creates a new directory named “directory”.

Renaming Files and Directories:

  • mv: The mv command is used to rename files and directories. For example, mv file.txt newfile.txt renames “file.txt” to “newfile.txt”.

Deleting Files and Directories:

  • rm: The rm command is used to delete files and directories. Be cautious when using it, as deleted files cannot be easily recovered. For example, rm file.txt deletes the file “file.txt”.
  • rmdir: The rmdir command removes empty directories. Use it when you want to delete an empty directory.
  • rm -r: The rm -r command is used to delete directories and their contents recursively. Exercise caution when using this command, as it permanently deletes files and directories.

Managing Permissions and Ownership of Files and Directories

Linux provides robust permission and ownership management for files and directories, ensuring security and controlled access. The following commands are useful for managing permissions and ownership:

  1. chmod: The chmod command is used to change the permissions of files and directories. It allows you to grant or revoke read (r), write (w), and execute (x) permissions for the owner, group, and others. For example, chmod u+r file.txt grants read permission to the owner of “file.txt”.
  2. chown: The chown command changes the owner of a file or directory. This is useful when transferring ownership or modifying permissions for a specific user. For example, chown john file.txt changes the owner of “file.txt” to the user “john”.
  3. chgrp: The chgrp command changes the group ownership of a file or directory. It allows multiple users to have access to shared resources. For example, chgrp staff file.txt changes the group ownership of “file.txt” to the “staff” group.

Copying, Moving, and Linking Files and Directories

Copying, moving, and linking files and directories are common operations in Linux. The following commands facilitate these actions:

  1. cp: The cp command copies files and directories. For example, cp file.txt /home/john copies “file.txt” to John’s home directory.
  2. mv: The mv command moves or renames files and directories. It can be used to move files to different directories or to rename files. For instance, mv file.txt /newdirectory moves “file.txt” to the “newdirectory” directory.
  3. ln: The ln command creates links to files or directories. There are two types of links: hard links and symbolic links. Hard links point directly to the file, while symbolic links are shortcuts that point to the file’s location. For example, ln file.txt link.txt creates a hard link named “link.txt” to “file.txt”.

Understanding these commands and their proper usage is crucial for effective file and directory management in the Linux terminal. Whether it’s creating, renaming, deleting, managing permissions, or copying files and directories, mastering these operations empowers users to efficiently handle their data and organize their file system. In the upcoming sections, we will explore more advanced techniques, such as text processing, package management, process management, and customization.

Text Processing and Manipulation

Working with Text Files: Viewing, Creating, and Editing

Text files are a fundamental component of many tasks in the Linux terminal. Understanding how to view, create, and edit text files is essential for efficient text processing.

Viewing Text Files:

  • cat: The cat command displays the contents of a text file on the terminal. For example, cat file.txt displays the contents of “file.txt”.
  • less: The less command allows you to view large text files interactively, scrolling through them in a pager-like manner.

Creating Text Files:

  • echo: The echo command is often used to create simple text files. For instance, echo "Hello, World!" > file.txt creates a file named “file.txt” with the text “Hello, World!”.
  • touch: The touch command, mentioned earlier, can also be used to create an empty text file.

Editing Text Files:

  • nano: Nano is a user-friendly and beginner-focused text editor that can be used directly from the terminal. For example, nano file.txt opens “file.txt” for editing in the nano editor.
  • vi/Vim: Vi and Vim are powerful and widely used text editors. They have a steep learning curve but offer advanced features and customization options.

Text Processing Tools and Techniques: Searching, Sorting, and Filtering

Linux provides numerous text processing tools and techniques that enable searching, sorting, filtering, and manipulating text files. Here are some commonly used tools:

  1. grep: The grep command searches for patterns in text files. It allows you to find specific words, phrases, or regular expressions within files. For example, grep "keyword" file.txt searches for occurrences of “keyword” in “file.txt”.
  2. sed: Sed (Stream Editor) is a versatile tool for manipulating text. It can perform various operations, such as search and replace, text substitutions, and selective printing of lines.
  3. awk: Awk is a powerful scripting language designed for data extraction and reporting. It can process text files by specifying patterns and actions.
  4. sort: The sort command sorts the lines of a text file in either ascending or descending order. It can be combined with other commands to perform complex text processing operations.

Redirection and Pipelines: Harnessing the Power of Input and Output Streams

Redirection and pipelines are powerful techniques for manipulating input and output streams, allowing you to chain commands and perform complex text processing operations.

Redirection:

  • >: The greater-than symbol (>) redirects the output of a command to a file. For example, ls > file.txt redirects the output of the ls command to a file named “file.txt”. If the file already exists, it will be overwritten with the new output.
  • >>: The double greater-than symbol (>>) appends the output of a command to a file without overwriting existing content. For example, ls >> file.txt appends the output of the ls command to the end of the “file.txt” file, preserving any existing content.

Pipelines:

  • |: The vertical bar symbol (|) is called a pipe. It allows you to redirect the output of one command as the input to another command, creating a pipeline. The output from the first command is passed directly to the second command, enabling you to perform complex operations and filter data.
  • For example, ls | grep "keyword" takes the output of the ls command (which lists files and directories) and passes it as input to the grep command. The grep command searches for lines containing the specified “keyword” in the input it receives from ls. This allows you to filter the list of files and directories based on the search criteria provided by grep.

Understanding how to view, create, edit, search, sort, filter, and manipulate text files in the Linux terminal is essential for data processing, log analysis, scripting, and other text-based operations. These techniques form the foundation for advanced text processing tasks. In the next section, we will explore the concept of redirection and pipelines, which further enhance the power and versatility of text processing in the Linux terminal.

Package Management and Software Installation

Understanding Package Managers in Linux

Package managers are tools that simplify the process of installing, updating, and managing software packages in Linux. They handle dependencies, ensure system compatibility, and provide a centralized repository for software distribution. Understanding package managers is crucial for efficient software management.

Package Manager Types:

  • APT (Advanced Package Tool): Used in Debian and Ubuntu-based distributions.
  • YUM (Yellowdog Updater Modified): Used in Red Hat and CentOS-based distributions.
  • Pacman: Used in Arch Linux and its derivatives.
  • Zypper: Used in openSUSE and SUSE Linux Enterprise.

Repository Concepts:

  • Repository: A centralized location that stores software packages for distribution.
  • Main Repository: Contains stable and officially supported packages.
  • Universe/Community Repository: Contains additional software packages contributed by the community.
  • Updates Repository: Provides security patches and bug fixes for installed packages.

Installing, Updating, and Removing Software Packages

Package managers simplify the process of installing, updating, and removing software packages in Linux:

Installing Packages:

  • apt install package: This command is used in Debian-based distributions (like Ubuntu) to install a package using the APT package manager. It resolves dependencies and installs the specified package.
  • yum install package: This command is used in Red Hat-based distributions (like CentOS) to install a package using the YUM package manager. It resolves dependencies and installs the specified package.
  • pacman -S package: This command is used in Arch Linux and its derivatives to install a package using the Pacman package manager. It resolves dependencies and installs the specified package.
  • zypper install package: This command is used in openSUSE and SUSE Linux Enterprise to install a package using the Zypper package manager. It resolves dependencies and installs the specified package.

Updating Packages:

  • apt update: This command updates the local package database for APT, ensuring that the system has the latest information about available packages and their versions.
  • yum update: This command updates installed packages using YUM. It checks for newer versions of installed packages and upgrades them if available.
  • pacman -Syu: This command updates all packages using Pacman. It synchronizes the package databases, checks for package updates, and upgrades the entire system.
  • zypper update: This command updates packages using Zypper. It checks for updates to installed packages and upgrades them if available.

Removing Packages:

  • apt remove package: This command removes a package using APT. It uninstalls the specified package from the system, including its dependencies that are no longer needed.
  • yum remove package: This command removes a package using YUM. It uninstalls the specified package from the system, along with its dependencies that are no longer needed.
  • pacman -R package: This command removes a package using Pacman. It uninstalls the specified package from the system, along with its dependencies that are no longer needed.
  • zypper remove package: This command removes a package using Zypper. It uninstalls the specified package from the system, along with its dependencies that are no longer needed.

Managing Software Repositories and Dependencies

Managing software repositories and dependencies is essential for proper package management:

Adding Repositories:

  • apt-add-repository: This command is used in Debian-based distributions (like Ubuntu) to add external repositories to APT. External repositories provide additional software packages that are not available in the default repositories of the distribution.
  • yum-config-manager: This command is used in Red Hat-based distributions (like CentOS) to manage repositories in YUM. It allows you to enable or disable repositories, as well as configure various repository options.
  • pacman -Syy: This command updates the Pacman database, including new repositories. It synchronizes the package databases and refreshes them, ensuring that the system has the latest information about available packages and their versions.
  • zypper addrepo: This command is used in openSUSE and SUSE Linux Enterprise to add repositories to Zypper. It allows you to add new software repositories, which provide additional packages for installation and updates.

Resolving Dependencies:

  • Dependency Resolution: Package managers automatically handle dependencies, ensuring required libraries and components are installed.
  • Package Verification: Package managers verify package integrity and authenticity using digital signatures.

Understanding package managers, repositories, and dependency management is crucial for maintaining a well-functioning Linux system. Proper installation, updating, and removal of software packages ensure system stability, security, and compatibility. In the next section, we will explore process management and system monitoring in the Linux terminal.

Process Management and System Monitoring

Managing Running Processes: Listing, Starting, Stopping, and Restarting

Effective process management is essential for controlling and monitoring running processes in Linux. Understanding how to list, start, stop, and restart processes is crucial for system administration and troubleshooting.

Listing Processes:

  • ps: The ps command displays information about currently running processes. By default, it shows processes associated with the current terminal session. It provides a snapshot of the processes, including their process IDs (PIDs), CPU and memory usage, execution state, and more. The ps command can be further customized with various options to filter and format the output according to specific requirements.
  • top: The top command provides real-time information about system processes. It displays a dynamic view of the system’s performance, including CPU usage, memory consumption, load averages, and other system metrics. The top command continuously updates the information, allowing you to monitor resource usage and identify processes that might be consuming excessive resources. It also provides interactive features, such as sorting processes by various criteria and sending signals to control them.

Starting Processes:

  • Executing Programs: Simply type the name of the program or command in the terminal to start a process. For example, typing firefox launches the Firefox web browser.
  • Background Execution: Append an ampersand (&) at the end of the command to run a process in the background while retaining control of the terminal.

Stopping and Restarting Processes:

  • kill: The kill command allows you to terminate a process by specifying its process ID (PID) or using other termination signals. For example, kill PID terminates a process with the given PID.
  • pkill: The pkill command terminates processes based on their name or other attributes. For instance, pkill firefox terminates all processes with the name “firefox”.

Monitoring System Resources: CPU, Memory, and Disk Usage

Monitoring system resources provides insights into the performance and health of a Linux system. Understanding how to monitor CPU, memory, and disk usage is vital for system optimization and troubleshooting.

CPU Monitoring:

  • top: As mentioned earlier, the top command provides real-time CPU usage information for running processes.
  • mpstat: The mpstat command displays CPU usage statistics, including utilization, idle time, and more.

Memory Monitoring:

  • free: The free command shows information about system memory usage, including total, used, and available memory.
  • vmstat: The vmstat command provides a snapshot of virtual memory statistics, including information on memory usage, paging, and swapping.

Disk Monitoring:

  • df: The df command displays disk space usage of file systems, providing information on available, used, and total disk space.
  • du: The du command calculates the disk usage of files and directories, helping identify space-consuming files or directories.

Job Control and Process Prioritization

Job control allows for managing and prioritizing processes in the Linux terminal:

Background Jobs:

  • bg: The bg command moves a suspended or stopped job to the background, allowing it to continue executing.
  • fg: The fg command brings a background job to the foreground, allowing interaction with it.

Process Prioritization:

  • nice: The nice command sets the priority of a process, determining how much CPU time it receives. Higher priorities (lower numerical values) receive more CPU time.
  • renice: The renice command adjusts the priority of an already running process.

By effectively managing processes and monitoring system resources, Linux administrators can optimize performance, identify potential issues, and ensure the smooth operation of their systems. In the next section, we will explore customization options and productivity enhancements in the Linux terminal.

Shell Customization and Scripting

7.1 Configuring the Shell Environment: Customizing Prompts and Shell Variables

Customizing the shell environment allows users to personalize their experience and enhance productivity. Understanding how to configure prompts and shell variables is essential for efficient workflow management.

Customizing Prompts:

  • PS1 and PS2 Variables: The PS1 variable defines the primary prompt displayed in the terminal. It can be modified to include information like the current working directory, username, and hostname. The PS2 variable defines the secondary prompt used for multiline commands.
  • ANSI Escape Codes: ANSI escape codes allow for adding colors, formatting, and symbols to the prompt, making it more visually appealing and informative.

Shell Variables:

  • Environment Variables: Environment variables store information about the system environment and user preferences. They can be accessed and modified using commands like echo, export, and unset. Common environment variables include PATH, HOME, and LANG.
  • User-defined Variables: Users can create their own variables to store values, making them accessible within the shell environment and scripts.

Writing and Executing Shell Scripts: Automation and Repetitive Tasks

Shell scripting enables the automation of tasks and the execution of repetitive commands. Understanding how to write and execute shell scripts is essential for streamlining workflows and increasing efficiency.

Script Creation:

  • Script File Extension: Shell scripts typically have the .sh file extension.
  • Shebang: The shebang (#!) at the beginning of a script specifies the interpreter to use. For example, #!/bin/bash indicates the Bash interpreter.
  • Permissions: Scripts must have executable permissions to be run. Use the chmod command to grant execution permission to a script.

Writing Shell Scripts:

  • Syntax and Structure: Shell scripts consist of a series of commands and control structures written in a scripting language (such as Bash).
  • Variables and Parameters: Shell scripts can utilize variables, command-line arguments, and special parameters to manipulate data and control script behavior.
  • Control Structures: Control structures like if-else statements, loops (for, while, until), and case statements enable conditional execution and repetitive tasks.

Executing Shell Scripts:

  • Running Scripts: Shell scripts can be executed by typing the script’s filename in the terminal.
  • Command Substitution: The output of a command can be captured and used as input in a script using command substitution. For example, $(command) or `command`.

Aliases and Functions: Increasing Productivity and Efficiency

Aliases and functions provide shortcuts and custom commands, enhancing productivity and reducing typing effort.

Aliases:

  • Aliases allow users to create shortcuts for frequently used commands or command combinations. For example, alias ll='ls -l' creates an alias ‘ll’ for the ‘ls -l’ command.

Functions:

  • Functions are blocks of code that perform a specific task. They can be defined in the shell environment or within shell scripts, offering modularity and reusability.

By customizing the shell environment, writing and executing shell scripts, and utilizing aliases and functions, users can tailor their Linux terminal experience, automate repetitive tasks, and increase productivity. In the next section, we will explore essential security practices and techniques for the Linux terminal.

Terminal Tips and Tricks for Power Users

Command Line Shortcuts and History: Navigating and Reusing Commands

Mastering command line shortcuts and history is essential for efficient navigation and reusing commands in the Linux terminal.

  1. Navigation Shortcuts:
  • Ctrl+A: Move the cursor to the beginning of the command line.
  • Ctrl+E: Move the cursor to the end of the command line.
  • Ctrl+B: Move the cursor back one character.
  • Ctrl+F: Move the cursor forward one character.
  1. Command History:
  • Up Arrow: Recall previous commands from history.
  • Ctrl+R: Search command history based on keywords.
  • !!: Execute the previous command.
  • !$: Use the last argument of the previous command.
  1. Command Substitution:
  • !$: Replaces with the last argument of the previous command.
  • !^: Replaces with the first argument of the previous command.
  • !$: Replaces with the last argument of the previous command.
  • !*: Replaces with all the arguments of the previous command.

Tab Completion and Auto-Suggestions: Speeding Up Command Entry

Tab completion and auto-suggestions are powerful features that accelerate command entry and reduce typing effort in the Linux terminal.

Tab Completion:

  • File and Directory Names: Press Tab to complete file and directory names automatically.
  • Command Names: Type the initial letters of a command and press Tab to complete it.
  • Variable Names: Press Tab to complete variable names.

Auto-Suggestions:

  • Fish Shell: The Fish shell provides inline auto-suggestions as you type commands, based on command history.

Useful Utilities and Lesser-Known Command Line Tools

Explore lesser-known command line tools and utilities that can greatly enhance productivity and streamline your workflow in the Linux terminal.

  1. ncdu: ncdu (NCurses Disk Usage) is a disk usage analyzer that provides a visual representation of disk space usage.
  2. tmux: tmux is a terminal multiplexer that allows you to create and manage multiple terminal sessions within a single window.
  3. fzf: fzf (Fuzzy Finder) is a command-line fuzzy finder that enables quick and efficient searching and filtering of files, command history, and more.
  4. ripgrep: ripgrep (rg) is a fast, line-oriented search tool that recursively searches directories for text patterns, providing powerful searching capabilities.

By utilizing command line shortcuts and history, leveraging tab completion and auto-suggestions, and exploring useful utilities and lesser-known tools, power users can maximize their efficiency and productivity in the Linux terminal. In the next section, we will delve into the essential security practices and techniques for the Linux terminal.

Conclusion

Recap of Key Concepts Learned in Using the Terminal in Linux

we explored the essential concepts of using the terminal in Linux. We covered topics such as file system navigation, text editing, package management, process management, shell customization, and more. Let’s recap the key concepts we learned:

  • Navigating the File System: We learned how to navigate the file system hierarchy, use essential commands for directory exploration, and employ advanced techniques for efficient navigation.
  • Text Editing: We explored various text editors, including vi/Vim, nano, and Emacs, understanding their features, usage, and customization options.
  • Package Management: We delved into package managers, their OS compatibility, and how to install, update, and remove software packages. We also learned about managing software repositories and handling dependencies.
  • Process Management: We covered managing running processes, monitoring system resources, and prioritizing jobs using tools like ps, top, kill, and nice.
  • Shell Customization and Scripting: We explored how to configure the shell environment, write and execute shell scripts for automation, and increase productivity with aliases and functions.
  • Terminal Tips and Tricks: We discovered shortcuts for command line navigation, utilizing command history, leveraging tab completion and auto-suggestions, and explored useful utilities and lesser-known command line tools.

Happy terminal adventures!

June 30, 2023 0 comments
4 FacebookTwitterPinterestEmail
Newer Posts
Older Posts

Recent Posts

  • Creating Custom Nginx Rules for Different Subdomains in DirectAdmin
  • Nginx Reverse Proxy for Nextcloud: A Guide
  • How to Reverse Proxy in DirectAdmin with Nginx_Apache
  • How to install Python 3.10 on RHEL
  • How to install Python 3.10 on Ubuntu 20.04

Recent Comments

  1. Daron Buesgens on Introduction to PHP Server-Side Scripting Language
  2. Tim Slosek on How to install Python on CentOS 8
  3. аналитика леонида малолетова on 15,000 WordPress Sites hacked with Malicious Redirects
  4. 076 on Websites Posing as MSI Afterburner That Spread CoinMiner
  • Home
  • Tools
    • CHMOD Calculator
    • Subnet Calculator
  • Linux Guides & Tutorials
    • Beginner Guides
    • Linux Installation Tutorials
    • Command Line Tutorials
    • Server Administration Guides
    • Security Tutorials
    • Database Tutorials
    • Open-Source Software
      • Nextcloud Guides
      • Apache
    • Operating Systems
      • Ubuntu
      • RHEL/Rocky/Alma
  • Ransomware News
  • Cybersecurity Laws and Regulations

Recent Posts

Creating Custom Nginx Rules for Different Subdomains in DirectAdmin
Nginx Reverse Proxy for Nextcloud: A Guide
How to Reverse Proxy in DirectAdmin with Nginx_Apache
How to install Python 3.10 on RHEL

Most Viewed

Best Linux distribution (distros) in 2022
15,000 WordPress Sites hacked with Malicious Redirects
How to Install Python 3.9 on Ubuntu 18.04
6aabc923d85895a8823d81efa5e551d7
PCPlanet – Tech Blogs | Information
  • Home