PCPlanet – Tech Blogs | Information
  • Home
  • Tools
    • CHMOD Calculator
    • Subnet Calculator
  • Linux Guides & Tutorials
    • Beginner Guides
    • Linux Installation Tutorials
    • Command Line Tutorials
    • Server Administration Guides
    • Security Tutorials
    • Database Tutorials
    • Open-Source Software
      • Nextcloud Guides
      • Apache
    • Operating Systems
      • Ubuntu
      • RHEL/Rocky/Alma
  • Ransomware News
  • Cybersecurity Laws and Regulations
Top Posts
How to install Emby Server on Ubuntu
Best Linux distribution (distros) in 2022
15,000 WordPress Sites hacked with Malicious Redirects
How to Install Python 3.9 on Ubuntu 18.04
How to Install Python 3.9 on Ubuntu 16.04
How to Install MongoDB on Ubuntu 16.04 to...
How to enable HSTS on Apache
How to install Python on CentOS 8
How to install PHP 8.1 on RHEL based...
Comment activer HSTS pour Apache
Navigating CVE-2023-49103: Proactive Defense for ownCloud
Tuesday, May 13, 2025
PCPlanet – Tech Blogs | Information
  • Home
  • Tools
    • CHMOD Calculator
    • Subnet Calculator
  • Linux Guides & Tutorials
    • Beginner Guides
    • Linux Installation Tutorials
    • Command Line Tutorials
    • Server Administration Guides
    • Security Tutorials
    • Database Tutorials
    • Open-Source Software
      • Nextcloud Guides
      • Apache
    • Operating Systems
      • Ubuntu
      • RHEL/Rocky/Alma
  • Ransomware News
  • Cybersecurity Laws and Regulations
Copyright 2021 - All Right Reserved
LinuxUbuntu

How to install Emby Server on Ubuntu

by pcplanet July 8, 2022
written by pcplanet 3 minutes read

Emby Server is a powerful, open-source media solution that allows you to create your own personal streaming platform. With its user-friendly interface and extensive features, Emby simplifies the process of organizing and accessing your multimedia library from any device. In this comprehensive guide, we’ll walk you through the step-by-step installation and configuration of Emby Server on Ubuntu 20.04, along with expert tips to enhance performance and user experience.

https://emby.media/

Prerequisites:

  • A server running Ubuntu 20.04
  • SSH access to the server
  • Basic knowledge of Linux commands

Install Emby Server on Ubuntu

For the sake of this post, I have Ubuntu 20.04 server set up and running on a separate server. Therefore, most of the time I will connect to the server via SSH.

Step 1. Update Ubuntu

Before starting to install emby server on ubuntu, it’s crucial to ensure that your Ubuntu system is up to date. Open your terminal and run the following command:

Bash
sudo apt update && sudo apt upgrade

Step 2. Install Emby Server

To install Emby Server on ubuntu, you’ll need to download the appropriate package. Use the following command to download the latest stable release:

Bash
Wget https://github.com/MediaBrowser/Emby.Releases/releases/download/4.7.5.0/emby-server-deb_4.7.5.0_amd64.deb
sudo dpkg -i emby-server-deb_4.7.5.0_amd64.deb

Once the installation is complete, verify that the Emby service is running:

Bash
sudo systemctl status emby-server.service
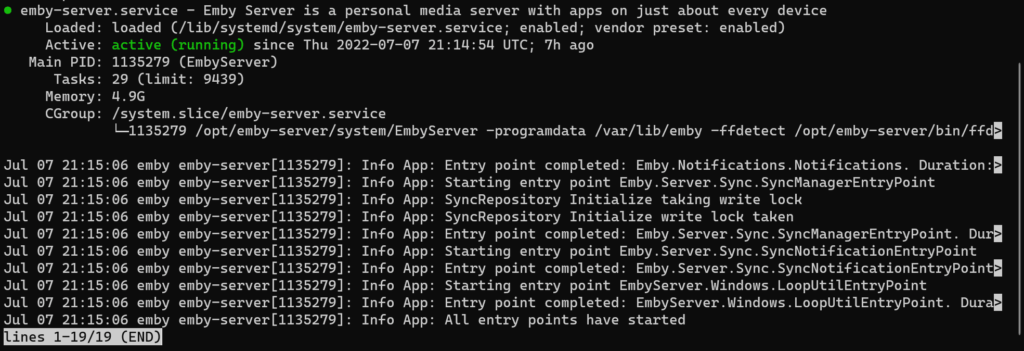
emby cli service information

Step 2.1 Install Emby Server Beta

If you prefer to use the beta version of Emby Server on ubuntu, follow these steps instead:

Bash
Wget https://github.com/MediaBrowser/Emby.Releases/releases/download/4.8.0.21/emby-server-deb_4.8.0.21_amd64.deb
sudo dpkg -i emby-server-deb_4.8.0.21_amd64.deb

Alternatively, you can use curl:

Bash
curl -O https://github.com/MediaBrowser/Emby.Releases/releases/download/4.8.0.21/emby-server-deb_4.8.0.21_amd64.deb
sudo dpkg -i emby-server-deb_4.8.0.21_amd64.deb

Step 3. Configure Emby

To access the Emby web interface, open a browser on another device connected to the same network and enter the server’s IP address followed by port 8096:

Bash
http://x.x.x.x:8096

The first step is to pick a language of preference.
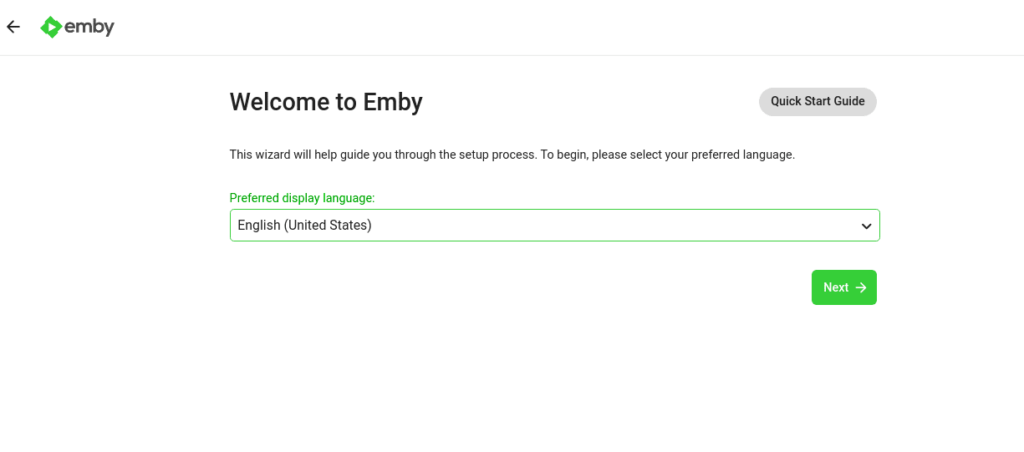
Create a new user by pressing Next.
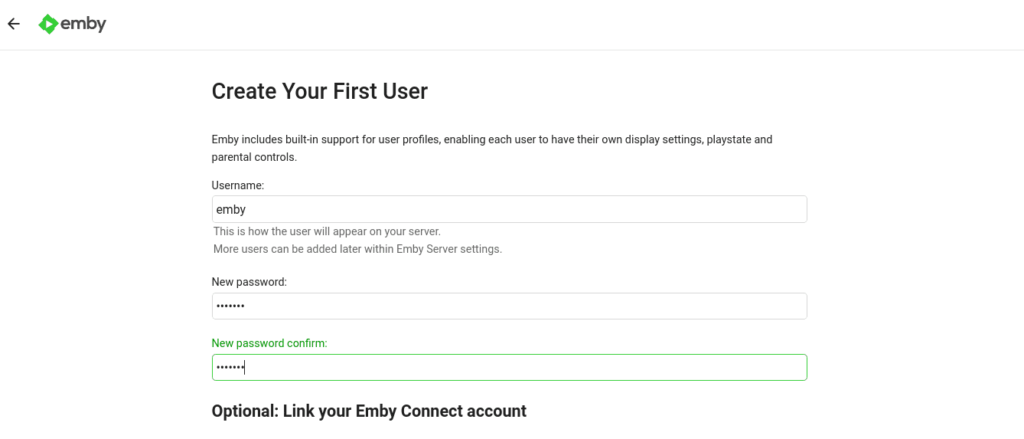
After that, we may begin building our media collections. For the time being, you may just click the next button.

Next, set up remote access. Emby can be accessed remotely in this scenario.
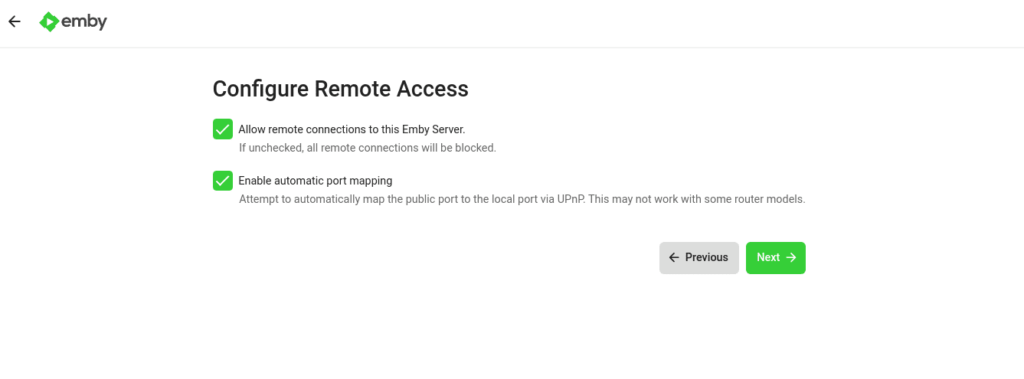
Finally, we’re all set.
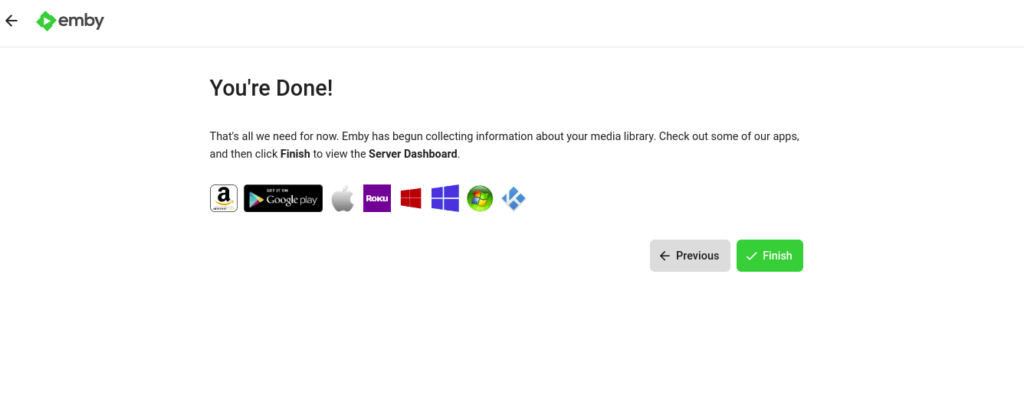
There is now a working emby server on ubuntu on the network. Adding your music and movies is all we need to do.

TIPS

Better performance

If you want better performance, I would highly suggest you use HTTPS when connecting externally. HTTP is not able to use HTTP/2 and is limited to http1.1. HTTPS on the other hand is able to provide better bandwidth and better performance due to the support of HTTP1.1 and most importantly, HTTP/2.

See here for more information about HTTP/2

HTTP/2 is able to handle multiple streams in a single connection while http1.1 sends them 1 by 1 and can have a hold up.. In the newer versions, emby has been confirmed having support for it

https://emby.media/community/index.php?/topic/36187-server-upgrade-code-to-http2-http11-successor/

Reverse Proxying

If you can avoid using a reverse proxy and let emby through the firewall using Port forward, 1:1 NAT, or any of the other ways described above, that would be the best way to use emby.

Otherwise, head into your reverse proxy server and open up either /etc/nginx/nginx.conf or /etc/apache2/sites-enabled/*.conf

Replace x.x.x.x with your emby machine ip and port if it applies.

NGINX

Bash
proxy_pass http://x.x.x.x:8096/;

Apache / HTTPD

Bash
ProxyPreserveHost On
proxypass / http://x.x.x.x:8096/
ProxyPassReverse / http://x.x.x.x:8096/
July 8, 2022 0 comments
1 FacebookTwitterPinterestEmail
Directadminv1.666 2024
Web Servers & Hosting

Creating Custom Nginx Rules for Different Subdomains in DirectAdmin

by pcplanet October 27, 2024
written by pcplanet 2 minutes read

As web administrators, we often need to host multiple applications under the same domain using subdomains. Each application might require its own specific Nginx configuration. Today, we’ll explore how to implement different Nginx rules for your main domain and subdomains in DirectAdmin.

The Challenge

Consider this common scenario: You have WordPress running on your main domain, but you need to host a different application (like a calculator tool or an API) on a subdomain. Each requires its own unique Nginx configuration rules.

The Solution: Conditional Configuration Blocks

DirectAdmin provides an elegant way to handle this using conditional statements in your Nginx configuration. Here’s how to implement it:

  1. Navigate to Admin Level -> Custom Httpd Config in your DirectAdmin panel
  2. Select your domain
  3. Locate the nginx.conf configuration for… or CUSTOMX section

Implementation Example

Here’s a practical example of how to structure your configuration:

Nginx
# Main domain WordPress configuration
|*if !SUB|
    # WordPress specific rules
    location = /favicon.ico {
        log_not_found off;
        access_log off;
    }

    location / {
        try_files $uri $uri/ /index.php?$args;
    }

    location ~* \.(js|css|png|jpg|jpeg|gif|ico)$ {
        expires max;
        log_not_found off;
    }
|*endif|

# Subdomain specific configuration
|*if SUB="calculator"|
    # Custom rules for calculator subdomain
    location / {
        # Your specific subdomain rules here
        proxy_pass http://localhost:3000;
        # Add other relevant configurations
    }
|*endif|

Understanding DirectAdmin’s Nginx Conditionals

DirectAdmin provides powerful conditional statements for fine-tuning your Nginx configurations. Let’s break down the key conditional structures you can use:

Basic Conditional Syntax

Nginx
|*if CONDITION|
    # Your Nginx configuration here
|*endif|

Common Conditional Patterns

  1. Checking for Subdomains:
Nginx
|*if !SUB|
    # Main domain rules
|*endif|

|*if SUB="blog"|
    # Blog subdomain specific rules
|*endif|
  1. Domain-Specific Rules:
Nginx
|*if DOMAIN="example.com"|
    # Rules for specific domain
|*endif|
  1. Combining Conditions:
Nginx
|*if DOMAIN="example.com" && SUB="api"|
    # Rules for api.example.com only
|*endif|

Pro Tips

  • Use !SUB to target your main domain exclusively
  • Conditions are case-sensitive
  • Multiple conditions can be combined using && (AND) operator
  • Always test your conditional blocks before deploying
  • Keep your conditions organized and well-commented

This conditional system allows you to create highly specific configurations while maintaining clean and manageable Nginx rules. It’s particularly useful when managing multiple applications or services across different subdomains of your website.

Remember that changes to these conditions require a web server reload to take effect, so plan your modifications accordingly during low-traffic periods.

Key Benefits

  • Isolation: Each application gets its own specific configuration
  • Maintainability: Clear separation between different site configurations
  • Flexibility: Easy to add or modify rules for new subdomains
  • Security: Better control over application-specific security requirements

Best Practices

  1. Always backup your configuration before making changes
  2. Test your configuration in a staging environment first
  3. Use meaningful subdomain names that reflect their purpose
  4. Document your custom configurations for future reference
  5. Keep security in mind when setting up specific rules

Important Notes

  • Changes to Nginx configurations require a service restart
  • Monitor your error logs after implementing changes
  • Ensure your DNS records are properly configured for new subdomains
  • Consider potential impact on SSL/TLS certificates

This solution provides a clean and maintainable way to manage different Nginx configurations for your various subdomains while keeping your main domain configuration intact.

Happy hosting!

October 27, 2024 0 comments
13 FacebookTwitterPinterestEmail
Image
NextcloudNginx

Nginx Reverse Proxy for Nextcloud: A Guide

by pcplanet June 20, 2024
written by pcplanet 5 minutes read
Image

Nextcloud is a powerful self-hosted cloud storage solution, but exposing it directly to the internet can be risky. Enter the reverse proxy – a crucial component for enhancing security, performance, and flexibility. In this comprehensive guide, we’ll dive deep into setting up a Nextcloud reverse proxy using Nginx, exploring each configuration option to help you create a robust and efficient setup.

Prerequisites:

  • A server running Nginx
  • Nextcloud installed and running on an internal network
  • Basic knowledge of server administration and Nginx configuration

Before we dive into this, I assume you already have a working nginx server and you already set it up with SSL as I don’t include the whole server block.

Let’s dive into the nitty-gritty of our Nextcloud reverse proxy configuration.

Understanding the Core Proxy Settings

Nginx
location / {
    proxy_pass http://internal_nextcloud_ip:port;
    proxy_set_header Host $host;
    proxy_set_header X-Real-IP $remote_addr;
    proxy_set_header X-Forwarded-For $proxy_add_x_forwarded_for;
    proxy_set_header X-Forwarded-Proto $scheme;
}

This block forms the foundation of our reverse proxy setup. Let’s break it down:

  1. proxy_pass: This directive tells Nginx where to forward the incoming requests. Replace internal_nextcloud_ip:port with your Nextcloud server’s internal IP and port.
  2. proxy_set_header Host $host: Ensures that the original Host header is passed to the Nextcloud server, maintaining proper routing.
  3. proxy_set_header X-Real-IP $remote_addr: Passes the client’s real IP address to Nextcloud, useful for logging and security purposes.
  4. proxy_set_header X-Forwarded-For $proxy_add_x_forwarded_for: Appends the client’s IP to the X-Forwarded-For header, maintaining a chain of IP addresses if multiple proxies are involved.
  5. proxy_set_header X-Forwarded-Proto $scheme: Informs Nextcloud about the original protocol (HTTP or HTTPS) used by the client.

Enabling WebSocket Support

Nginx
proxy_http_version 1.1;
proxy_set_header Upgrade $http_upgrade;
proxy_set_header Connection "upgrade";

These directives enable WebSocket support, which is crucial for real-time features in Nextcloud, such as instant notifications and live collaboration.

Handling Large File Uploads

Nginx
proxy_read_timeout 3600s;
proxy_send_timeout 3600s;
proxy_connect_timeout 3600s;
client_max_body_size 10G;

These settings are essential for handling large file uploads:

  1. The proxy_*_timeout directives set a generous timeout of 1 hour (3600 seconds) for various proxy operations, preventing timeouts during large file transfers.
  2. client_max_body_size 10G allows uploads up to 10 gigabytes. Adjust this value based on your needs and server capabilities.

Enhancing Security with HTTP Headers

Note: this is optional if you are using panels like DirectAdmin, Plesk, etc. as they already apply some of these.

Nginx
add_header X-Content-Type-Options nosniff;
add_header X-XSS-Protection "1; mode=block";
add_header X-Robots-Tag none;
add_header X-Download-Options noopen;
add_header X-Permitted-Cross-Domain-Policies none;
add_header Referrer-Policy no-referrer;

These add_header directives improve security by setting various HTTP headers:

  1. X-Content-Type-Options: Prevents MIME type sniffing.
  2. X-XSS-Protection: Enables the browser’s built-in XSS protection.
  3. X-Robots-Tag: Prevents search engine indexing.
  4. X-Download-Options: Prevents IE from executing downloads in the site’s context.
  5. X-Permitted-Cross-Domain-Policies: Restricts Adobe Flash and PDF content.
  6. Referrer-Policy: Controls the Referer header sent by the browser.

Implementing HSTS (HTTP Strict Transport Security)

Nginx
# add_header Strict-Transport-Security "max-age=31536000; includeSubDomains" always;

This commented-out directive enables HSTS, forcing browsers to use HTTPS for an extended period (1 year in this case). Uncomment and adjust as needed if you’re using HTTPS.

Optimizing Proxy Behavior

Nginx
proxy_buffering off;
proxy_request_buffering off;
proxy_redirect off;
proxy_cache off;

These settings optimize the proxy’s behavior:

  1. proxy_buffering off: Disables response buffering, sending the response to the client as soon as it’s received from Nextcloud.
  2. proxy_request_buffering off: Disables request buffering, allowing Nginx to start forwarding the request body to Nextcloud immediately.
  3. proxy_redirect off: Prevents Nginx from modifying the Location and Refresh headers from Nextcloud.
  4. proxy_cache off: Disables caching of responses from Nextcloud.

Securing Sensitive Directories (Optional) (experimental)

Nginx
location ~ ^/(?:build|tests|config|lib|3rdparty|templates|data)(?:$|/) {
    deny all;
}

This block denies access to sensitive Nextcloud directories, preventing potential security risks. Use and edit at your own risk.

Putting It All Together

Here’s the complete Nginx configuration block for your Nextcloud reverse proxy:

Nginx
location / {
    proxy_pass http://internal_nextcloud_ip:port;
    proxy_set_header Host $host;
    proxy_set_header X-Real-IP $remote_addr;
    proxy_set_header X-Forwarded-For $proxy_add_x_forwarded_for;
    proxy_set_header X-Forwarded-Proto $scheme;

    # WebSocket support
    proxy_http_version 1.1;
    proxy_set_header Upgrade $http_upgrade;
    proxy_set_header Connection "upgrade";

    # Timeout settings for large file uploads
    proxy_read_timeout 3600s;
    proxy_send_timeout 3600s;
    proxy_connect_timeout 3600s;

    # Increase max upload size (adjust as needed)
    client_max_body_size 10G;

    # Security headers
    add_header X-Content-Type-Options nosniff;
    add_header X-XSS-Protection "1; mode=block";
    add_header X-Robots-Tag none;
    add_header X-Download-Options noopen;
    add_header X-Permitted-Cross-Domain-Policies none;
    add_header Referrer-Policy no-referrer;

    # HSTS (optional - uncomment if you're using HTTPS)
    # add_header Strict-Transport-Security "max-age=31536000; includeSubDomains" always;

    # Optimizations
    proxy_buffering off;
    proxy_request_buffering off;
    proxy_redirect off;
    proxy_cache off;
}

# Deny access to sensitive files
#location ~ ^/(?:build|tests|config|lib|3rdparty|templates|data)(?:$|/) {
#    deny all;
#}

This configuration provides a solid foundation for your Nextcloud reverse proxy setup. Remember to replace internal_nextcloud_ip:port with your actual Nextcloud server’s internal IP and port.

Best Practices and Additional Considerations

  1. SSL/TLS Encryption: Always use HTTPS for your Nextcloud instance. Configure SSL/TLS on your reverse proxy to encrypt traffic between clients and your server.
  2. Regular Updates: Keep both Nginx and Nextcloud up to date to ensure you have the latest security patches and features.
  3. Monitoring: Implement monitoring for your reverse proxy to detect and respond to any unusual activities or performance issues.
  4. Backup: Regularly backup your Nginx configuration along with your Nextcloud data.
  5. Rate Limiting: Consider implementing rate limiting to protect against brute-force attacks and excessive requests.
  6. Firewall Configuration: Ensure your firewall is properly configured to allow traffic only on necessary ports.
  7. Testing: Always test your configuration in a non-production environment before deploying to production.

Conclusion

Setting up a Nextcloud reverse proxy with Nginx provides enhanced security, improved performance, and greater flexibility in managing your self-hosted cloud storage solution. By following this somewhat comprehensive guide and understanding each configuration option, you can create a robust and efficient setup tailored to your specific needs.

Remember, server security is an ongoing process. Regularly review and update your configuration to maintain a secure and performant Nextcloud instance.

Image 2

FAQ

Q: Why use a reverse proxy for Nextcloud?
A: A reverse proxy enhances security, improves performance through caching and load balancing, and provides flexibility in server configuration.

Q: Can I use Apache instead of Nginx as a reverse proxy?
A: Yes, Apache can also be used as a reverse proxy. However, Nginx is often preferred for its efficiency in handling concurrent connections.

Q: How do I troubleshoot if my Nextcloud instance isn’t accessible through the reverse proxy?
A: Check your Nginx error logs, ensure the proxy_pass directive points to the correct internal IP and port, and verify that Nextcloud is running and accessible internally. It’ll also depend on where the error is so check both the reverse proxy logs and the local webserver for nextcloud logs. Check the nexcloud logs as well just to be sure.

Q: Is this configuration suitable for a production environment?
A: While this configuration provides a solid foundation, always test thoroughly and consider consulting with a security professional before deploying in a production environment.

Q: How can I implement SSL/TLS with this reverse proxy setup?
A: You can use Let’s Encrypt with Certbot to obtain and configure free SSL/TLS certificates for your Nginx server.

June 20, 2024 0 comments
1 FacebookTwitterPinterestEmail
LinuxNetworkingRHELUbuntu

How to Reverse Proxy in DirectAdmin with Nginx_Apache

by pcplanet May 13, 2024
written by pcplanet 3 minutes read

Introduction

Reverse proxying is a powerful technique that allows you to enhance the security, performance, and flexibility of your website hosted on a DirectAdmin server. By setting up a reverse proxy using Nginx or Apache, you can efficiently route traffic to backend servers, distribute load, and add an extra layer of protection. In this blog post, we’ll explore the concept of reverse proxying and guide you through the process of configuring a reverse proxy in DirectAdmin using either Nginx or Apache.

Prerequisites

Before diving into the reverse proxy setup, ensure that you have the following prerequisites in place:

  1. A DirectAdmin server with root access or appropriate permissions to modify server configurations.
  2. Nginx_Apache OR Nginx as webserver installed on your DirectAdmin server. DirectAdmin typically comes with Apache pre-installed, but you may need to install Nginx separately if desired.
  3. Basic understanding of web server configuration files and directives.
  4. Access to the DirectAdmin control panel to manage your server and website settings.

Nginx_Apache Setup benefits

When it comes to optimizing the performance of your website, implementing an Nginx_Apache reverse proxy setup can work wonders. This powerful combination leverages the strengths of both web servers to deliver a seamless and efficient user experience.

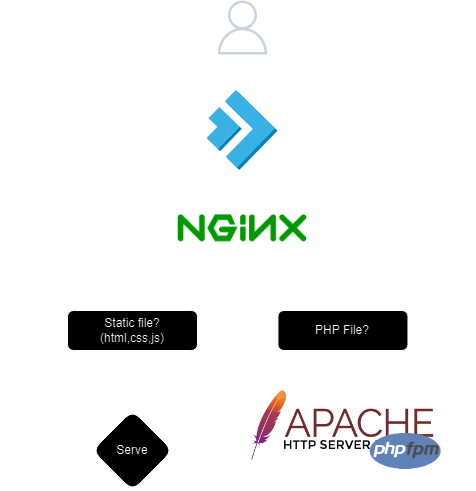
In an Nginx_Apache reverse proxy setup, Nginx takes the lead by handling incoming connections and serving static files, such as images, CSS, and JavaScript. Nginx’s lightweight architecture and optimized handling of static content make it exceptionally fast at delivering these files to users.

On the other hand, when a request for a PHP file arrives, Nginx forwards it to Apache. Apache, with its robust PHP processing capabilities, takes over and handles the dynamic content. If PHP-FPM (FastCGI Process Manager) is enabled, Apache seamlessly communicates with PHP-FPM to compile and execute the PHP script.

One significant advantage of this setup is its compatibility with .htaccess files. Apache’s rich feature set and extensive module support ensure that your existing .htaccess configurations will work smoothly, allowing you to maintain control over your website’s behavior and security.

The overall flow of a request in an Nginx_Apache reverse proxy setup can be summarized as follows:

  1. Nginx receives a new connection and determines if it is for a static file or a PHP script.
  2. If the request is for a static file, Nginx efficiently serves it directly to the user.
  3. If the request is for a PHP file, Nginx forwards it to Apache.
  4. Apache processes the PHP request, utilizing PHP-FPM (if enabled) to compile and execute the script.
  5. Apache sends the output of the PHP script back to Nginx.
  6. Nginx returns the final response to the user.

How to reverse proxy in DirectAdmin with Nginx_apache

Step 1: Access Server Management

  1. Log in to DirectAdmin as an administrator.
  2. Navigate to the Admin column in the sidebar.
  3. Select Server Manager -> Custom HTTPD Configurations.
    • This page allows you to manage specific configurations for your hosted domains.

Step 2: Select Your Domain

  1. From the Custom HTTPD Configurations page, select the domain you wish to set up as a reverse proxy.
    • You will see a list of your domains along with key configuration files such as httpd.conf, nginx.conf, and php-fpm.conf.

Step 3: Customize Nginx Configuration

  1. Click on the nginx.conf link next to the domain you want to configure. This action opens the configuration editor for Nginx.
  2. Press the Customize button to modify the existing configuration.
    • It’s important to modify the correct sections to avoid misconfigurations.

Step 4: Edit Configuration

  1. Decide where to place your reverse proxy configuration:
    • You can add your configuration directly at the top of the nginx.conf file. This is suitable for general settings that apply irrespective of other conditional configurations.
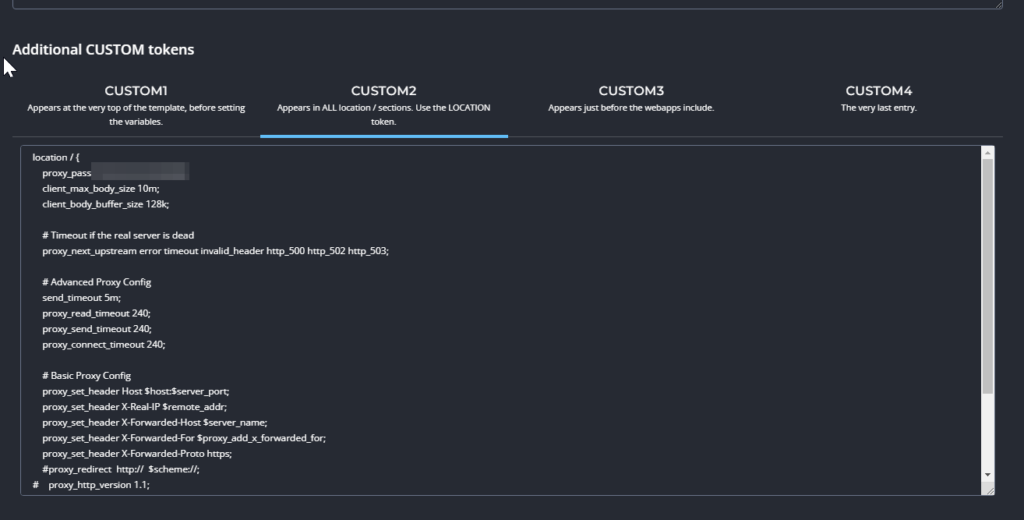
    • Alternatively, place your reverse proxy settings within the CUSTOM2 token. This token is designed for user-specific customizations and ensures that your settings are preserved during automatic updates or rewrites by DirectAdmin.

Here’s a basic example of what the reverse proxy configuration might look like:

Nginx
location / {
    proxy_pass http://yourbackendserver.com;
    proxy_set_header Host $host;
    proxy_set_header X-Real-IP $remote_addr;
    proxy_set_header X-Forwarded-For $proxy_add_x_forwarded_for;
    proxy_set_header X-Forwarded-Proto $scheme;
}

Step 5: Save and Test

  1. Save your changes by clicking the appropriate button in the DirectAdmin interface.
  2. Then go back until you can click on da build
May 13, 2024 0 comments
3 FacebookTwitterPinterestEmail
LinuxRHEL

How to install Python 3.10 on RHEL

by pcplanet May 12, 2024
written by pcplanet 2 minutes read

Python 3.10 is the latest version of the popular programming language, packed with new features, security patches, and performance improvements. One notable addition is the support for parenthesized context managers, allowing for better readability and continuation across multiple lines. In this blog post, we’ll walk you through the process to install Python 3.10 from source on Fedora and CentOS/RHEL 8 systems because for some reason no rpms are available for this version.

Prerequisites

Before we begin, ensure that your system has the following:

  • A pre-installed GCC compiler
  • SSH or shell access to your server

To install the necessary packages, run the following command:

Bash
sudo dnf install wget yum-utils make gcc openssl-devel bzip2-devel libffi-devel zlib-devel

Step 1: Download Python 3.10 Source Code

Visit the official Python download site at https://www.python.org/ftp/python to get the latest version of Python 3.10. Alternatively, you can use the command line to download the source code directly:

Bash
wget https://www.python.org/ftp/python/3.10.14/Python-3.10.14.tgz

Once the download is complete, extract the archive file:

Bash
tar xzf Python-3.10.14.tgz

This will create a directory named Python-3.10.14 containing the source files.

Step 2: install Python 3.10 on RHEL

Navigate to the extracted directory:

Bash
cd Python-3.10.14

Prepare the source code with the required values to install python 3.10 before compiling:

Bash
sudo ./configure --with-system-ffi --with-computed-gotos --enable-loadable-sqlite-extensions

Next, compile the source code using make. Use all available CPU cores for optimal performance but it may still take a little while:

Bash
#this command may fail - sudo make -j ${nproc}
sudo make altinstall

make altinstall prevents replacing the default Python binary at /usr/bin/python.

You should see something along the lines of the picture below:

install python 3.10 on rhel command line

After installation, remove the downloaded archive to free up space:

Bash
sudo rm Python-3.10.14.tgz

Step 3: Test Python Version

Verify the installed Python and PIP versions:

Bash
python3.10 -V
#Python 3.10.14

pip3.10 -V
#pip 23.0.1 from /usr/local/lib/python3.10/site-packages/pip (python 3.10)

You have successfully installed Python 3.10.14 on your Fedora, CentOS/RHEL 8, or Rocky Linux system.

Quicker Method

A user posted on GitHub a script to facilitate installation of python 3.10 on RHEL, the version installed is 3.10.8 and not .14

Bash
#!/usr/bin/env bash

sudo dnf install wget yum-utils make gcc openssl-devel bzip2-devel libffi-devel zlib-devel
# Ubuntu: sudo apt install -y wget yum-utils make gcc libssl-dev libbz2-dev libffi-dev zlib1g-dev
mkdir tmp
cd tmp
wget https://www.python.org/ftp/python/3.10.8/Python-3.10.8.tgz 
tar xzf Python-3.10.8.tgz 
cd Python-3.10.8 
sudo ./configure --with-system-ffi --with-computed-gotos --enable-loadable-sqlite-extensions --enable-optimizations
sudo make -j $(nproc)
# to remove the unused stuff: find . -maxdepth 1  -mtime +1 -exec rm -rf {} \;
# to install pip we can use: python -m ensurepip --upgrade
# it will install pip into $HOME/.local/bin
sudo make altinstall 
sudo rm Python-3.10.8.tgz
sudo update-alternatives --install /usr/bin/python3 python3 /usr/local/bin/python3.10 1
sudo update-alternatives --set python3 /usr/local/bin/python3.10
sudo rm -rf /usr/local/bin/pip3
sudo update-alternatives --install /usr/bin/pip3 pip3 /usr/local/bin/pip3.10 1
sudo update-alternatives --set pip3 /usr/local/bin/pip3.10

FAQ

  1. Can I install multiple versions of Python on the same system?
    Yes, you can have multiple Python versions installed simultaneously. Use the specific version’s binary (e.g., python3.10) to run the desired Python version.
  2. How do I set Python 3.10 as the default Python version?
    It’s generally not recommended to replace the default Python version to avoid potential system conflicts. However, you can create an alias or update your environment variables to use Python 3.10 by default.
May 12, 2024 0 comments
5 FacebookTwitterPinterestEmail
LinuxUbuntu

How to install Python 3.10 on Ubuntu 20.04

by pcplanet May 7, 2024
written by pcplanet 3 minutes read

Are you an Ubuntu user looking to upgrade to the latest version of Python? Python 3.10 introduces several new features and enhancements that can improve your coding experience. In this guide, we’ll walk you through the step-by-step process of installing Python 3.10 on your Ubuntu 20.04 system. The steps are much easier than installing python 3.10 on rhel.

Commands have been tested on a Ubuntu 20.04 LXC Container

command line showing lsb_release of a ubuntu 20.04 machine
running python3.10 from the command line and displaying the shell

Why Upgrade to Python 3.10 on Ubuntu?

Python 3.10 comes with several notable improvements, including better error handling, structural pattern matching, parenthesized context managers, and more precise type annotations. These features can help you write more readable, maintainable, and efficient code.

  1. Better Error Handling: Python 3.10 introduces a more user-friendly and informative error handling system, making it easier to understand and debug issues in your code.
  2. Structural Pattern Matching: This powerful feature allows you to match and extract values from complex data structures, such as lists and dictionaries, using a more intuitive and expressive syntax.
  3. Parenthesized Context Managers: Python 3.10 simplifies the creation of context managers, which are used to manage resources in a safe and efficient manner.
  4. More Precise Type Annotations: The typing system in Python 3.10 has been improved, allowing for more precise and expressive type annotations, making your code more readable and maintainable.
  5. Performance Enhancements: Python 3.10 brings several performance optimizations, leading to faster execution times for certain operations and workloads.

Step 1: Update Your Ubuntu System

Before proceeding with the installation, ensure that your Ubuntu 20.04 system is up-to-date by running the following commands:

Bash
sudo apt update
sudo apt upgrade

This will update your package lists and upgrade any existing packages, ensuring a smooth installation process.

Step 2: Add the Deadsnakes PPA

To install the latest version of Python, you’ll need to add the Deadsnakes PPA (Personal Package Archive) to your system. Run the following commands:

Bash
sudo apt install software-properties-common
sudo add-apt-repository ppa:deadsnakes/ppa

Press Enter when prompted to continue.

Step 3: Install Python 3.10 on Ubuntu

After adding the Deadsnakes PPA, you can now install Python 3.10 by running:

Bash
sudo apt install python3.10

This command will install Python 3.10 on Ubuntu along with its associated libraries and tools.

Step 4: Verify the Installation

Once the installation is complete, verify the installed version of Python by running:

Bash
python3.10 --version

This should output the version number of the installed Python 3.10.

Step 5: Set Python 3.10 as the Default (Optional)

If you want to set Python 3.10 as the default Python version on your system, follow these steps:

  1. Install the update-alternatives utility:
Bash
   sudo apt install update-alternatives
  1. Configure Python 3.10 as the default version:
Bash
   sudo update-alternatives --install /usr/bin/python3 python3 /usr/bin/python3.10 1
   sudo update-alternatives --config python3

Choose the entry corresponding to Python 3.10 when prompted.

  1. Verify the default Python version:
Bash
   python3 --version

This should output the version number of Python 3.10.

Running Python 3.10 Scripts

With Python 3.10 installed, you can run Python scripts using the python3.10 command or the default python3 command if you’ve set Python 3.10 as the default version.

Bash
python3.10 script.py

or

Bash
python3 script.py

Conclusion

You have successfully installed Python 3.10 on your Ubuntu 20.04 system. With this guide, you can now take advantage of the latest Python features and enhancements, enabling you to write more efficient, readable, and maintainable code. Explore the new features and enjoy the benefits of this latest release.

May 7, 2024 0 comments
3 FacebookTwitterPinterestEmail
LinuxWindows

Getting comfortable with Python Virtual Environments (venv)

by pcplanet April 22, 2024
written by pcplanet 3 minutes read

Working on multiple Python projects can be a hassle, especially when dealing with conflicting dependencies or managing different package versions. Fortunately, Python provides a powerful solution to this problem: virtual environments. In this comprehensive guide, we’ll explore what virtual environments are, why you should use them, and how to create, manage, and utilize them effectively.

What are Python Virtual Environments?

A Python virtual environment is an isolated Python environment that allows you to install and manage Python packages specific to a particular project. Each virtual environment has its own set of installed packages, separate from your system’s global Python installation and other virtual environments. This isolation ensures that your projects remain independent and free from package conflicts or version incompatibilities.

Why Use Python Virtual Environments?

Using virtual environments in your Python projects offers several key benefits:

1. Dependency Management

Different projects may require different versions of the same package. Virtual environments allow you to install and manage dependencies for each project independently, avoiding conflicts and compatibility issues. This means you can have multiple projects running on different package versions without any interference.

2. Reproducibility

By creating a virtual environment and specifying the dependencies in a requirements.txt file, you can easily share your project or recreate the same environment on a different system, ensuring consistent behavior across different development environments. This makes collaboration and deployment much smoother.

3. Clean Development Setup

Virtual environments keep your global Python installation clean and untouched, making it easier to manage and uninstall packages per project. This prevents cluttering your system’s Python installation with packages that may not be needed for other projects or system-wide tools.

Creating Python Virtual Environments

Creating a new virtual environment is a straightforward process using Python’s built-in venv module. Follow these steps:

  1. Open your terminal or command prompt and navigate to the directory where you want to create your project.
  2. Create a new virtual environment using the following command:
Bash
   python -m venv myenv

Replace myenv with the desired name for your virtual environment.

  1. Activate the virtual environment:
  • On Windows: myenv\Scripts\activate
  • On Unix or macOS: source myenv/bin/activate After activation, you should see the name of your virtual environment in parentheses at the beginning of your terminal prompt, indicating that the virtual environment is active and ready for use.

Installing Packages in Python Virtual Environments

With the virtual environment activated, you can install Python packages using pip. Any packages installed will be isolated within the virtual environment and will not affect your system’s global Python installation or other projects.

Bash
pip install package_name

Replace package_name with the name of the package you want to install. This command will install the specified package within the active virtual environment.

Managing Dependencies with Requirements Files

To keep track of the packages and dependencies required for your project, it’s recommended to use a requirements.txt file. This file lists all the packages and their versions that your project depends on.

Create a requirements.txt file:

Bash
pip freeze > requirements.txt

This command will generate a requirements.txt file containing all the installed packages and their versions.

Install packages from a requirements.txt file:

Bash
pip install -r requirements.txt

This command will install all the packages listed in the requirements.txt file within the active virtual environment.

By using a requirements.txt file, you can easily share your project’s dependencies with others or recreate the same environment on a different system, ensuring consistent behavior and reproducibility.

Deactivating and Deleting Python Virtual Environments

When you’re done working on your project, you can deactivate the virtual environment using the following command:

  • On Windows:
Bash
  deactivate
  • On Unix or macOS:
Bash
  deactivate

If you no longer need a virtual environment, you can delete it by simply removing the directory where it was created.

Conclusion

Python virtual environments are an essential tool for managing dependencies, ensuring reproducibility, and maintaining a clean and organized development setup. By following the steps outlined in this guide, you can create, activate, and utilize virtual environments effectively, allowing you to work on multiple projects with different dependencies without conflicts or compatibility issues. Embrace virtual environments and take your Python development to the next level!

April 22, 2024 0 comments
1 FacebookTwitterPinterestEmail
LinuxWindows

Understanding NGINX Location Rules: A Comprehensive Guide

by pcplanet March 26, 2024
written by pcplanet 4 minutes read

NGINX is renowned for its speed, efficiency, and the powerful flexibility it offers for web server configuration. However, its “location” rules, pivotal for handling different request URIs and directing them to the correct content, often come across as cryptic and under-explained in official manuals. This article aims to demystify these rules, providing a clear, comprehensive guide to understanding and implementing the four types of location directives in NGINX, ensuring your web server operates with precision and efficiency.

What Are NGINX Location Rules?

NGINX location rules are configuration directives used to determine how different client request URIs are processed and responded to. They play a crucial role in the routing of requests to the correct files or scripts, making them essential for website functionality and performance. Understanding these rules can significantly enhance your ability to manage and optimize your web server.

Types of NGINX Location Rules

NGINX categorizes its location rules into four distinct types, each with its own set of priorities and use cases. These types include exact matches, high priority prefixes, regular expressions (regex), and low priority prefixes. Let’s delve into each type to understand their functionalities and implementation nuances.

Exact Matches

An exact match location rule is defined by the ‘=’ modifier and, as the name suggests, matches a request URI precisely. This type of rule has the highest priority among all location directives and is used when you want to specify a configuration for a specific URI.

Nginx
location = /foo/bar {
  # exact match configuration
}

In this example, the rule will apply only when the request URI is exactly “/foo/bar”. It’s the go-to choice for targeting a specific page or resource without affecting others.

High Priority Prefix Matches

High priority prefix matches are defined with the ‘^~’ modifier. These rules take precedence over regular expression matches but are below exact matches in the priority hierarchy. They are useful when you have a group of URIs that share a common path component you wish to configure collectively.

Nginx
location ^~ /foo {
  # high priority prefix match configuration
}

This rule targets any request URI that begins with “/foo”, making it versatile for handling URIs under a common directory or path.

Regular Expressions Matches

NGINX handles regular expressions (regex) location rules with either ‘~’ for case-sensitive matches or ‘~*’ for case-insensitive matches. Regex rules offer the most flexibility and are powerful for complex URI matching scenarios.

Nginx
location ~ .foo$ {
  # case-sensitive regex match configuration
}

location ~* .foo$ {
  # case-insensitive regex match configuration
}

These rules are applied based on the order they are defined in the NGINX configuration file, with the first matching rule taking precedence. Regex matches are particularly useful for dynamically configured patterns in URIs.

Low Priority Prefix Matches

Defined without any modifier, low priority prefix matches are the most general type of location rule in NGINX. They are applied when no exact, high priority prefix, or regex match is found.

Nginx
location /foo {
  # low priority prefix match configuration
}

This rule targets any request URI that begins with “/foo”, similar to the high priority prefix match but with a lower precedence. It’s useful for catch-all configurations within a specific path.

Strategically Implementing NGINX Location Rules

Understanding the nuances and priorities of NGINX location rules is crucial for effective web server configuration. By strategically implementing these directives, you can ensure that your server efficiently routes requests, optimizing both performance and user experience.

Consider the specific needs of your web application or site when choosing between exact matches, prefix matches, and regexes. A well-thought-out configuration, leveraging the strengths of each location rule type, can dramatically improve the manageability and functionality of your NGINX server.

FAQs

How do I choose between the different types of NGINX location rules?
Select the type based on the specificity and flexibility you need for matching request URIs. Use exact matches for specific URIs, prefix matches for general path configurations, and regex for complex matching patterns.

Can I use multiple types of location rules in a single NGINX configuration?
Yes, you can use a combination of different location rule types within your NGINX configuration to handle various URI matching scenarios effectively.

What happens if multiple location rules match a request URI?
NGINX applies the location rule with the highest priority. Exact matches have the highest priority, followed by high priority prefixes, regex matches, and finally, low priority prefixes.

Can regular expressions be used for both case-sensitive and case-insensitive matches?
Yes, NGINX allows for both case-sensitive (‘~’) and case-insensitive (‘~*’) regex matches, providing flexibility for URI matching based on case sensitivity.

Is there a performance difference between the types of location rules?
Exact and prefix matches are generally faster to process than regex matches due to their simpler nature. However, the performance impact is usually minimal unless your server is handling a very high volume of requests.

Conclusion

NGINX location rules are a fundamental aspect of web server configuration, providing the means to direct client requests to the appropriate content efficiently. By fully understanding and appropriately applying the four types of location rules, you can enhance your server’s routing capabilities, leading to improved performance and user satisfaction. Remember, the key to effective NGINX configuration lies in selecting the right type of location rule for each scenario, ensuring that your web applications run smoothly and reliably.

March 26, 2024 0 comments
1 FacebookTwitterPinterestEmail
LinuxWindows

Introduction to PHP Server-Side Scripting Language

by pcplanet March 20, 2024
written by pcplanet 7 minutes read

In the world of web development, PHP (Hypertext Preprocessor) has long been a go-to language for creating dynamic and interactive websites. As a server-side scripting language, PHP has the power to generate dynamic content, interact with databases, handle form submissions, and much more. Whether you’re a beginner looking to dive into web development or an experienced programmer seeking to expand your skills, understanding the fundamentals of PHP is crucial. In this comprehensive blog post, we’ll explore the basics of PHP, its inner workings, and the different modes it can operate in, such as PHP-FPM and FastCGI.

What is PHP?

PHP is a server-side scripting language that is widely used for web development. It was created by Rasmus Lerdorf in 1994 and has since evolved into a powerful and versatile language. PHP code is executed on the server, generating HTML or other output that is sent to the client’s web browser. This allows for dynamic content generation, server-side processing, and interaction with databases.

One of the key advantages of PHP is its simplicity and ease of use. PHP code can be embedded directly into HTML files, making it seamless to integrate with web pages. It follows a straightforward syntax similar to C and Java, making it accessible to developers with different programming backgrounds.

How PHP Works

To understand how PHP works, let’s take a look at the typical flow of a PHP-powered web page:

  1. A user requests a PHP file by entering a URL in their web browser or clicking on a link.
  2. The web server receives the request and recognizes that it is a PHP file based on its extension (e.g., .php).
  3. The web server forwards the request to the PHP interpreter, which processes the PHP code within the file.
  4. The PHP interpreter executes the code, performing tasks such as retrieving data from databases, processing form inputs, or generating dynamic content.
  5. The PHP interpreter generates the final HTML output and sends it back to the web server.
  6. The web server sends the HTML output to the user’s web browser, which renders the page.

This process happens seamlessly and quickly, allowing PHP to generate dynamic web pages on the fly.

PHP Syntax and Basic Constructs

PHP code is typically enclosed within special tags, <?php and ?>, which identify it as PHP code. Here’s a simple example of a PHP script that outputs “Hello, World!”:

PHP
<?php
echo "Hello, World!";
?>

In this example, the echo statement is used to output text. PHP supports various basic constructs, such as variables, data types, control structures, and functions, which allow you to write powerful and dynamic code.

Variables in PHP are prefixed with a dollar sign ($) and can store different types of data, such as strings, numbers, booleans, and arrays. PHP is a loosely typed language, meaning you don’t need to explicitly declare the data type of a variable.

PHP
$name = "John Doe";
$age = 25;
$isStudent = true;

The PHP server-side scripting language provides control structures like if statements, for loops, and while loops to control the flow of code execution based on certain conditions. These constructs allow you to make decisions, repeat code blocks, and build dynamic logic into your PHP scripts.

Functions in PHP are reusable blocks of code that perform specific tasks. PHP has a wide range of built-in functions for various purposes, such as string manipulation, date and time handling, file operations, and database interaction. You can also define your own custom functions to encapsulate specific functionality.

PHP
function greet($name) {
    echo "Hello, " . $name . "!";
}

greet("John");

PHP and Web Forms

One of the most common uses of PHP is handling web forms. PHP makes it easy to retrieve form data submitted by users and process it on the server. When a user submits a form, the form data is sent to the PHP script specified in the form’s action attribute. PHP provides the $_GET and $_POST superglobal variables to access the form data depending on the form’s submission method.

Here’s an example of a simple HTML form that submits data to a PHP script:

PHP
<form action="process.php" method="post">
    <label for="name">Name:</label>
    <input type="text" id="name" name="name" required>
    <button type="submit">Submit</button>
</form>

In the corresponding PHP script (process.php), you can retrieve the submitted form data using the $_POST variable:

PHP
<?php
$name = $_POST['name'];
echo "Hello, " . $name . "!";
?>

This script retrieves the value of the “name” field submitted via the form and outputs a greeting message.

PHP and Databases

PHP has excellent support for interacting with databases, making it a popular choice for building database-driven web applications. PHP provides extensions and libraries for connecting to various databases, such as MySQL, PostgreSQL, and SQLite.

To connect to a database, you typically use PHP’s built-in functions or object-oriented interfaces specific to the database you’re working with. For example, to connect to a MySQL database using the mysqli extension, you can use the following code:

PHP
<?php
$servername = "localhost";
$username = "your_username";
$password = "your_password";
$dbname = "your_database";

// Create a connection
$conn = new mysqli($servername, $username, $password, $dbname);

// Check the connection
if ($conn->connect_error) {
    die("Connection failed: " . $conn->connect_error);
}

echo "Connected successfully";
?>

Once connected to a database, you can perform various operations like executing queries, retrieving data, and manipulating database records using PHP’s database-specific functions or prepared statements.

PHP Modes: CGI, FastCGI, and PHP-FPM

PHP can operate in different modes depending on how it interacts with the web server. Let’s explore the common modes:

  1. CGI (Common Gateway Interface):
    CGI is a traditional method of running PHP scripts. In CGI mode, each request to a PHP script spawns a new PHP process to handle the request. While straightforward, CGI can be resource-intensive and slow, especially under high traffic loads.
  2. FastCGI:
    FastCGI is an improvement over traditional CGI. Instead of creating a new process for each request, FastCGI maintains a pool of persistent PHP processes that handle multiple requests. This approach reduces overhead and improves performance. FastCGI is commonly used with web servers like Apache and Nginx.
  3. PHP-FPM (FastCGI Process Manager):
    PHP-FPM is an alternative PHP FastCGI implementation that provides additional features and benefits. It is designed to efficiently manage PHP processes and optimize resource utilization. PHP-FPM allows for fine-grained control over process management, including setting the number of worker processes, managing process lifecycle, and handling process isolation. To use PHP-FPM with a web server like Nginx, you need to configure Nginx to forward PHP requests to the PHP-FPM process. Here’s an example of an Nginx server block configured to use PHP-FPM:
Nginx
   server {
       listen 80;
       server_name example.com;
       root /var/www/example.com;
       index index.php;

       location ~ \.php$ {
           fastcgi_pass unix:/var/run/php/php7.4-fpm.sock;
           fastcgi_index index.php;
           include fastcgi_params;
           fastcgi_param SCRIPT_FILENAME $document_root$fastcgi_script_name;
       }
   }

In this configuration, Nginx forwards PHP requests to the PHP-FPM process via a Unix socket file (php7.4-fpm.sock). The fastcgi_pass directive specifies the socket file path, and the fastcgi_param directives set the necessary parameters for PHP-FPM to handle the request.

Frameworks and Libraries

PHP has a rich ecosystem of frameworks and libraries that make web development faster, easier, and more efficient. These tools provide pre-built components, utilities, and conventions that help you structure your code, handle common tasks, and follow best practices.

Some popular frameworks include:

  1. Laravel: Laravel is a powerful and expressive PHP framework known for its elegant syntax, extensive features, and developer-friendly ecosystem. It provides a robust set of tools for routing, database abstraction, authentication, and more.
  2. Symfony: Symfony is a mature and feature-rich PHP framework that emphasizes modularity and reusability. It offers a set of decoupled components that can be used independently or integrated into a full-stack framework.
  3. CodeIgniter: CodeIgniter is a lightweight and fast PHP framework that follows the MVC (Model-View-Controller) architectural pattern. It provides a simple and intuitive structure for building web applications.
  4. Zend Framework: Zend Framework is a comprehensive PHP framework that promotes best practices and design patterns. It offers a collection of loosely coupled components that can be used separately or combined to create robust applications.

In addition to frameworks, PHP has a vast collection of libraries and packages available through package managers like Composer. These libraries cover a wide range of functionalities, such as database abstraction, HTTP clients, authentication, PDF generation, and more. Leveraging existing libraries can save you time and effort in implementing common features and allow you to focus on your application’s unique requirements.

Conclusion

PHP is a versatile and powerful server-side scripting language that has been at the forefront of web development for decades. Its simplicity, flexibility, and extensive ecosystem make it an excellent choice for building dynamic and interactive websites.

In this blog post, we explored the basics of PHP, including its syntax, basic constructs, and how it works behind the scenes. We also delved into PHP’s interaction with web forms and databases, two crucial aspects of web development. Additionally, we discussed the different modes PHP can operate in, such as CGI, FastCGI, and PHP-FPM, and how they impact performance and resource utilization.

Furthermore, we touched upon PHP frameworks and libraries, which provide a wealth of tools and abstractions to streamline web development and promote best practices.

March 20, 2024 1 comment
1 FacebookTwitterPinterestEmail
Windows

How to Install Windows 10 Without a Microsoft Account

by pcplanet March 17, 2024
written by pcplanet 3 minutes read

Setting up a new Windows 10 computer doesn’t have to mean using a Microsoft account. Whether it’s due to privacy concerns or a preference for the traditional local account setup, you have options to avoid this step. In this guide, we’ll walk you through how to install Windows 10 without a Microsoft account using a couple of straightforward methods.

Install Windows 10 Without a Microsoft Account Using the Special Email Approach

Bypassing the Microsoft account requirement during the Windows 10 setup is possible with a clever workaround. Here’s how to use the special email method:

  1. During the Windows installation, when you’re prompted to sign in with a Microsoft account at the account sign-in screen, enter a@a.com as the email address.
  2. For the password, type in any combination, as the authentication is meant to fail.
  3. After the sign-in attempt fails, Windows will present the option to continue with a local account setup.

This method lets you swiftly proceed to install Windows 10 without a Microsoft account, granting you immediate access to your new local account.

Install Windows 10 With a Local Account via Installation Media

If you prefer to start off with a local account right from the installation media, this method is for you:

  1. Use a tool such as Rufus to create your installation media and opt for the local account setup feature it provides.
  2. During the Windows 10 setup, make sure your PC is disconnected from the internet by disabling network adapters in the BIOS or avoiding Wi-Fi and Ethernet connections.
  3. Without an internet connection, the setup will redirect you to create a local account instead of signing in with a Microsoft account.

Bypassing Network Requirements During Setup

Sometimes you might reach the network connection page unexpectedly. If you need to bypass the internet requirement, follow these steps:

  1. When you’re landed on the “Oops, you’ve lost internet connection” or “Let’s connect you to a network” page, open a Command Prompt with the Shift + F10 shortcut.
  2. Type OOBE\BYPASSNRO in the Command Prompt and press Enter. This command bypasses the network requirements and restarts the setup process.
  3. After the restart, you’ll encounter the network connection prompt again. This time, select the “I don’t have internet” option.
  4. Proceed by choosing the “Continue with limited setup” to finalize the installation of Windows 10 with a local account.

By following these steps, you can easily install Windows 10 without a Microsoft account, keeping your system setup in line with your privacy preferences. It’s important to note that while a local account offers increased privacy, it may restrict access to certain features such as the Microsoft Store and device synchronization. Nonetheless, for users who prioritize privacy or do not require these features, these methods will ensure a local account is used for your Windows 10 environment.

Additional resources:

  • https://answers.microsoft.com/en-us/insider/forum/all/set-up-windows-11-without-internet-oobebypassnro/4fc44554-b416-4ecb-8961-6f79fd55ae0f
  • https://answers.microsoft.com/en-us/windows/forum/all/how-do-i-get-past-requiring-an-internet-connection/1a92c388-fbe1-4772-bce1-6cb4ccb0258f
March 17, 2024 0 comments
1 FacebookTwitterPinterestEmail
LinuxNginx

Implementing SSL on NGINX: Protecting Your Website with Secure Connections

by pcplanet March 16, 2024
written by pcplanet 5min read

In today’s digital landscape, securing your website with an SSL certificate is crucial for protecting sensitive data and establishing trust with your users. Whether you’re running a web server on a cloud-based virtual private server (VPS) or a local machine behind a network address translation (NAT) gateway, properly configuring your setup to accept and verify SSL certificates is essential. In this comprehensive guide, we’ll walk you through the steps involved in setting up your machine to handle SSL certificates seamlessly.

See our Setup guide that contains reverse proxy configs.

Before going further, you should make sure the following is already one:

  1. Update DNS records:
    • Log in to your domain registrar’s control panel or the DNS management interface provided by your DNS hosting provider.
    • Create an A record for your domain (yourdomain.com) and point it to the public IP address of the server where your website is hosted.
    • Create another A record for the www subdomain (www.yourdomain.com) and point it to the same IP address.
    • If your server has a static IP address, you can directly enter the IP address in the A records.
    • If your server has a dynamic IP address, you may need to use a dynamic DNS service to automatically update the IP address whenever it changes.
  2. Wait for DNS propagation:
    • After updating the DNS records, it may take some time for the changes to propagate across the internet.
    • DNS propagation can take anywhere from a few minutes to a few hours, depending on various factors.
    • You can use online tools like “What’s My DNS” or “DNS Checker” to verify that your DNS records have propagated correctly.

Understanding the Difference: Cloud VPS vs. NAT Network

Before we dive into the setup process, it’s important to understand the distinction between a cloud-based VPS and a network that utilizes NAT.

Cloud VPS (e.g., Amazon EC2):

  • A cloud VPS, such as Amazon Elastic Compute Cloud (EC2), provides a virtualized server environment that is directly accessible from the internet.
  • With a cloud VPS, you typically have a public IP address assigned to your instance, eliminating the need for port forwarding.
  • The cloud provider manages the underlying network infrastructure, simplifying the setup process.

NAT Network:

  • In a NAT network, your web server is located behind a router or firewall that translates between private and public IP addresses.
  • To make your web server accessible from the internet, you need to configure port forwarding on your router to direct incoming traffic to the appropriate internal IP address and port.
  • NAT networks are commonly found in home or small office settings where a single public IP address is shared among multiple devices.

Step 1: Preparing Your Web Server

To provide a hands-on experience, let’s walk through the process of setting up a fictitious WordPress installation on an NGINX web server and configuring SSL using Let’s Encrypt. We’ll focus on the NGINX, Certbot, and SSL configuration steps.

Install NGINX Web Server:

  1. Open a terminal or SSH into your server.
  2. Update the package manager:
Bash
   sudo apt update
  1. Install NGINX:
Bash
   sudo apt install nginx
  1. Verify that NGINX is running by accessing your server’s IP address or domain name in a web browser. You should see the default NGINX page.

Install Certbot and Obtain a Certificate for NGINX:

  1. Install Certbot, the Let’s Encrypt client, and the NGINX plugin:
Bash
   sudo apt install certbot python3-certbot-nginx
  1. Obtain an SSL certificate using Certbot:
Bash
   sudo certbot --nginx -d yourdomain.com -d www.yourdomain.com

Replace yourdomain.com with your actual domain name.

  1. Follow the prompts to provide an email address and agree to the Let’s Encrypt terms of service.
  2. Choose whether to redirect HTTP traffic to HTTPS (recommended for better security).
  3. Certbot will automatically configure NGINX with the obtained SSL certificate.

Verify SSL in NGINX:

  1. Open the NGINX SSL configuration file:
Bash
   sudo nano /etc/nginx/sites-available/default
  1. Verify that the following lines are present in the server block:
   ssl_certificate /etc/letsencrypt/live/yourdomain.com/fullchain.pem;
   ssl_certificate_key /etc/letsencrypt/live/yourdomain.com/privkey.pem;

Replace yourdomain.com with your actual domain name.

  1. Save the file and exit the text editor.
  2. Test the NGINX configuration for any syntax errors:
Bash
   sudo nginx -t
  1. If the configuration test is successful, reload NGINX to apply the changes:
Bash
   sudo systemctl reload nginx

Verify SSL Configuration:

  1. Open a web browser and access your WordPress site using https:// (e.g., https://yourdomain.com).
  2. Verify that the website loads securely with a valid SSL certificate. You should see a padlock icon in the browser’s address bar.
  3. Click on the padlock icon to view the SSL certificate details and ensure that it is issued by Let’s Encrypt and valid for your domain.

Additional Configuration:

  • To ensure that your SSL certificate remains valid, set up automatic renewal using Certbot. You can create a cron job or systemd timer to run the renewal command regularly.
  • Consider implementing HTTP Strict Transport Security (HSTS) to enforce HTTPS connections and improve security.
  • Regularly monitor your SSL configuration and keep your web server software up to date to address any potential vulnerabilities.

Note: Remember to replace yourdomain.com with your actual domain name throughout the configuration process.

Step 2: Network Configuration

The network configuration steps vary depending on whether you’re using a cloud VPS or a NAT network.

Cloud VPS (e.g., Amazon EC2):

  • No additional network configuration is required since your VPS has a public IP address.
  • Ensure that the necessary ports (e.g., port 443 for HTTPS) are open in your VPS’s security group or firewall settings.

NAT Network:

  • Access your router’s administrative interface, typically through a web browser.
  • Locate the port forwarding or virtual server settings.
  • Create a new port forwarding rule specifying the following:
    • External port: 443,80 as the verification may be done via http, dns
    • Internal IP address: The private IP address of your web server
    • Internal port: The port on which your web server is listening (e.g., 443 or 80)
  • Save the port forwarding rule and restart your router if necessary.

Step 3: Testing and Verification

Once you have completed the web server and network configuration, it’s time to test and verify that your SSL certificate is properly set up.

Access Your Website via HTTPS:

  • Open a web browser and enter your website’s URL preceded by https:// (e.g., https://www.example.com).
  • Verify that the website loads securely without any SSL-related errors or warnings.

Check Certificate Details:

  • Click on the padlock icon in the browser’s address bar to view the SSL certificate details.
  • Ensure that the certificate is issued to your domain name and is valid and trusted.

Perform SSL Server Test:

  • Use online tools like SSL Labs (https://www.ssllabs.com/ssltest/) to perform a comprehensive SSL server test.
  • The test will evaluate your SSL configuration and provide a detailed report highlighting any potential issues or vulnerabilities.

Conclusion

Setting up a machine to accept and verify SSL certificates is a critical step in securing your website and protecting your users’ data. By following the steps outlined in this guide, you can configure your web server and network to handle SSL certificates effectively, regardless of whether you’re using a cloud VPS or a NAT network. Remember to regularly monitor and update your SSL configuration to ensure ongoing security and compliance with industry standards.

Additional Resources:

  • Let’s Encrypt: https://letsencrypt.org/
  • Apache SSL/TLS Encryption: https://httpd.apache.org/docs/current/ssl/
  • Nginx SSL Termination: https://docs.nginx.com/nginx/admin-guide/security-controls/terminating-ssl-http/
  • Amazon EC2: https://aws.amazon.com/ec2/
  • SSL Labs Server Test: https://www.ssllabs.com/ssltest/

By taking the time to properly set up your machine for SSL certificate verification, you can enhance the security and trustworthiness of your website, providing a safe and secure experience for your users.

March 16, 2024 0 comments
0 FacebookTwitterPinterestEmail
Newer Posts
Older Posts

Recent Posts

  • Creating Custom Nginx Rules for Different Subdomains in DirectAdmin
  • Nginx Reverse Proxy for Nextcloud: A Guide
  • How to Reverse Proxy in DirectAdmin with Nginx_Apache
  • How to install Python 3.10 on RHEL
  • How to install Python 3.10 on Ubuntu 20.04

Recent Comments

  1. Daron Buesgens on Introduction to PHP Server-Side Scripting Language
  2. Tim Slosek on How to install Python on CentOS 8
  3. аналитика леонида малолетова on 15,000 WordPress Sites hacked with Malicious Redirects
  4. 076 on Websites Posing as MSI Afterburner That Spread CoinMiner
  • Home
  • Tools
    • CHMOD Calculator
    • Subnet Calculator
  • Linux Guides & Tutorials
    • Beginner Guides
    • Linux Installation Tutorials
    • Command Line Tutorials
    • Server Administration Guides
    • Security Tutorials
    • Database Tutorials
    • Open-Source Software
      • Nextcloud Guides
      • Apache
    • Operating Systems
      • Ubuntu
      • RHEL/Rocky/Alma
  • Ransomware News
  • Cybersecurity Laws and Regulations

Recent Posts

Creating Custom Nginx Rules for Different Subdomains in DirectAdmin
Nginx Reverse Proxy for Nextcloud: A Guide
How to Reverse Proxy in DirectAdmin with Nginx_Apache
How to install Python 3.10 on RHEL

Most Viewed

Best Linux distribution (distros) in 2022
15,000 WordPress Sites hacked with Malicious Redirects
How to Install Python 3.9 on Ubuntu 18.04
6aabc923d85895a8823d81efa5e551d7
PCPlanet – Tech Blogs | Information
  • Home